
-
Spread Windows Forms Product Documentation
- Getting Started
-
Developer's Guide
- Understanding the Product
- Working with the Component
- Spreadsheet Objects
- Ribbon Control
- Sheets
- Rows and Columns
- Headers
- Cells
- Cell Types
- Data Binding
- Customizing the Sheet Appearance
- Customizing Interaction in Cells
- Tables
- Pivot Table
- Understanding the Underlying Models
- Customizing Row or Column Interaction
- Formulas in Cells
- Sparklines
- Keyboard Interaction
- Events from User Actions
- File Operations
- Storing Excel Summary and View
- Printing
- Chart Control
- Enhanced Chart
- Customizing Drawing
- Touch Support with the Component
- Spread Designer Guide
- Assembly Reference
- Import and Export Reference
- Version Comparison Reference
Working with Images
Spread for WinForms provides support for customizing images provided by the user in the Spread worksheet.
All the features listed below use the enhanced shape engine so its property must be set to true. As they inherit all the features of the enhanced shape engine, the output images are supported for Excel I/O as well.
Crop Images
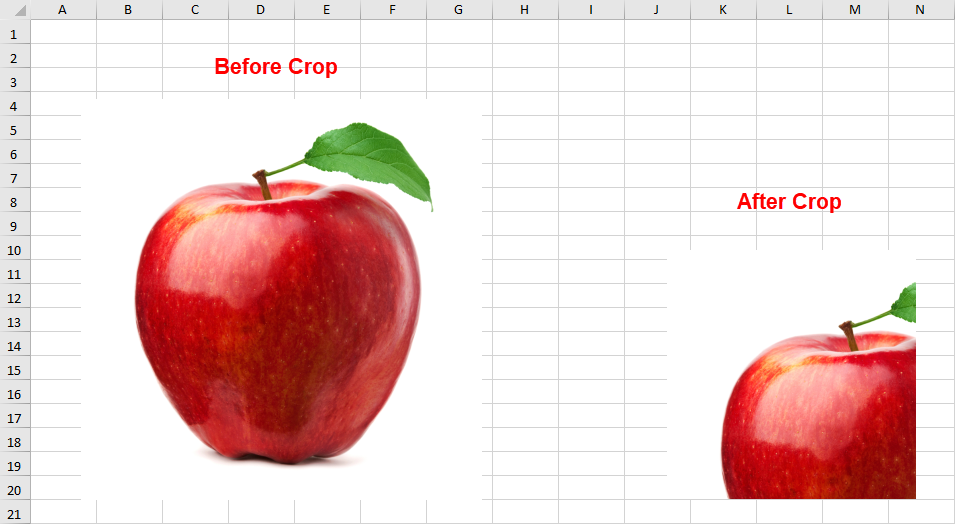
You can crop an image in the worksheet and trim any unnecessary outer edge parts of an image. Spread for WinForms provides the option to crop an image using code or through runtime UI crop handles.
Using Code
You can set the ICrop interface properties such as PictureOffsetX, ShapeTop, PictureWidth to control the dimensions of an image and crop it accordingly.
The following image shows the output of an image before and after it has been modified in the code.
// Cropping a picture using code
fpSpread1.LegacyBehaviors = FarPoint.Win.Spread.LegacyBehaviors.None;
fpSpread1.Features.EnhancedShapeEngine = true;

GrapeCity.Spreadsheet.IWorksheet TestActiveSheet = fpSpread1.AsWorkbook().ActiveSheet;

GrapeCity.Spreadsheet.Drawing.IShape picture1 = TestActiveSheet.Shapes.AddPicture(@"D:\apple.jpg", false, false, 50, 50, 400, 400);
picture1.AutoShapeType = GrapeCity.Spreadsheet.Drawing.AutoShapeType.Rectangle;

GrapeCity.Spreadsheet.Drawing.IShape picture2 = TestActiveSheet.Shapes.AddPicture(@"D:\apple.jpg", true, true, 200, 200, 400, 400);
picture2.AutoShapeType = GrapeCity.Spreadsheet.Drawing.AutoShapeType.Rectangle;

picture2.PictureFormat.Crop.PictureOffsetX = 100;
picture2.PictureFormat.Crop.PictureOffsetY = 100;

picture2.PictureFormat.Crop.ShapeLeft = 150;
picture2.PictureFormat.Crop.ShapeTop = 150;
' Cropping a picture using code
FpSpread1.LegacyBehaviors = FarPoint.Win.Spread.LegacyBehaviors.None
FpSpread1.Features.EnhancedShapeEngine = True
Dim TestActiveSheet As GrapeCity.Spreadsheet.IWorksheet = FpSpread1.AsWorkbook().ActiveSheet
Dim picture1 As GrapeCity.Spreadsheet.Drawing.IShape = TestActiveSheet.Shapes.AddPicture("D:\apple.jpg", False, False, 50, 50, 400, 400)
picture1.AutoShapeType = GrapeCity.Spreadsheet.Drawing.AutoShapeType.Rectangle
Dim picture2 As GrapeCity.Spreadsheet.Drawing.IShape = TestActiveSheet.Shapes.AddPicture("D:\apple.jpg", True, True, 200, 200, 400, 400)
picture2.AutoShapeType = GrapeCity.Spreadsheet.Drawing.AutoShapeType.Rectangle
picture2.PictureFormat.Crop.PictureOffsetX = 100
picture2.PictureFormat.Crop.PictureOffsetY = 100
picture2.PictureFormat.Crop.ShapeLeft = 150
picture2.PictureFormat.Crop.ShapeTop = 150Using Runtime UI
You can enable UI crop handles in runtime to crop images in a worksheet. The black crop handles appear on the edges and corners of an image when using the FpSpread.StartCropping method.
You can also add a margin around a picture by dragging the cropping handles outward.
When you are done with the cropping, press Escape or click anywhere outside the picture within the sheet.
The following code example shows how to use the runtime UI crop in a Spread worksheet.
// Cropping a picture at runtime
fpSpread1.LegacyBehaviors = FarPoint.Win.Spread.LegacyBehaviors.None;
fpSpread1.Features.EnhancedShapeEngine = true;

GrapeCity.Spreadsheet.IWorksheet TestActiveSheet = fpSpread1.AsWorkbook().ActiveSheet;

GrapeCity.Spreadsheet.Drawing.IPicture pic1 = (GrapeCity.Spreadsheet.Drawing.IPicture)TestActiveSheet.Shapes.AddPicture(@"D:\apple.jpg", false, false, 50, 50, 200, 150);
bool started = fpSpread1.StartCropping(pic1);
'Cropping a picture at runtime
FpSpread1.LegacyBehaviors = FarPoint.Win.Spread.LegacyBehaviors.None
FpSpread1.Features.EnhancedShapeEngine = True
Dim TestActiveSheet As GrapeCity.Spreadsheet.IWorksheet = FpSpread1.AsWorkbook().ActiveSheet
Dim pic1 As GrapeCity.Spreadsheet.Drawing.IPicture = CType(TestActiveSheet.Shapes.AddPicture("D:\apple.jpg", False, False, 50, 50, 200, 150), GrapeCity.Spreadsheet.Drawing.IPicture)
Dim started As Boolean = FpSpread1.StartCropping(pic1)Format Images
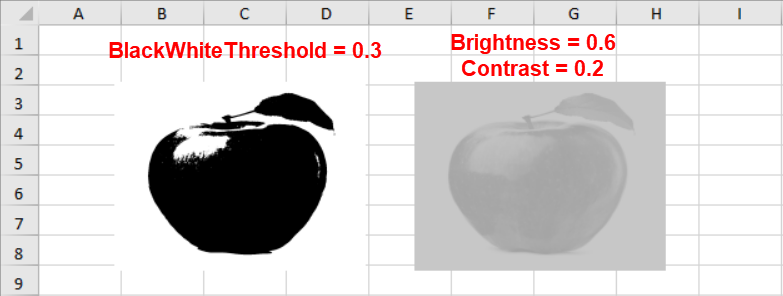
You can format the images in a worksheet according to your requirements with the help of the available picture format options in Spread for Winforms.
The IPictureFormat interface consists of formatting options such as brightness, contrast, black and white threshold, and transparency which can be used to enhance an image.
The following example shows an image customized with two different enhancement options.
fpSpread1.Features.EnhancedShapeEngine = true;

IWorksheet TestActiveSheet = fpSpread1.AsWorkbook().ActiveSheet;
GrapeCity.Spreadsheet.Drawing.IShape picture1 = TestActiveSheet.Shapes.AddPicture(@"D:\apple.jpg", false, false, 60, 45, 200, 150);

picture1.PictureFormat.ColorType = GrapeCity.Spreadsheet.Drawing.PictureColorType.BlackAndWhite;
picture1.PictureFormat.BlackWhiteThreshold = 0.3;

GrapeCity.Spreadsheet.Drawing.IShape picture2 = TestActiveSheet.Shapes.AddPicture(@"D:\apple.jpg", false, false, 300, 45, 200, 150);

picture2.PictureFormat.Brightness = 0.6;
picture2.PictureFormat.Contrast = 0.2;
' Cropping a picture using code
FpSpread1.LegacyBehaviors = FarPoint.Win.Spread.LegacyBehaviors.None
FpSpread1.Features.EnhancedShapeEngine = True
Dim TestActiveSheet As GrapeCity.Spreadsheet.IWorksheet = FpSpread1.AsWorkbook().ActiveSheet
Dim picture1 As GrapeCity.Spreadsheet.Drawing.IShape = TestActiveSheet.Shapes.AddPicture("D:\apple.jpg", False, False, 50, 50, 400, 400)
picture1.AutoShapeType = GrapeCity.Spreadsheet.Drawing.AutoShapeType.Rectangle
Dim picture2 As GrapeCity.Spreadsheet.Drawing.IShape = TestActiveSheet.Shapes.AddPicture("D:\apple.jpg", True, True, 200, 200, 400, 400)
picture2.AutoShapeType = GrapeCity.Spreadsheet.Drawing.AutoShapeType.Rectangle
picture2.PictureFormat.Crop.PictureOffsetX = 100
picture2.PictureFormat.Crop.PictureOffsetY = 100
picture2.PictureFormat.Crop.ShapeLeft = 150
picture2.PictureFormat.Crop.ShapeTop = 150For information on how to create images of the specified data in a Spread worksheet, refer to Saving to an Image File.
Picture Adjustments
You can customize an image in a worksheet by adding various artistic effects, and transform any image into a sketch or a painting.
The following picture adjustments take effect for painting in Spread.
Blur: Adds a blur effect.
Brightness contrast: Adjusts the brightness and contrast of the image.
Color tone: Adjusts the brightness and color temperature of the image.
Film grain: Applies a grainy effect to the image.
Glow edges: Adds a glowing texture to the image edges.
Saturation: Adds saturation effect to the image.
Sharpness soften: Sharpens and softens the image.
Recolor: Changes the color of a picture.
The following table provides a comparison between the original image and images under different picture adjustments.
Original image | Sharpness soften | Brightness contrast |
|---|---|---|
|
|
|
Color tone | Film grain | Saturation |
|
|
|
Glow edges | Blur | Recolor |
|
|
|


The PictureEffectType enumeration provides various options for defining picture effects.
The following code shows how to apply an artistic effect using the PictureEffectType enumeration:
IWorksheet TestActiveSheet = fpSpread1.AsWorkbook().ActiveSheet;
fpSpread1.AsWorkbook().WorkbookSet.CalculationEngine.CalcFeatures = GrapeCity.Spreadsheet.CalcFeatures.All;
fpSpread1.Features.EnhancedShapeEngine = true;
GrapeCity.Spreadsheet.Drawing.IShape picture1 = TestActiveSheet.Shapes.AddPicture(@"D:\logo.png", true, true, 40, 20, 150, 150);
GrapeCity.Spreadsheet.Drawing.IShape picture2 = TestActiveSheet.Shapes.AddPicture(@"D:\logo.png", true, true, 300, 20, 150, 150);
GrapeCity.Spreadsheet.Drawing.IPictureEffects pic = picture2.Fill.PictureEffects;
// Add brightness contrast effect
GrapeCity.Spreadsheet.Drawing.IPictureEffect pics2 = pic.Insert(GrapeCity.Spreadsheet.Drawing.PictureEffectType.BrightnessContrast);
pics2.EffectParameters[0].Value = 0.2d;
pics2.EffectParameters[1].Value = -0.9d;
Dim TestActiveSheet As IWorksheet = FpSpread1.AsWorkbook().ActiveSheet
FpSpread1.AsWorkbook().WorkbookSet.CalculationEngine.CalcFeatures = GrapeCity.Spreadsheet.CalcFeatures.All
FpSpread1.Features.EnhancedShapeEngine = True
Dim picture1 As GrapeCity.Spreadsheet.Drawing.IShape = TestActiveSheet.Shapes.AddPicture("D:\logo.png", True, True, 40, 20, 150, 150)
Dim picture2 As GrapeCity.Spreadsheet.Drawing.IShape = TestActiveSheet.Shapes.AddPicture("D:\logo.png", True, True, 300, 20, 150, 150)
Dim pic As GrapeCity.Spreadsheet.Drawing.IPictureEffects = picture2.Fill.PictureEffects
Dim pics2 As GrapeCity.Spreadsheet.Drawing.IPictureEffect = pic.Insert(GrapeCity.Spreadsheet.Drawing.PictureEffectType.BrightnessContrast)
pics2.EffectParameters(0).Value = 0.2R
pics2.EffectParameters(1).Value = -0.9RYou can also change the color of a picture in the worksheet using the Recolor method of the IPictureFormat interface.
fpSpread1.Features.EnhancedShapeEngine = true;
IWorksheet TestActiveSheet = fpSpread1.AsWorkbook().ActiveSheet;
fpSpread1.AsWorkbook().WorkbookSet.CalculationEngine.CalcFeatures = GrapeCity.Spreadsheet.CalcFeatures.All;
fpSpread1.Features.EnhancedShapeEngine = true;
GrapeCity.Spreadsheet.Drawing.IShape picture1 = TestActiveSheet.Shapes.AddPicture(@"D:\logo.png", true, true, 40, 20, 150, 150);
GrapeCity.Spreadsheet.Drawing.IShape picture2 = TestActiveSheet.Shapes.AddPicture(@"D:\logo.png", true, true, 300, 20, 150, 150);
picture1.PictureFormat.Recolor(GrapeCity.Core.SchemeColor.CreateArgbColor(0, 246, 243), true);
FpSpread1.Features.EnhancedShapeEngine = True
Dim TestActiveSheet As IWorksheet = fpSpread1.AsWorkbook().ActiveSheet
FpSpread1.AsWorkbook().WorkbookSet.CalculationEngine.CalcFeatures = GrapeCity.Spreadsheet.CalcFeatures.All
FpSpread1.Features.EnhancedShapeEngine = True
Dim picture1 As GrapeCity.Spreadsheet.Drawing.IShape = TestActiveSheet.Shapes.AddPicture("D:\logo.png", True, True, 40, 20, 150, 150)
Dim picture2 As GrapeCity.Spreadsheet.Drawing.IShape = TestActiveSheet.Shapes.AddPicture("D:\logo.png", True, True, 300, 20, 150, 150)
picture1.PictureFormat.Recolor(GrapeCity.Core.SchemeColor.CreateArgbColor(0, 246, 243), True)You can also restore the original colors of a picture that was re-colored using the RestoreOriginalColors method.
!type=note
Note: As of now, Spread for WinForms only supports the above-mentioned picture effects. We will support more effects in the future releases.