
-
Spread Windows Forms Product Documentation
- Getting Started
-
Developer's Guide
- Understanding the Product
- Working with the Component
-
Spreadsheet Objects
- Understanding Parts of the Component
- Object Parentage
- Resetting Parts of the Interface
- Rich Text Editing
- Improving Performance by Suspending the Layout
- Ways to Improve Performance
- Allowing User Functionality
- Allowing the User to Zoom the Display of the Component
- Working with Scroll Bars
- Adding a Status Bar
- Customizing Viewports
- Customizing Split Boxes
- Working With Slicers
- Working with Built-In Dialogs
- Ribbon Control
- Sheets
- Rows and Columns
- Headers
- Cells
- Cell Types
- Data Binding
- Customizing the Sheet Appearance
- Customizing Interaction in Cells
- Tables
- Pivot Table
- Understanding the Underlying Models
- Customizing Row or Column Interaction
- Formulas in Cells
- Sparklines
- Keyboard Interaction
- Events from User Actions
- File Operations
- Storing Excel Summary and View
- Printing
- Chart Control
- Enhanced Chart
- Customizing Drawing
- Touch Support with the Component
- Spread Designer Guide
- Assembly Reference
- Import and Export Reference
- Version Comparison Reference
Working With Slicers
Spread for WinForms provides support for using slicers (visual filters) in the worksheet. Slicers enable users to perform quick filtration of the data in tables without using drop-down lists.
Users can have multiple "copies" of a slicer operating together on different worksheets. You can select an item or drag across a number of items by using the keyboard shortcuts "Ctrl + Click" or "Shift + Click" to include the filter items and the data for that item will be displayed in the report as per the specific requirements.
Add a Slicer
To add a slicer in the worksheet, users first need to set the value of the EnhancedShapeEngine property to "true" in order to enable the new shape engine. After enabling the EnhancedShapeEngine, users can either use the Add() method of the ISlicerCaches interface or simply click anywhere on the table and select the "Insert" button on the ribbon bar to add a slicer to the worksheet.
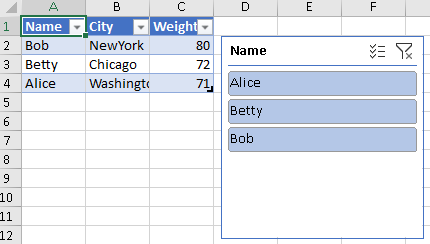
A slicer contains a header, a caption, slicer items and a clear button. The following image shows a slicer added to the worksheet.
The following example code shows how to add a slicer in the spreadsheet.
// Enable Shape Engine using EnhancedShapeEngine property to use the slicer feature
fpSpread1.Features.EnhancedShapeEngine = true;
// Add the Slicer
  private static void AddSlicer(IWorkbook WorkBook, IWorksheet WorkSheet)
{
// Initialize Data in worksheet
WorkSheet.Cells[0, 0].Text = "Name";
WorkSheet.Cells[0, 1].Text = "City";
WorkSheet.Cells[0, 2].Text = "Weight";
WorkSheet.Cells[1, 0].Text = "Bob";
WorkSheet.Cells[1, 1].Text = "NewYork";
WorkSheet.Cells[1, 2].Value = 80;
WorkSheet.Cells[2, 0].Text = "Betty";
WorkSheet.Cells[2, 1].Text = "Chicago";
WorkSheet.Cells[2, 2].Value = 72;
WorkSheet.Cells[3, 0].Text = "Alice";
WorkSheet.Cells[3, 1].Text = "Washington";
WorkSheet.Cells[3, 2].Value = 71;
// Create Table
ITable table = WorkSheet.Tables.Add("A1:C4", YesNoGuess.Yes);

// Add SlicerCache using the Column index
ISlicerCache slicerCache = WorkBook.SlicerCaches.Add(table, 0, "slicerCache");

// Add Slicer to SlicerCache
ISlicer slicer = slicerCache.Slicers.Add(WorkSheet, "slicer", "Name", 200, 20, 200, 200);
}
Add Multiple Slicers
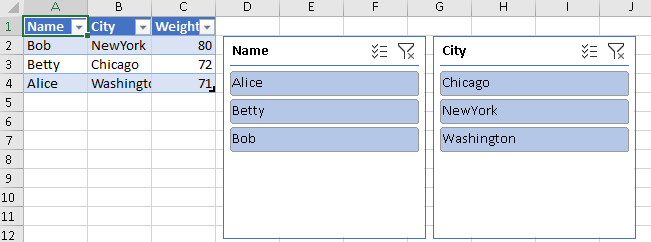
Users can also add multiple slicers to the worksheet by using the Add() method of the ISlicerCaches interface. The following image shows a spreadsheet with multiple slicers.
The following example code shows how to add multiple slicers in a spreadsheet.
// Enable Shape Engine using EnhancedShapeEngine property to use the slicer feature
fpSpread1.Features.EnhancedShapeEngine = true;
private static void AddMultipleSlicer(IWorkbook WorkBook, IWorksheet WorkSheet)
{
// Initialize Data in worksheet
  WorkSheet.Cells[0, 0].Text = "Name";
  WorkSheet.Cells[0, 1].Text = "City";
  WorkSheet.Cells[0, 2].Text = "Weight";
  WorkSheet.Cells[1, 0].Text = "Bob";
  WorkSheet.Cells[1, 1].Text = "NewYork";
  WorkSheet.Cells[1, 2].Value = 80;
  WorkSheet.Cells[2, 0].Text = "Betty";
  WorkSheet.Cells[2, 1].Text = "Chicago";
  WorkSheet.Cells[2, 2].Value = 72;
  WorkSheet.Cells[3, 0].Text = "Alice";
  WorkSheet.Cells[3, 1].Text = "Washington";
  WorkSheet.Cells[3, 2].Value = 71;
// Create Table
  ITable table = WorkSheet.Tables.Add("A1:C4", YesNoGuess.Yes);

// Add SlicerCache using the Column index
  ISlicerCache slicerCache = WorkBook.SlicerCaches.Add(table, 0, "slicerCache");

// Add Slicer to SlicerCache
  ISlicer slicer = slicerCache.Slicers.Add(WorkSheet, "slicer", "Name", 200, 20, 200, 200);

// Add another SlicerCache using the Column Name
 ISlicerCache slicerCache2 = WorkBook.SlicerCaches.Add(table, "City", "slicerCache2");

// Add another Slicer to another SlicerCache
 ISlicer slicer2 = slicerCache2.Slicers.Add(WorkSheet, "slicer2", "City", 410, 20, 200, 200);
}
Select Slicer Items
Users can select and deselect slicer items by setting the Selected property of the ISlicerItem interface to "true" or "false" respectively.
The following example code shows how to select slicer items in the spreadsheet.
private static void Filter(IWorkbook WorkBook)
{
  WorkBook.SlicerCaches[0].SlicerItems["Bob"].Selected = false;
  WorkBook.SlicerCaches[0].SlicerItems["Betty"].Selected = true;
  WorkBook.SlicerCaches[0].SlicerItems["Alice"].Selected = false;
}
Alternatively, you can use the keyboard shortcut "Ctrl + Click" or "Alt+S" to enable the multi selection mode. Then, you can click on the specific sites to filter out the data of selected items. To select multiple slicer items, you simply need to click the first item on the slicer, drag the mouse pointer towards the last item and then all the items between the first and last item will be selected.
Clear Slicer Filters
Users can also remove the slicer filters when they want to show all the data by using the ClearAllFilters() method, the ClearManualFilter() method and the ClearDateFilter() method of the ISlicerCache interface. Alternatively, you can also click the "Clear Filter" button at the top right of the slicer or use the keyboard shortcut "Alt + C" to clear slicer filters from the spreadsheet.
The following example code shows how to clear slicer filters from the spreadsheet.
private static void ClearFilter(IWorkbook WorkBook)
{
// Clear all filters from the Slicer
WorkBook.SlicerCaches[0].ClearAllFilters();
}
Modify Slicer Settings
Users can also modify slicer settings as per their specific preferences by using the Caption property of the ISlicer interface and the SortItems property of the ISlicerCache interface.
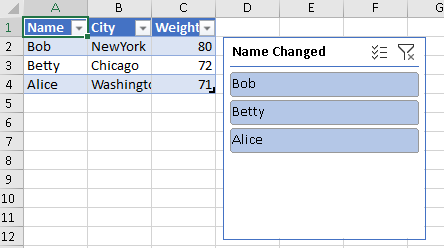
The following image shows the slicer with changed slicer caption and modified sorting order (names are showing up in the descending order).
The following example code shows how to modify slicer settings in the spreadsheet.
private static void ModifySlicerSetting(IWorkbook WorkBook, IWorksheet WorkSheet)
 {
  // Change the Caption Name
  WorkSheet.Slicers["slicer"].Caption = "Name Changed";

  // Change the Sorting Order
  WorkBook.SlicerCaches["slicerCache"].SortItems = SlicerSort.Descending;
}
Change Slicer Formatting
Users can also modify the formatting of the slicer by using the NumberOfColumns property (to set the number of columns), the Width property (to set the width of the slicer), the Height property (to set the height of the slicer), the ColumnWidth property (to set the width of the columns), the RowHeight property (to set the height of the rows) and the DisplayHeader property (to configure the visibility of the header) of the ISlicer interface.
The following image shows a slicer with custom formatting.

The following example code shows how to change slicer formatting in the spreadsheet.
private static void ChangeSlicerFormatting(IWorksheet WorkSheet)
{
// Change Slicer Formatting
WorkSheet.Slicers["slicer"].NumberOfColumns = 2;
WorkSheet.Slicers["slicer"].Width = 250;
WorkSheet.Slicers["slicer"].Height = 150;
WorkSheet.Slicers["slicer"].ColumnWidth = 100;
WorkSheet.Slicers["slicer"].RowHeight = 70;
WorkSheet.Slicers["slicer"].DisplayHeader = false;
}
Customize Slicer Style
Users can customize the slicer style as per their specific preferences by defining a custom style, setting the ShowAsAvailableSlicerStyle property of the ITableStyle interface to true and applying the custom style to the slicer.
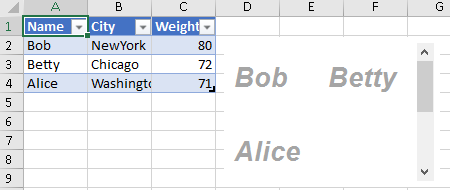
The following image shows a slicer with custom font style, font size and font color configured in the spreadsheet.
The following example code shows how to customize slicer styles in the spreadsheet.
private static void CustomizeSlicerStyle(IWorkbook WorkBook, IWorksheet WorkSheet)
{
// Set Custom Style to Slicer
ITableStyle slicerStyle = WorkBook.TableStyles.Add("CustomStyle1");

// Enable ShowAsAvailableSlicerStyle to true to set custom style to Slicer
slicerStyle.ShowAsAvailableSlicerStyle = true;
slicerStyle.TableStyleElements[TableStyleElementType.SelectedItemWithData].Font.Name = "Arial";
slicerStyle.TableStyleElements[TableStyleElementType.SelectedItemWithData].Font.Bold = true;
slicerStyle.TableStyleElements[TableStyleElementType.SelectedItemWithData].Font.Italic = true;
slicerStyle.TableStyleElements[TableStyleElementType.SelectedItemWithData].Font.Size = 20;
slicerStyle.TableStyleElements[TableStyleElementType.SelectedItemWithData].Font.Color = GrapeCity.Spreadsheet.Color.FromThemeColor(GrapeCity.Core.ThemeColors.Accent3);
WorkSheet.Slicers["slicer"].Style = slicerStyle;
}
Delete Slicer
Users can delete the slicer from the spreadsheet by using the Delete() method of the ISlicer interface.
If you want to delete the slicer cache and all its slicers, you can use the Delete() method of the ISlicerCache interface.
The following example code shows how to delete a slicer from the spreadsheet.
private static void DeleteSlicer(IWorkbook WorkBook)
{
// Delete Slicer
WorkBook.SlicerCaches["slicerCache"].Slicers["slicer"].Delete();
}