-
Spread Windows Forms Product Documentation
- Getting Started
-
Developer's Guide
- Understanding the Product
- Working with the Component
- Spreadsheet Objects
- Ribbon Control
- Sheets
- Rows and Columns
- Headers
- Cells
- Cell Types
- Data Binding
- Customizing the Sheet Appearance
- Customizing Interaction in Cells
- Tables
- Pivot Table
- Understanding the Underlying Models
- Customizing Row or Column Interaction
- Formulas in Cells
- Sparklines
- Keyboard Interaction
- Events from User Actions
- File Operations
- Storing Excel Summary and View
- Printing
- Chart Control
- Enhanced Chart
- Customizing Drawing
- Touch Support with the Component
- Spread Designer Guide
- Assembly Reference
- Import and Export Reference
- Version Comparison Reference
Adding Custom Properties
Custom properties are metadata fields that you can add to a workbook to describe its content, purpose, or other relevant information. You can add text, date, or numeric values to custom properties and choose a custom name from a list of suggested names. You can also assign them the values yes or no.
To add additional custom properties, you can use the CustomDocumentProperties object of the IDocumentProperties Interface. It represents all the custom properties of the workbook.
Spread Designer also provides you an option for custom properties of the workbook in the File > Properties > Custom tab.

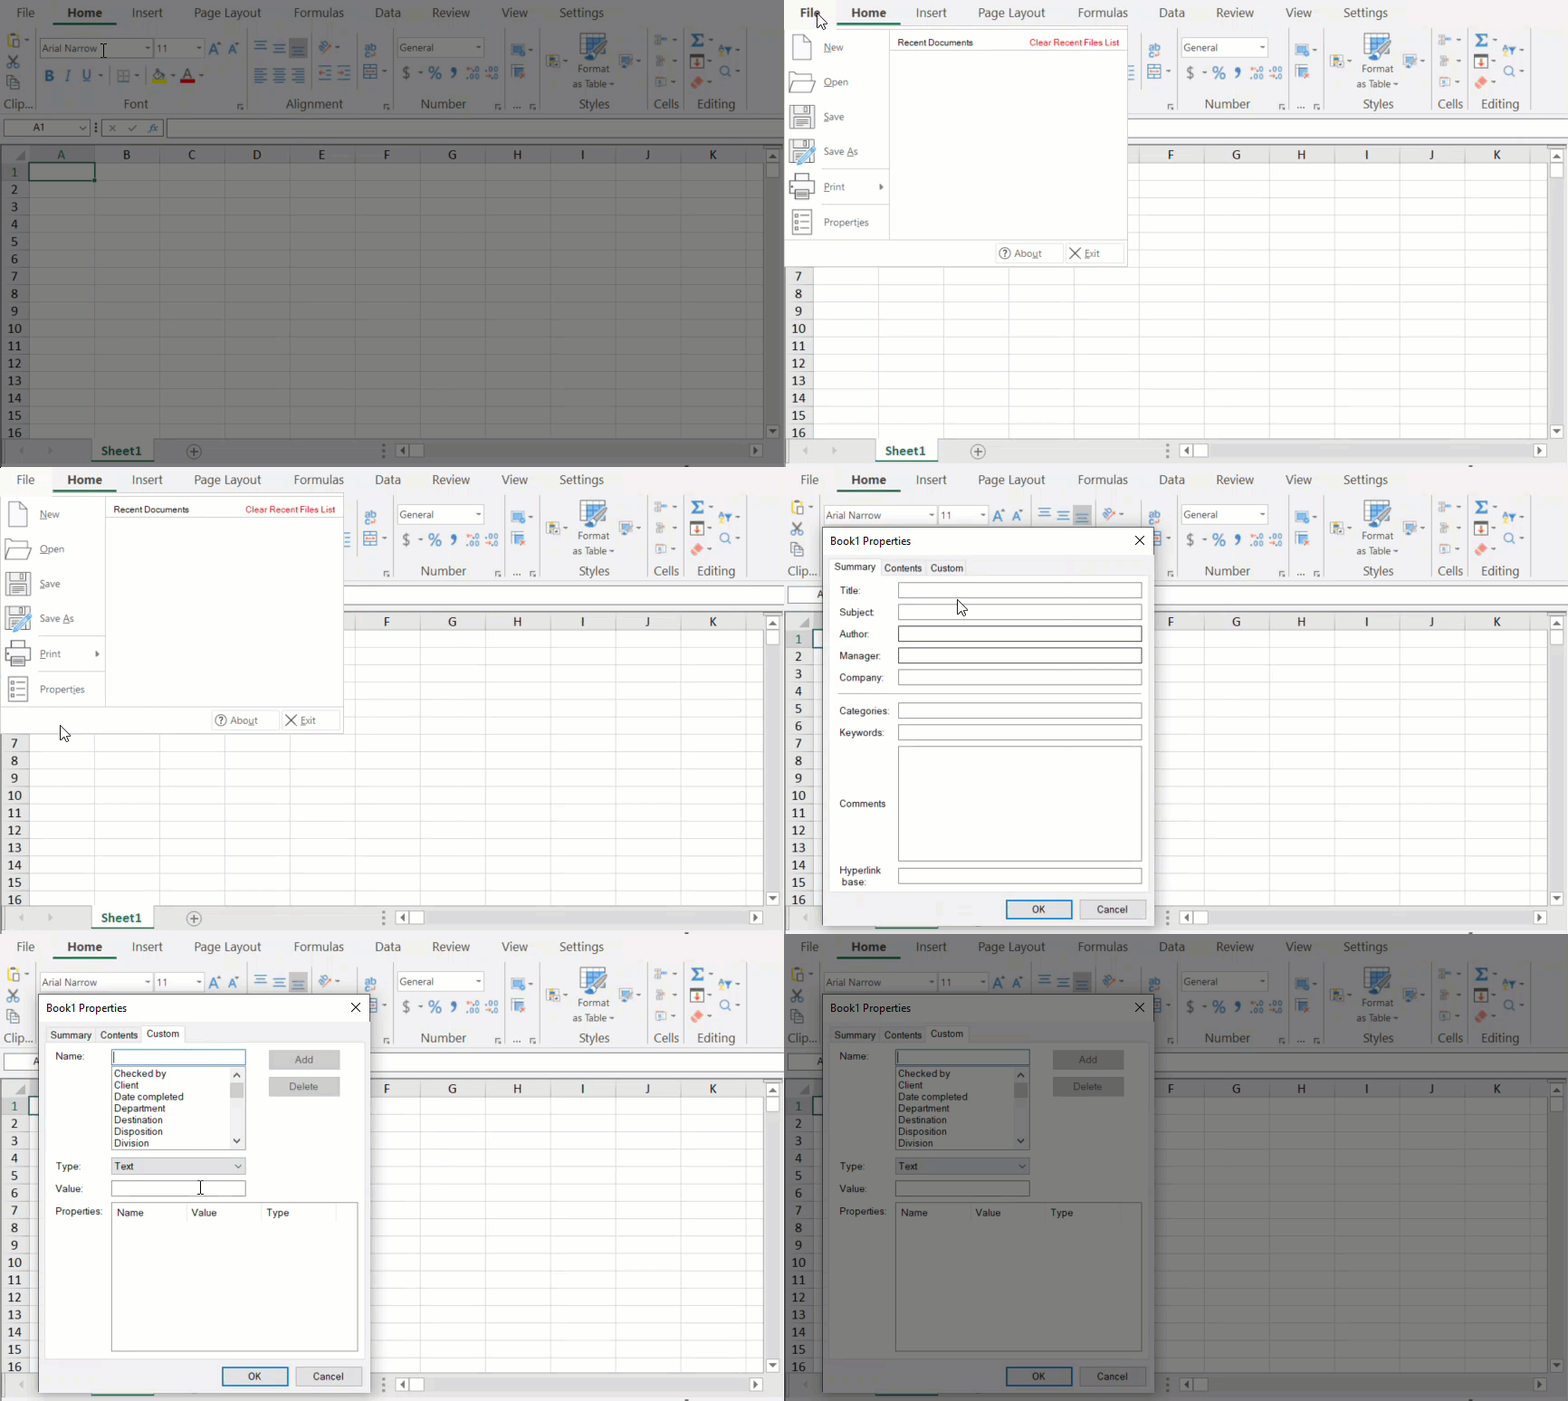
Custom properties can be added by code or using the ribbonBar at runtime. To do so, follow the steps below.
1. Open the Properties dialog.
Using Code
// Open dialog using code
FarPoint.Win.Spread.Dialogs.BuiltInDialogs.DocumentProperties(fpSpread1.AsWorkbook());
' Open dialog using code
FarPoint.Win.Spread.Dialogs.BuiltInDialogs.DocumentProperties(FpSpread1.AsWorkbook())Using RibbonBar
Run the code below to attach the ribbonBar with fpSpread.
ribbonBar1.Attach(fpSpread1);ribbonBar1.Attach(FpSpread1)Open the File menu.
Select Properties. The Properties dialog appears.
2. Add custom properties to the Properties dialog.
Using Code
The following example code shows how to add custom properties to the Properties dialog.
// Add properties using code
fpSpread1.AsWorkbook().CustomDocumentProperties.Add("Client", GrapeCity.Core.DocumentPropertyType.Boolean, true);
fpSpread1.AsWorkbook().CustomDocumentProperties.Add("Date completed", GrapeCity.Core.DocumentPropertyType.Date, new System.DateTime(2023, 3, 12));
fpSpread1.AsWorkbook().CustomDocumentProperties.Add("Document number", GrapeCity.Core.DocumentPropertyType.Number, 123);
fpSpread1.AsWorkbook().CustomDocumentProperties.Add("Language", GrapeCity.Core.DocumentPropertyType.String, "English");
FarPoint.Win.Spread.Dialogs.BuiltInDialogs.DocumentProperties(fpSpread1.AsWorkbook());
' Add properties using code
FpSpread1.AsWorkbook().CustomDocumentProperties.Add("Client", GrapeCity.Core.DocumentPropertyType.[Boolean], True)
FpSpread1.AsWorkbook().CustomDocumentProperties.Add("Date completed", GrapeCity.Core.DocumentPropertyType.[Date], New DateTime(2023, 3, 12))
FpSpread1.AsWorkbook().CustomDocumentProperties.Add("Document number", GrapeCity.Core.DocumentPropertyType.Number, 123)
FpSpread1.AsWorkbook().CustomDocumentProperties.Add("Language", GrapeCity.Core.DocumentPropertyType.[String], "English")
FarPoint.Win.Spread.Dialogs.BuiltInDialogs.DocumentProperties(FpSpread1.AsWorkbook())Using RibbonBar
Click on the Custom tab and provide the following details:
In the Name list, select a name from the list.
In the Type list, select the data type for the property to be added.
In the Value box, type a value for the property.
The value that you type must match the selection in the Type list. For example, if you select a Number in the Type list, you must type a number in the Value box.
Click Add.
The custom property gets added to the Properties table.
Modify/ Delete Custom Properties of Workbook
Spread also allows you to edit or delete an existing custom property as per your requirement. To make changes, select the property name from the Properties table, make the necessary edits, and then click the Modify button to save the changes. Similarly, you may delete an unwanted custom property by selecting the property name and then clicking the Delete button.
Modify/Delete Custom Properties of Worksheet
Spread allows the user to add identifier information to a worksheet called custom properties. CustomProperties are used to store additional metadata or information related to the worksheet. To add custom properties to a worksheet, use the CustomProperties property of the IWorksheet interface. You can add the CustomProperties to a worksheet only programmatically.
You can also use Add/Delete method of CustomProperties for adding/removing the metadata to a worksheet.
Consider the following example code to add and delete the identifier information at worksheet level.
IWorksheet sheet = fpSpread1.AsWorkbook().ActiveSheet;
object[,] properties = new object[,] { { "Department", 3 },
                             { "Editor", "Serena"},
                             { "Project", "Spread"},
                             { "Status", true} };
for (int i = 0; i < 4; i++)
  {
     sheet.CustomProperties.Add(properties[i, 0].ToString(), properties[i, 1]);
  }
sheet.CustomProperties[0].Delete();
sheet.CustomProperties[0].Delete();
Console.WriteLine(sheet.CustomProperties[0].Name);
Console.WriteLine(sheet.CustomProperties[1].Name);
Dim sheet As IWorksheet = FpSpread1.AsWorkbook().ActiveSheet
Dim properties As Object(,) = New Object(,) {
{"Department", 3},
{"Editor", "Serena"},
{"Project", "Spread"},
{"Status", True}}
For i As Integer = 0 To 4 - 1
sheet.CustomProperties.Add(properties(i, 0).ToString(), properties(i, 1))
Next
sheet.CustomProperties(0).Delete()
sheet.CustomProperties(0).Delete()
Console.WriteLine(sheet.CustomProperties(0).Name)
Console.WriteLine(sheet.CustomProperties(1).Name)

