-
Spread Windows Forms Product Documentation
- Getting Started
-
Developer's Guide
- Understanding the Product
- Working with the Component
- Spreadsheet Objects
- Ribbon Control
- Sheets
- Rows and Columns
- Headers
-
Cells
- Working with the Active Cell
- Adding Hyperlink in a Cell
- Creating a Range of Cells
- Managing Data on a Sheet
- Displaying Cell Data
- Creating a Span of Cells
- Allowing Cells to Merge Automatically
- Adding a Note to a Cell
- Adding a Tag to a Cell
- Displaying Text Tips in a Cell
- Working with Cell Format Strings
- Working with Pattern and Gradient Fill Effects
- Inserting Cells
- Setting Rich Text in a Cell
- Adding a Comment to a Cell
- Adding Image in a Cell
- Formatting a Cell Value
- Cell Types
- Data Binding
- Customizing the Sheet Appearance
- Customizing Interaction in Cells
- Tables
- Pivot Table
- Understanding the Underlying Models
- Customizing Row or Column Interaction
- Formulas in Cells
- Sparklines
- Keyboard Interaction
- Events from User Actions
- File Operations
- Storing Excel Summary and View
- Printing
- Chart Control
- Enhanced Chart
- Customizing Drawing
- Touch Support with the Component
- Spread Designer Guide
- Assembly Reference
- Import and Export Reference
- Version Comparison Reference
Adding Image in a Cell
Spread for Winforms provides the ability to insert images in a cell as a value. This helps to add images in a cell without converting the cell into a ImageCellType class object.
Note: To add images using ImageCellType, refer to Setting an Image Cell topic.
You can use one of the following methods to display images in a cell. These methods help to set the image object to the cell value, set a local image file path, or set a base64-encoded image string in cells:
Using value - Convert the value itself to an image data type such as image, byte or Stream that stores image's binary data. Use the System.Drawing.Image class methods to take the image file path as a parameter.
The following image shows a picture inserted inside a cell by providing an image file path.
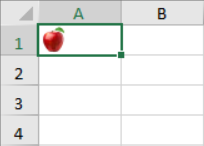
IWorksheet TestActiveSheet = fpSpread1.AsWorkbook().ActiveSheet;
fpSpread1.AsWorkbook().WorkbookSet.CalculationEngine.CalcFeatures = CalcFeatures.All;
fpSpread1.LegacyBehaviors = FarPoint.Win.Spread.LegacyBehaviors.None;

// Displaying cell image using value

// Image type
TestActiveSheet.Cells["A1"].Value = Image.FromFile(@"D:\apple.jpg");

// Byte type
// TestActiveSheet.Cells["A3"].Value = File.ReadAllBytes("D:\\apple.jpg");

// Stream type
// TestActiveSheet.Cells["A5"].Value = new FileStream("D:\\apple.jpg", FileMode.Open);
Dim TestActiveSheet As IWorksheet = FpSpread1.AsWorkbook().ActiveSheet FpSpread1.AsWorkbook().WorkbookSet.CalculationEngine.CalcFeatures = CalcFeatures.All FpSpread1.LegacyBehaviors = FarPoint.Win.Spread.LegacyBehaviors.None 'Displaying cell image using value 'Image type TestActiveSheet.Cells("A1").Value = Image.FromFile("D:\apple.jpg") 'Byte type 'TestActiveSheet.Cells("A3").Value = File.ReadAllBytes("D:\\apple.jpg") 'Stream type 'TestActiveSheet.Cells("A5").Value = New FileStream("D:\apple.jpg", FileMode.Open)Using attribute - The CellValueDataTypeAttribute class provides different data types such as byte, image, and string. These data types can be used to define a class attribute to get images.
The following GIF illustrates the use of attributes to display an image in a cell as well as show additional information.

private void CellImageAsAttribute_Load(object sender, EventArgs e)
{
    IWorksheet TestActiveSheet = fpSpread1.AsWorkbook().ActiveSheet;

    fpSpread1.AsWorkbook().WorkbookSet.CalculationEngine.CalcFeatures = CalcFeatures.All;
    fpSpread1.LegacyBehaviors = FarPoint.Win.Spread.LegacyBehaviors.None;

    // Displaying cell image using attribute
    GrapeCity.CalcEngine.RichValue<Country> ct = new GrapeCity.CalcEngine.RichValue<Country>(new Country()
    {
        Name = "India",
        Capital = "New Delhi",
    });
    ct.ShowDetailsIcon = true;

    TestActiveSheet.Cells["A1"].Value = ct;

    TestActiveSheet.Columns[0].ColumnWidth = 100;
    TestActiveSheet.Columns[2].ColumnWidth = 100;
}

[System.Reflection.DefaultMember("Data")]
[CellImage("Name")]
public class Country
{
    public string Name { get; set; }
    [DisplayName("Capital Name")]
    public string Capital { get; set; }
    public string ContentType => "image/png";

    [GrapeCity.CalcEngine.CellValueDataType(GrapeCity.CalcEngine.PrimitiveValueType.Image)]
    public Image Data
    {
        get
        {
            return Image.FromFile(@"D:\apple.jpg");
        }
    }
}
Private Sub CellImageAsAttribute_Load(sender As Object, e As EventArgs) Handles MyBase.Load Dim TestActiveSheet As IWorksheet = FpSpread1.AsWorkbook().ActiveSheet FpSpread1.AsWorkbook().WorkbookSet.CalculationEngine.CalcFeatures = CalcFeatures.All FpSpread1.LegacyBehaviors = FarPoint.Win.Spread.LegacyBehaviors.None 'Displaying cell image using attribute Dim ct As GrapeCity.CalcEngine.RichValue(Of Country) = New GrapeCity.CalcEngine.RichValue(Of Country)(New Country() With { .Name = "India", .Capital = "New Delhi" }) ct.ShowDetailsIcon = True TestActiveSheet.Cells("A1").Value = ct TestActiveSheet.Columns(0).ColumnWidth = 100 TestActiveSheet.Columns(2).ColumnWidth = 100 End Sub <System.Reflection.DefaultMember("Data")> <CellImage("Name")> Public Class Country Public Property Name As String <DisplayName("Capital Name")> Public Property Capital As String Public ReadOnly Property ContentType As String Get Return "image/png" End Get End Property <GrapeCity.CalcEngine.CellValueDataType(GrapeCity.CalcEngine.PrimitiveValueType.Image)> Public ReadOnly Property Data As Image Get Return Image.FromFile("D:\apple.jpg") End Get End Property End Class
Note: The data type return by string only supports local image file path.
Display Image and Cell Value
If you want to display the image along with a cell value, it can be achieved by using the CellImageAttribute class members. Its constructor method takes the following parameters:
Parameter | Description |
|---|---|
member | A string value indicating the member specified cell inline image data. |
isField | A Boolean value indicating whether the member is a field. Default is false. |
The following GIF illustrates an image displayed along with a cell value according to the image attributes set in Spread.
private void CellImageAndValue_Load(object sender, EventArgs e)
{
    IWorksheet TestActiveSheet = fpSpread1.AsWorkbook().ActiveSheet;
    fpSpread1.AsWorkbook().WorkbookSet.CalculationEngine.CalcFeatures = CalcFeatures.All;
    fpSpread1.LegacyBehaviors = FarPoint.Win.Spread.LegacyBehaviors.None;

    // Displaying both image and cell value
    RichValue<Country> ct = new RichValue<Country>(new Country()
    {
        Name = "Apple",
    });
    ct.ShowDetailsIcon = true;
    TestActiveSheet.Cells["A1"].Value = ct;

    TestActiveSheet.Rows[0].RowHeight = 100;
    TestActiveSheet.Columns[0].ColumnWidth = 150;
    TestActiveSheet.Columns[2].ColumnWidth = 100;
}

[System.Reflection.DefaultMember("Name")]
[CellImage("Image")]
public class Country
{
    public string Name { get; set; }
    [CellValueDataType(PrimitiveValueType.Image)]
    public string Image
    {
        get
        {
            return @"D:\apple.jpg";
        }
    }
}
Private Sub CellImageAndValue_Load(sender As Object, e As EventArgs) Handles MyBase.Load
Dim TestActiveSheet As IWorksheet = FpSpread1.AsWorkbook().ActiveSheet
FpSpread1.AsWorkbook().WorkbookSet.CalculationEngine.CalcFeatures = CalcFeatures.All
FpSpread1.LegacyBehaviors = FarPoint.Win.Spread.LegacyBehaviors.None
'Displaying both image and cell value
Dim ct As RichValue(Of Country) = New RichValue(Of Country)(New Country() With {
.Name = "Apple"
})
ct.ShowDetailsIcon = True
TestActiveSheet.Cells("A1").Value = ct
TestActiveSheet.Rows(0).RowHeight = 100
TestActiveSheet.Columns(0).ColumnWidth = 150
TestActiveSheet.Columns(2).ColumnWidth = 100
End Sub
<System.Reflection.DefaultMember("Name")>
<CellImage("Image")>
Public Class Country
Public Property Name As String
<CellValueDataType(PrimitiveValueType.Image)>
Public ReadOnly Property Image As String
Get
Return "D:\apple.jpg"
End Get
End Property
End Class
Note: This class has a higher priority than CellValueDataTypeAttribute class.
Spread for WinForms also provides the GC.IMAGE function to place an image in a cell. For more information about this function, refer to the Image Sparkline topic. You can also use the IMAGE function, which inserts images into cells from a source location.
Insert Picture in Cell
Spread for Winforms allows you to use the InsertPictureInCell method of the IRange interface to insert an image into a cell. This method returns a CellImage object to customize the properties of an image such as Sizing, Width, and Height.
Using Code
The following example code inserts an image using the IRange.InsertPictureInCell method.
fpSpread1.AsWorkbook().ActiveSheet.Cells[7, 2].InsertPictureInCell(@”picture.jpg”);FpSpread1.AsWorkbook().ActiveSheet.Cells(7, 2).InsertPictureInCell("picture.jpg")At Runtime
You can also insert an image inside a cell using ribbonBar at runtime. Follow the steps below to insert an image using the ribbonBar.
Run the code below to load a spread control with the ribbonBar.
ribbonBar1.Attach(fpSpread1);ribbonBar1.Attach(FpSpread1)Choose the Insert option from the menu.
In the Illustrations group, click on Picture and select Place in Cell.
Note: You can also add images to the worksheet and have them float on top by using the Place over Cells option.
Select an image and click OK.
The following GIF illustrates how to insert an image into a cell using ribbonBar.
Additionally, Spread for Winforms supports various sizing modes for an image in a cell. To set the sizing mode for an image, use the SizingMode enumeration of the GrapeCity.CalcEngine namespace which represents different image dimensions like Fit, Fill, Original, and Custom. It ensures that pictures retain their specified dimensions consistently even when exported.
The table below describes different SizingMode options:
Sizing Mode | Description | Sample Image |
|---|---|---|
Fit | Fits the image in a cell, maintaining the original aspect ratio. |
|
Fill | Fills the entire cell with the image, ignoring the aspect ratio. |
|
Original | Maintains the original image size, which may exceed the bounds of the cell. |
|
Custom | Displays the image according to custom height and width. |
|


The following example code inserts a picture into a cell using the InsertPictureInCell method and sets the sizing option to Custom using the SizingMode enumeration.
IWorksheet sheet = fpSpread1.AsWorkbook().ActiveSheet;
// Insert image using InsertPictureInCell method
var image = sheet.Cells["A2"].InsertPictureInCell(@"cherry.jpg");
// Modify the sizing, width, and height properties of the image
image.Sizing = GrapeCity.CalcEngine.SizingMode.Custom; // Custom is a sizing option in SizingMode Enum
image.Width = 60;
image.Height = 40;
sheet.Rows["1:2"].RowHeight = 60;
Dim sheet As IWorksheet = fpSpread1.AsWorkbook().ActiveSheet
// Insert image using InsertPictureInCell method
Dim image = sheet.Cells("A2").InsertPictureInCell("cherry.jpg")
// Modify the sizing, width, and height properties of image
image.Sizing = GrapeCity.CalcEngine.SizingMode.Custom // Custom is a sizing option in SizingMode Enum
image.Width = 60
image.Height = 40
sheet.Rows("1:2").RowHeight = 60Note: For all the SizingMode options set, an image will always be exported as 'Fit' mode in the XLSX format.
Paste Picture in Cell
Using the PastePictureInCell method of the IRange interface, you can paste an image from your clipboard into a cell.
Note:
To copy an image to the clipboard, you have to open it on the Paint app and perform the copy operation.
Then only, you will be able to paste it in a cell using the PastePictureInCell method.
Pasting an image into a cell works with flat style mode (LegacyBehaviors.None) only.
Using code
The following example code pastes an image using the IRange.PastePictureInCell method.
Copy an image to clipboard.
Run the code below to load a spread control with the RichClipboard property as True.
fpSpread1.Features.RichClipboard = true;
fpSpread1.AsWorkbook().ActiveSheet.ActiveCell.PastePictureInCell();
FpSpread1.Features.RichClipboard = True FpSpread1.AsWorkbook().ActiveSheet.ActiveCell.PastePictureInCell()
At runtime
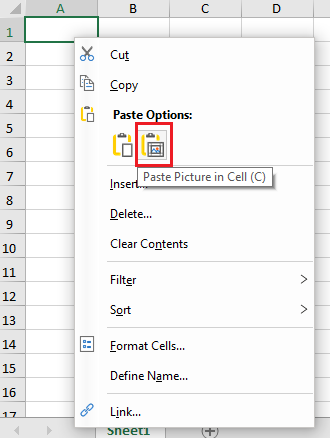
The following steps show how to paste an image using the context menu.
Copy an image to clipboard.
Run the code below to load a spread control with the ribbonBar having RichClipboard property as True.
fpSpread1.LegacyBehaviors = LegacyBehaviors.None; // flat style mode
fpSpread1.Features.RichClipboard = true;
ribbonBar1.Attach(fpSpread1);
FpSpread1.LegacyBehaviors = LegacyBehaviors.None; // flat style mode FpSpread1.Features.RichClipboard = True ribbonBar1.Attach(FpSpread1)Right-click on the cell where you want to paste the copied image.
On the Context menu, select the Paste Picture in Cell(C) option.