-
Spread Windows Forms 18 Product Documentation
- Getting Started
-
Developer's Guide
- Understanding the Product
-
Working with the Component
- Adding NuGet Package in Spread Windows Forms
- Migrate .NET Framework Project to .NET 8 Platform
- Migrate .NET Framework Project to .NET 6 Platform
- Adding a Component to a Visual Studio 2019 or 2022 Project
- Adding a Component to a Visual Studio 2017 Project
- Adding a Component to a Visual Studio 2013 Project
- Setting the Properties
- Adding Support for High DPI Settings
- Spreadsheet Objects
- Ribbon Control
- Sheets
- Rows and Columns
- Headers
- Cells
- Cell Types
- Data Binding
- Customizing the Sheet Appearance
- Customizing Interaction in Cells
- Tables
- Understanding the Underlying Models
- Customizing Row or Column Interaction
- Formulas in Cells
- Sparklines
- Keyboard Interaction
- Events from User Actions
- File Operations
- Storing Excel Summary and View
- Printing
- Chart Control
- Customizing Drawing
- Touch Support with the Component
- Spread Designer Guide
- Assembly Reference
- Import and Export Reference
- Version Comparison Reference
Migrate .NET Framework Project to .NET 8 Platform
Spread for WinForms supports the .NET 8 platform. If you want to migrate your .NET Framework projects/solutions to the .NET 8 platform, follow the step-by-step instructions provided in this topic.
!type=note
Note: The steps outlined below are based on an example of migrating a.NET 4.8 Framework project to the.NET 8 platform.
Step 1: Analyze portability and start upgrade process.
The portability analyzer is not yet available in Visual Studio 2022. Therefore, you can update your application using the steps given below.
Open the solution in Visual Studio 2022.
Select Tools > Command Line > Developer Command Prompt.
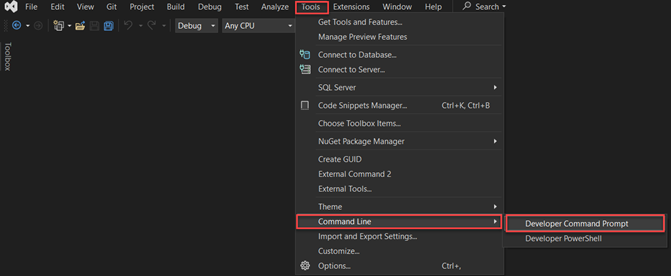
Run the following command to install upgrade-assistant.
dotnet tool install -g upgrade-assistantRun the following command to upgrade your solution.
upgrade-assistant upgrade <solution file path>For example: upgrade-assistant upgrade C:\Users\project\solution_file.sln
Depending on the project type you are upgrading, you may also be given the option to specify different styles of upgrade before proceeding, such as:
• In-place project upgrade: This option upgrades the project without creating a copy.
• Side-by-side project upgrade: This option is available only for .NET Framework projects. It copies the project, upgrades the copy, and leaves the original project alone.
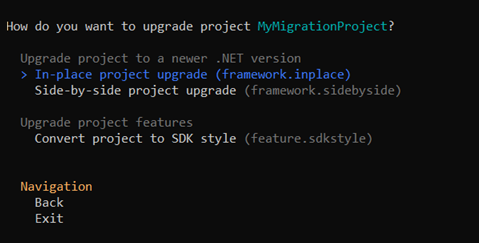
Additionally, if you have multiple target frameworks available for upgrade, you need to select the desired target framework.
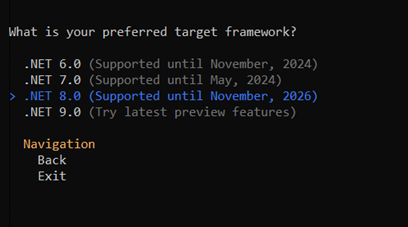
When you select the target framework, press Y to confirm and to start the upgrade.

If any errors or warnings occur, review and fix them to continue.
For more information on .NET upgrade assistance, refer to Overview of the.NET Upgrade Assistant.
Step 2: Port your project to the .NET 8 platform.
Note that if your project's packages.config file does not have NuGet references, you can skip the first two steps of migrating the NuGet format to PackageReference and proceed directly to step 3 of this section.
In the Solution Explorer, right-click on packages.config in your project and select Migrate Packages.config to PackageReference...
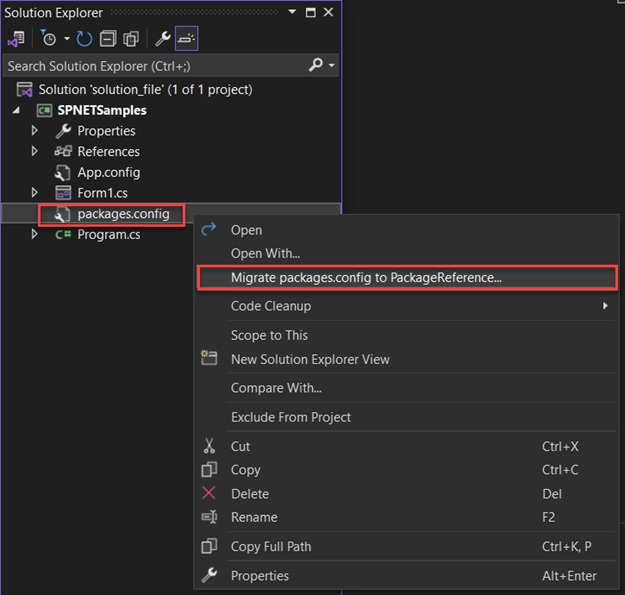
Select OK in the Migrate NuGet formats to PackageReference dialog.
In the Solution Explorer, right-click on your Winforms project and click Unload Project.
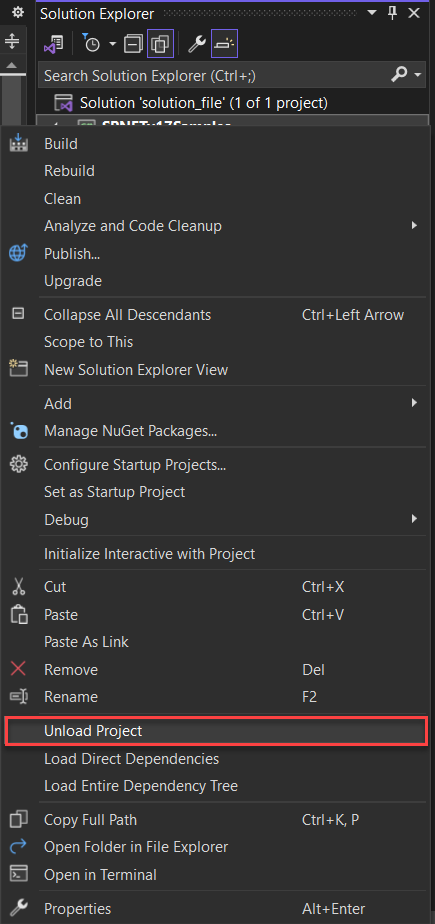
Double-click on the project file to view the .csproj file of the project.
Delete the content of the .csproj file and make it blank.
!type=note
Note: Make sure that you copy the content to a text file for backup before deleting.
Add the following code to the blank .csproj file and change it to project SDK type.
Here, the project is a Windows Forms Application project, so the is "WinExe".
<Project Sdk="Microsoft.NET.Sdk">
        <PropertyGroup>
                <OutputType>WinExe</OutputType>
                <TargetFramework>net8.0-windows</TargetFramework>
                <UseWindowsForms>true</UseWindowsForms>
        </PropertyGroup>
</Project>
Find the text "PackageReference" in the backup text file, copy the entire , and paste it inside the section of the .csproj file.
<ItemGroup>
    <PackageReference Include="GrapeCity.Spread.WinForms">
      <Version>x.x.x.x</Version>
    </PackageReference>
</ItemGroup>
Add the following code to your .csproj file to turn off "Auto-generate assembly information".
<PropertyGroup>
    <GenerateAssemblyInfo>false</GenerateAssemblyInfo>
</PropertyGroup>
Right-click on the project and select Reload Project.
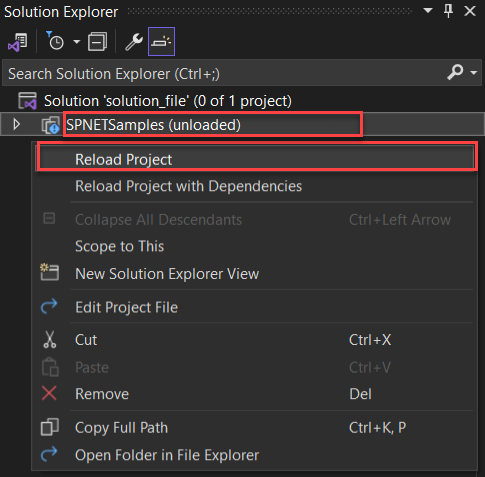
The final content of the .csproj file will look like below:
<Project Sdk="Microsoft.NET.Sdk">

 <PropertyGroup>
  <OutputType>WinExe</OutputType>
  <TargetFramework>net8.0-windows</TargetFramework>
  <UseWindowsForms>true</UseWindowsForms>
 </PropertyGroup>

 <ItemGroup>
  <PackageReference Include="GrapeCity.Spread.WinForms">
   <Version>x.x.x.x</Version>
  </PackageReference>
 </ItemGroup>

 <PropertyGroup>
  <GenerateAssemblyInfo>false</GenerateAssemblyInfo>
 </PropertyGroup>

</Project>
Step 3: Install the SpreadWin Nuget package
From the Tools tab in Visual Studio 2022 or higher versions, select NuGet Package Manager > Manage NuGet Packages for Solution.
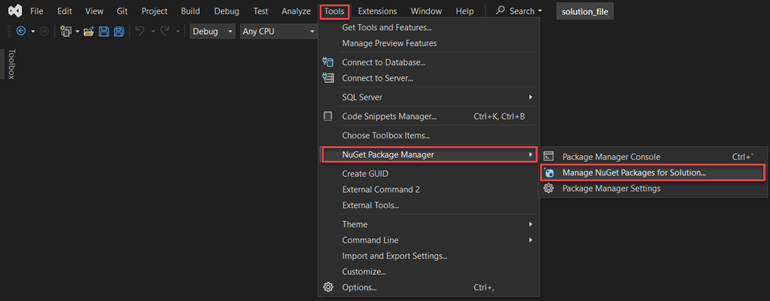
Search for "Grapecity.Spread" and install the GrapeCity.Spread.WinForms NuGet package into your solution.
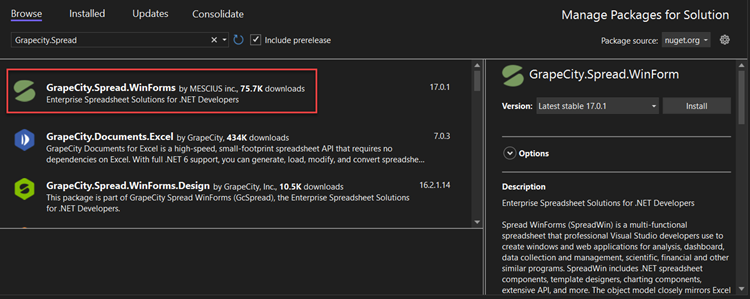
Once installed, rebuild the solution, and verify that the project is successfully migrated to the .NET 8 platform.


