
-
Spread Windows Forms Product Documentation
- Getting Started
-
Developer's Guide
- Understanding the Product
- Working with the Component
- Spreadsheet Objects
- Ribbon Control
-
Sheets
- Working with the Active Sheet
- Working with Multiple Sheets
- Customizing the Sheet Name Tabs
- Navigating Sheet Tabs
- Adding a Sheet
- Adding ChartSheet
- Removing a Sheet
- Showing or Hiding a Sheet
- Moving a Sheet
- Selecting Multiple Sheets
- Copying and Inserting a Sheet
- Protecting a Worksheet
- Form Controls
- Adding a Title and Subtitle to a Sheet
- Placing Child Controls on a Sheet
- Displaying a Footer for Columns or Groups
- Adding a Tag to a Sheet
- Working with 1-Based Indexing
- Customizing Clipboard Operation Options
- Rows and Columns
- Headers
- Cells
- Cell Types
- Data Binding
- Customizing the Sheet Appearance
- Customizing Interaction in Cells
- Tables
- Pivot Table
- Understanding the Underlying Models
- Customizing Row or Column Interaction
- Formulas in Cells
- Sparklines
- Keyboard Interaction
- Events from User Actions
- File Operations
- Storing Excel Summary and View
- Printing
- Chart Control
- Enhanced Chart
- Customizing Drawing
- Touch Support with the Component
- Spread Designer Guide
- Assembly Reference
- Import and Export Reference
- Version Comparison Reference
Navigating Sheet Tabs
If a workbook contains more than one sheet, the tab strip displays the sheet name tabs with the tab for the active sheet highlighted. In this scenario, by using the previous and next tab strip buttons present in the bottom left corner of the workbook, you can navigate to the previous or next sheet of the active sheet.
To jump to the first or last sheets
If you want to jump to the first or last sheets without any manual scrolling, follow the steps below.
Run the following example code to load a spread control with 6 sheets.
fpSpread1.Width = 800;
fpSpread1.Sheets.Count = 6;
fpSpread1.TabStripRatio = 0.7;
FpSpread1.Width = 800 FpSpread1.Sheets.Count = 6 FpSpread1.TabStripRatio = 0.7Hover the mouse on the tab strip buttons to display tooltips with a description of their functions.
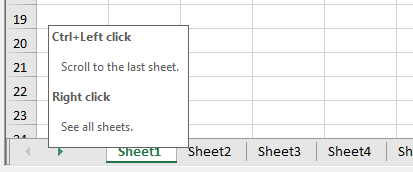
!type=note
Note: This tooltip functionality is only available in the Excel 2019 skin.
Hold Ctrl key and click on the Previous tab strip button to jump to the first sheet.
Hold Ctrl key and click on the Next tab strip button to jump to the last sheet.
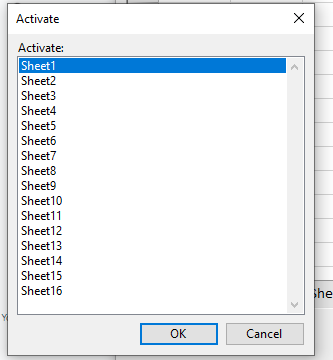
Right-click on the tab strip buttons to immediately jump to the selected sheet.
This will display the Activate dialog with the list of sheets available in the workbook.
You can select any sheet of your choice from the list and click OK or double-click the sheet to open.
Spread also allows you to open the Activate dialog using ActivateSheet method of the BuiltInDialogs class as shown below.
// Open Activate dialog by code
fpSpread1.Sheets.Count = 3;
FarPoint.Win.Spread.Dialogs.BuiltInDialogs.ActivateSheet(fpSpread1);
' Open Activate dialog by code
FpSpread1.Sheets.Count = 3
FarPoint.Win.Spread.Dialogs.BuiltInDialogs.ActivateSheet(FpSpread1)However, when not in use, you can hide the Activate dialog and tooltip and disable the tab strip buttons.
To hide Activate dialog
fpSpread1.GetActionMap().Parent.Remove(SpreadActions.ShowActivateSheetDialog);FpSpread1.GetActionMap().Parent.Remove(SpreadActions.ShowActivateSheetDialog)To hide the tooltip for tab strip buttons
fpSpread1.SetToolTip(SpreadToolTip.TabStripNextSheet, "");
fpSpread1.SetToolTip(SpreadToolTip.TabStripPreviousSheet, "");
FpSpread1.SetToolTip(SpreadToolTip.TabStripNextSheet, "")
FpSpread1.SetToolTip(SpreadToolTip.TabStripPreviousSheet, "")To disable tab strip buttons
private void FpSpread1_MouseDown(object sender, MouseEventArgs e)
    {
      if ((Control.ModifierKeys & Keys.Control) != 0)
      {
        FpSpread spread = (FpSpread)sender;
        HitTestInformation ht = spread.HitTest(e.X, e.Y);
        if (ht.Type == HitTestType.TabStrip)
        {
          switch (ht.TabStripInfo.Button)
          {
            case TabStripButton.Next:
            case TabStripButton.Previous:
             spread.Capture = false;
             break;
          }
        }
      }
    }
Private Sub FpSpread1_MouseDown(ByVal sender As Object, ByVal e As MouseEventArgs)
If (Control.ModifierKeys And Keys.Control) <> 0 Then
Dim spread As FpSpread = CType(sender, FpSpread)
Dim ht As HitTestInformation = spread.HitTest(e.X, e.Y)
If ht.Type = HitTestType.TabStrip Then
Select Case ht.TabStripInfo.Button
Case TabStripButton.[Next], TabStripButton.Previous
spread.Capture = False
End Select
End If
End If
End SubTo customize tab strip button behavior
You can change the default behavior of the TabStrip buttons to personalize their functionality. When you click the previous or next tab strip buttons in the bottom left corner of the worksheet, you can navigate to the sheet before or after the active one. However, using the TabStrip.ButtonClick event, you may switch between sheet tabs by making the previous or next sheets as active. For example, if you are on 'Sheet1' and click the next tab strip button, then the 'Sheet2' becomes the active sheet.
The following example code depicts the use of TabStrip.ButtonClick event.
fpSpread1.Sheets.Count = 8;
fpSpread1.TabStrip.ButtonClick += TabStrip_ButtonClick;
private void TabStrip_ButtonClick(object sender, TabStripButtonClickEventArgs e)
{
 e.Handled = true;
 if (e.Button == TabStripButton.Next)
 {
  fpSpread1.ActiveSheetIndex += 1;
 }
 else if (e.Button == TabStripButton.Previous)
 {
  fpSpread1.ActiveSheetIndex -= 1;
 }
}
FpSpread1.Sheets.Count = 8
FpSpread1.TabStrip.ButtonClick += TabStrip_ButtonClick
Private Sub TabStrip_ButtonClick(sender As Object, e As TabStripButtonClickEventArgs)
e.Handled = true
If e.Button Is TabStripButton.Next Then
FpSpread1.ActiveSheetIndex += 1
ElseIf e.Button Is TabStripButton.Previous Then
FpSpread1.ActiveSheetIndex -= 1
End If
End Sub