-
Spread Windows Forms 18 Product Documentation
- Getting Started
-
Developer's Guide
- Understanding the Product
- Working with the Component
- Spreadsheet Objects
- Ribbon Control
- Sheets
- Rows and Columns
- Headers
- Cells
- Cell Types
- Data Binding
- Customizing the Sheet Appearance
- Customizing Interaction in Cells
- Tables
- Understanding the Underlying Models
- Customizing Row or Column Interaction
- Formulas in Cells
- Sparklines
- Keyboard Interaction
- Events from User Actions
- File Operations
- Storing Excel Summary and View
- Printing
- Chart Control
- Customizing Drawing
- Touch Support with the Component
- Spread Designer Guide
- Assembly Reference
- Import and Export Reference
- Version Comparison Reference
Customizing Header Label Text
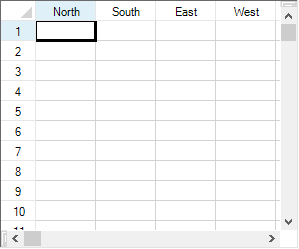
By default the Spread component displays letters in the column headers and numbers in the row headers. Besides this automatic text, you can add labels to any or all of the header cells. You can add customize the header label text, as shown in the following figure where the first four columns have custom labels.

To specify the custom text for a header label, you can use the Label property of the ColumnHeader.Column or RowHeader.Row shortcut objects or you can use the Text property of the Cells shortcut objects. For headers with multiple columns and multiple rows, you use the Text property of the Cells shortcut objects. Refer to the example in Creating a Header with Multiple Rows or Columns. For more information on the individual properties, refer to the Label property in the Column class or the Label property in the Row class.
Cells in the headers are separate from the cells in the data area, so the coordinates for cells in the headers start at 0,0 and count up from upper left to lower right within the header. The sheet corner cell is separate and is not counted when specifying header cell coordinates.
Using the Properties Window
At design time, in the Properties window, select the Spread component.
Select the Sheets property.
Click the button to display the SheetView Collection Editor.
Click the sheet for which you want to change the header labels.
You cannot add or change custom text in cells other than changing the labels displayed when using the Properties window.
In the property list, select the Cells property and click the button to display the Cell, Column, and Row Editor.
Select the column for which you want to change the labels displayed to custom text.
Set the Label property to set the custom text.
Click OK to close the Cell, Column, and Row Editor.
Click OK to close the SheetView Collection Editor.
Method to set
If you want to change the label display of the column header, refer to the target column in the Columns property of the ColumnHeader class, and after that, set custom text in Label property of Column class. If you want to change the label display of the row header, refer to the target row in the Rows property of RowHeader class and set custom text to Label property of Row class.
Example
This example code sets custom text for the labels in the first four column headers.
// Set custom text for columns A through D.
fpSpread1.Sheets[0].ColumnHeader.Columns[0].Label = "North";
fpSpread1.Sheets[0].ColumnHeader.Columns[1].Label = "South";
fpSpread1.Sheets[0].ColumnHeader.Columns[2].Label = "East";
fpSpread1.Sheets[0].ColumnHeader.Columns[3].Label = "West";
' Set custom text for columns A through D.
fpSpread1.Sheets(0).ColumnHeader.Columns(0).Label = "North"
fpSpread1.Sheets(0).ColumnHeader.Columns(1).Label = "South"
fpSpread1.Sheets(0).ColumnHeader.Columns(2).Label = "East"
fpSpread1.Sheets(0).ColumnHeader.Columns(3).Label = "West"Using the Spread Designer
Select the sheet tab for the sheet for which you want to set custom header text.
Select the row or column for which you want to set custom header text, then right-click and choose Headers.
In the Header Editor, double-click the header for which you want to display custom text.
If there is only one header row or column, click the one displayed cell with the text "".
Edit the text to be the custom text you want, and then press Enter to stop editing.
When you have edited all the header text you want to edit, click OK to close the Header Editor, then click Yes to apply your changes to the selection.
From the File menu choose Apply and Exit to apply your changes to the component and exit Spread Designer.


