- ASP.NET MVC
- Getting Started
- Configuring your MVC Application
- Adding NuGet Packages to your App
- Adding Controls
- Client-Side Support
- Globalization
-
Working with Controls
- Accordion
- Barcode
- CollectionView
- DashboardLayout
- Excel
- File Manager
- Financial Charts
- FlexChart
- FlexGrid
- Transposed Grid
- FlexMap
- FlexPie
- FlexRadar
- FlexReport
-
FlexSheet
- Key Features
- Quick Start
-
Work with FlexSheet
- Calculation Precision
- Cell Merging
- Client-side Loading and Saving of Excel
- Context Menu
- Data Binding
- Drag and Drop
- Excel HTML Entities Export
- Filtering
- Format Cells
- Formulas in FlexSheet
- Frozen Cells
- JSON Loading and Saving on Client-side
- Multiple Headers
- Remote Loading and Saving of Excel
- Sorting
- Styling and CSS
- Table
- Unbound Sheets
- FlexViewer
- Gauge
- Input Controls
- MultiRow
- TransposedMultiRow
- OLAP
- Sunburst Chart
- TabPanel
- TreeMap
- TreeView
- Styling
- ASP.NET MVC Samples
- Release History
Excel HTML Entities Export
FlexSheet supports saving an Excel (.xlsx) file with HTML entities content. In the client, convertHtmlEntities property of IFlexSheetXlsxOptions interface defines the conversion behavior for HTML entities such as """, "<", ">" and "&" using the HtmlEntityConversion enumeration, when exporting. The default value of the HtmlEntityConversion enumeration is set to Auto. The other options available in this enumeration are Yes and No. The former option can be used to always convert the HTML entities to the characters they represent and the latter can be used in case you do not want the conversion of HTML entities to be performed.
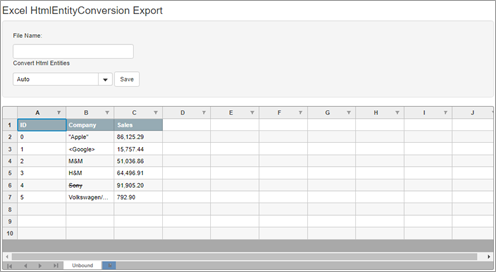
The following image showcases FlexSheet with HTML entities which can be exported to Excel (.xlsx) file using the Save button.

The following code demonstrates how to save an Excel (.xlsx) file with HTML entities. This example uses the excelHTMLEntities.js file.
@section Scripts{
    <script type="text/javascript" src="~/Scripts/FlexSheet/excelHtmlEntities.js"></script>
}
<style>
    .btn {
        margin-bottom: 0;
    }
</style>
<div>
    <div class="copy">
        <h3>Excel HtmlEntityConversion Export</h3>
    </div>
    <div class="row">
        <div class="col-md-12 col-xs-24">
            <div class="form-inline well well-lg">
                <p>File Name:</p>
                <input type="text" class="form-control" id="fileName2" />
                <p>Convert Html Entities</p>
                @(Html.C1().ComboBox().Id("HtmlEntityConversion").IsEditable(false))
                <button class="btn btn-default" onclick="exportHtmlEntities()">Save</button>
            </div>
        </div>
    </div>
    <div>
        @(Html.C1().FlexSheet().CssClass("flexSheet").Id("excelHtmlEntitiesSheet")
        .AddUnboundSheet("Unbound", 10, 10).Height("380px"))
    </div>
</div>
excelHTMLEntities.js
c1.documentReady(function () {
//export HtmlEntities
var HtmlEntitiesflexSheet = wijmo.Control.getControl('#excelHtmlEntitiesSheet');
var menu = wijmo.Control.getControl('#HtmlEntityConversion');
generateHtmlSheet(HtmlEntitiesflexSheet);
var items = [];
for (var i = 0; i <= 3; i++) {
items.push({ name: wijmo.grid.xlsx.HtmlEntityConversion[i], val: i })
}
menu.itemsSource = items;
menu.displayMemberPath = "name";
menu.selectedValuePath = "val";
});
//HtmlEntitiesConversion
function generateHtmlSheet(flexsheet) {
var companies = ['"Apple"', '<Google>', 'M&M', 'H&M', '<s>Sony</s>', 'Volkswagen/Audi'];
flexsheet.setCellData(0, 0, 'ID')
flexsheet.setCellData(0, 1, 'Company')
flexsheet.setCellData(0, 2, 'Sales')
for (var i = 0; i < companies.length; i++) {
flexsheet.setCellData(i + 1, 0, i)
flexsheet.setCellData(i + 1, 1, companies[i])
flexsheet.setCellData(i + 1, 2, Math.random() * 100000)
}
flexsheet.columns.getColumn(1).isContentHtml = true;
flexsheet.applyCellsStyle({
fontWeight: 'bold', backgroundColor: '#96abb4', color: 'white'
}, [new wijmo.grid.CellRange(0, 0, 0, 2)])
}
function exportHtmlEntities() {
var flexSheet = wijmo.Control.getControl('#excelHtmlEntitiesSheet'), combo = wijmo.Control.getControl('#HtmlEntityConversion'),
fileName = wijmo.getElement('#fileName2');
if (flexSheet) {
if (fileName.value == "") {
fileName.value = 'FlexSheet.xlsx';
}
flexSheet.save(fileName.value, { convertHtmlEntities: combo.selectedItem.val });
}
}

