- ASP.NET MVC
- Getting Started
- Configuring your MVC Application
- Adding NuGet Packages to your App
- Adding Controls
- Client-Side Support
- Globalization
-
Working with Controls
- Accordion
- Barcode
- CollectionView
- DashboardLayout
- Excel
- File Manager
- Financial Charts
- FlexChart
- FlexGrid
- Transposed Grid
- FlexMap
- FlexPie
- FlexRadar
- FlexReport
- FlexSheet
- FlexViewer
- Gauge
- Input Controls
- MultiRow
- TransposedMultiRow
- OLAP
- Sunburst Chart
- TabPanel
- TreeMap
- TreeView
- Styling
- ASP.NET MVC Samples
- Release History
Menu with Input Number
You can add different types of values to the Menu control that are as simple as strings shown in the Quick Start, or binding Menu with another control. This section describes how Menu control is used with InputNumber and how is the Menu's value updated with respect to value selected in the InputNumber control.
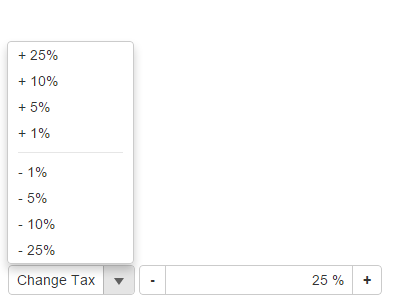
The following image shows how the Menu appears after binding it to Input Number.

The following code examples demonstrate how to bind Menu to an InputNumber control:
In Code
MenuController.cs
public ActionResult Feature()
{
    return View();
}
Menu.cshtml
<script>
    function execute(arg) {
        var inputNumber = wijmo.Control.getControl("#mInputNumber");
        // convert argument to Number
        arg = wijmo.changeType(arg, wijmo.DataType.Number);
        // check if the conversion was successful
        if (wijmo.isNumber(arg)) {
           // update the value
            inputNumber.value += arg;
        }
    }
    function canExecute(arg) {
        var inputNumber = wijmo.Control.getControl("#mInputNumber");
        // convert argument to Number
        arg = wijmo.changeType(arg, wijmo.DataType.Number);
        // check if the conversion was successful
        if (wijmo.isNumber(arg)) {
            var val = inputNumber.value + arg;
            // check if the value is valid
            return val >= 0 && val <= 1;
        }
        return false;
    }
</script>
<div>
    @(Html.C1().Menu().Header("Change Tax")
        .Command("execute", canExecute: "canExecute")
        .MenuItems(items =>
        {
            items.Add("+ 25%", 0.25);
            items.Add("+ 10%", 0.10);
            items.Add("+ 5%", 0.05);
            items.Add("+ 1%", 0.01);
            items.AddSeparator();
            items.Add("- 1%", -0.01);
            items.Add("- 5%", -0.05);
            items.Add("- 10%", -0.10);
            items.Add("- 25%", -0.25);
        })
    )
    @(Html.C1().InputNumber().Id("mInputNumber")
        .Value(0.07).Step(0.05).Format("p0").Min(0).Max(1)
    )
</div>


