- Getting Started
- Configuring your MVC Application
- Adding NuGet Packages to your App
- Adding Controls
- Client-Side Support
-
Working with Controls
- Accordion
- Barcode
- CollectionView
- DashboardLayout
- File Manager
- Financial Charts
- FlexChart
- FlexGrid
- Transposed Grid
- FlexMap
- Flex Pie
- Flex Radar
- Flex Report
- Flex Sheet
- Flex Viewer
- Gauge
- Input Controls
- Multi Row
- TransposedMultiRow
- OLAP
- Sunburst Chart
- Tab Panel
- Tree Map
- TreeView
- Globalization
- Styling
- ASP.NET MVC Samples
- ReleaseHistory
Date Validation
ComponentOne MVC Edition's InputDate control has a built-in validator, ItemValidator that lets you control the type of data or the value that users select from the InputDate drop down. All you need to do is create a validation function, which is assigned to ItemValidator to allow or restrict the selection of dates by the user.
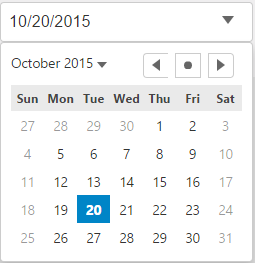
In this example, ItemValidator is created so that a user can select a weekday, but not Saturdays and Sundays i.e. in the InputDate control. This kind of validation is useful while planning your work sprints, workout days or diet plan.
The following images show how the InputDate control appears after applying ItemValidator function to it.

The following code examples demonstrate how to add ItemValidator in the InputDate control:
In Code
Add a new Controller:
- In the Solution Explorer, right click the folder Controllers.
- From the context menu, select Add | Controller. The Add Scaffold dialog appears.
- Complete the following steps in the Add Scaffold dialog:
- Select Empty MVC Controller template.
- Set name of the controller (for example:
Default1Controller). - Click Add.
- A new controller is added to the application.
InputDate.cshtml
@{
    var today = DateTime.Now.Date;
    var minDate = new DateTime(today.Year, 1, 1);
    var maxDate = new DateTime(today.Year, 12, 31);
}
<script>
    function itemValidator(date) {
        var weekday = date.getDay();
        return weekday != 0 && weekday != 6;
    }
</script>
<div>
    <c1-input-date value="@today" min="@minDate" max="@maxDate" item-validator="itemValidator">
    </c1-input-date>
</div>


