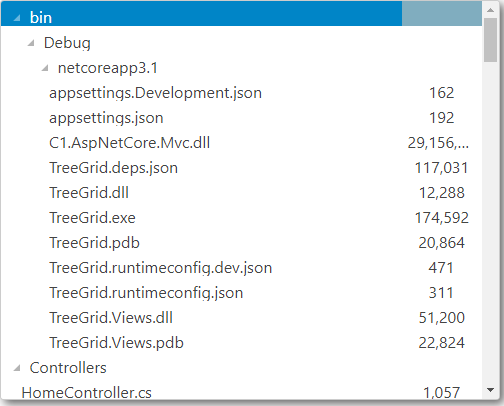
FlexGrid supports hierarchical data, that is items that have lists of sub items. To use FlexGrid as a TreeGrid with hierarchical data sources, set the ChildItemsPath property to the name of the data element that contains the child elements. The FlexGrid automatically scans the data and builds the tree.
The example below uses a sample folder structure of ASP.NET MVC Edition project. You can display the tree view structure of any folder by providing its path in the ChildItemsPath property.
The following image shows how the FlexGrid appears after setting the ChildItemsPath property.

The following code examples demonstrate how to enable TreeGrid in the FlexGrid:
TreeItem.cs). See Adding controls to know how to add a new model.| TreeItem.cs |
Copy Code
|
|---|---|
using System; using System.Collections.Generic; using System.Linq; namespace TreeGrid.Models { public interface TreeItem { string Header { get; set; } IList<TreeItem> Children { get; } } public class Folder : TreeItem { public string Header { get; set; } public IList<TreeItem> Children { get; private set; } public Folder(string name) { Header = name; Children = new List<TreeItem>(); } public static Folder Create(string path) { var folder = new Folder(System.IO.Path.GetFileName(path)); System.IO.Directory.GetDirectories(path).ToList().ForEach(d => folder.Children.Add(Folder.Create(d))); System.IO.Directory.GetFiles(path).ToList().ForEach(f => folder.Children.Add(File.Create(f))); return folder; } } public class File : TreeItem { public string Header { get; set; } public DateTime DateModified { get; set; } public long Size { get; set; } public IList<TreeItem> Children { get { return null; } } public File(string name) { Header = name; } public static File Create(string path) { var file = new File(System.IO.Path.GetFileName(path)); var info = new System.IO.FileInfo(path); file.DateModified = info.LastWriteTime; file.Size = info.Length; return file; } } } |
|
Controller code
| C# |
Copy Code
|
|---|---|
public IActionResult Index() { var list = Folder.Create(Directory.GetCurrentDirectory()).Children; return View(list); } |
|
View code
| HTML |
Copy Code
|
|---|---|
@using TreeGrid.Models
@model IEnumerable<TreeItem>

<style>
    .wj-flexgrid {
        height: 400px;
        background-color: white;
        box-shadow: 4px 4px 10px 0px rgba(50, 50, 50, 0.75);
        margin-bottom: 12px;
    }

    .custom-flex-grid .wj-header.wj-cell {
        color: #fff;
        background-color: #000;
        border-bottom: solid 1px #404040;
        border-right: solid 1px #404040;
        font-weight: bold;
    }

    .custom-flex-grid .wj-cell {
        background-color: #fff;
        border: none;
    }

    .custom-flex-grid .wj-alt:not(.wj-state-selected):not(.wj-state-multi-selected) {
        background-color: #fff;
    }

    .custom-flex-grid .wj-state-selected {
        background: #000;
        color: #fff;
    }

    .custom-flex-grid .wj-state-multi-selected {
        background: #222;
        color: #fff;
    }
</style>

<script>
    c1.documentReady(function () {
        wijmo.Control.getControl("#grid").rows.defaultSize = 25;
    });
</script>

<c1-flex-grid id="grid" class="custom-flex-grid" width="500px"
              child-items-path="Children" auto-generate-columns="false"
              allow-resizing="None" headers-visibility="None" selection-mode="ListBox">
    <c1-items-source source-collection="@Model"></c1-items-source>
    <c1-flex-grid-column binding="Header" width="*"></c1-flex-grid-column>
    <c1-flex-grid-column binding="Size" width="80" align="center"></c1-flex-grid-column>
</c1-flex-grid>
|
|