Themes
Work with ActiveReports to create and add themes, customize and apply themes, use constant expressions in a theme, and much more. A theme is a collection of properties that defines the appearance of a report. A theme includes colors, fonts, images, and constant expressions that you can apply to report elements once you add a theme to a report.
You can add one or many themes to a report. If a report has multiple themes, you can use the report's CollateBy enumeration to control the page order in a report. See Set Up Collation for more information.
The Theme Editor and the Report - Themes dialog allow you to manage themes in a report.
The theme saved as an .rdlx-theme file on your local machine can be added in your report using the Report – Themes dialog. Or, you can add a dynamic theme using an expression.
Also, in the File menu, select Open to open and modify an existing theme and select Save or Save As to save the changes on your local machine.
To access the Report - Themes dialog
- In the Designer, click the gray area around the report page to select a report.
- Do one of the following:
- In the Properties window, select the Themes property and click the ellipsis (…) button to open the Report - Themes dialog.
- With the report selected, in the Properties window under properties where the commands are displayed, click the Property dialog link. In the Report dialog that appears, go to Themes.
- On the Report menu, select Report Properties and go to Themes in the Report dialog that appears.
Create and add themes
A theme is a collection of properties that defines the appearance of a report. A theme includes colors, fonts, images, and expressions that you can apply to report elements once you add a theme to a report.
You can add one or many themes to a report. If a report has multiple themes, you can use the report's CollateBy property to control the page order in a report.
Use the following instructions to create and add themes.
Create a new theme
- Open Theme Editor.
- In the Theme Editor that opens, define the colors, fonts, images, and constant expressions properties for your new theme under the corresponding tabs.
- On the File menu, select Save.
- Choose a directory on your local machine and enter the name of a new theme, then click Save.
Add a theme to the report
- In the Designer, click the gray area around the report page to select a report.
- In the Properties window, select the Themes property and click the ellipsis (…) button to open the Report - Themes dialog.
- In the Report - Themes dialog that opens, click the Add... icon.
- From the Value drop-down, select <Open File...>.
- In the Open dialog that appears, select a theme file from your local files, click Open, and then select OK.
Customize and apply themes
Use the following instructions to customize an existing theme and apply it to your report.
Modify a theme
- In the designer, click the gray area around the report page to select a report.
- In the Properties panel, select the Themes property and click the ellipsis (…) button to open the Report - Themes dialog.
- In the Report - Themes dialog that opens, select an existing report theme.
- Click the Edit... icon above the list of themes.
- In the Theme Editor that opens, modify the theme properties and click OK to close the dialog.
Apply a theme color
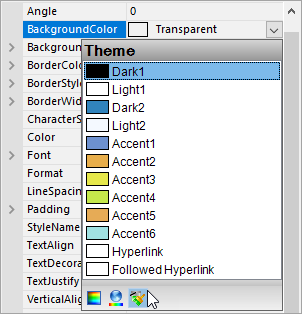
In the designer, select the report’s control (for example, a TextBox).
In the Properties panel, go to the color-related property (for example, the BackgroundColor property) and click the arrow to display the drop-down list of values.
In the list that appears, go to the Theme tab and select the color you want.
Apply a theme font
- In the designer, select the report’s control (for example, a TextBox).
- In the Properties window, go to a property from the Font properties group (for example, the Font property) and click the arrow to display the drop-down list of values.
- In the values list that appears, select a font defined in a theme (for example, =Theme.Fonts!MinorFont.Family).
Use Constant Expressions in a theme
In the Theme Editor, you can define constant expressions to be used in a theme. Later, you can apply a constant expression to the report’s control by selecting it in the Value field of that control.
Constant expressions allow you to define a name and an associated value to be used in themes.
Use the following instructions to create and use constant expressions in themes.
Define a constant expression
- In the Theme Editor, go to Constants.
- Double-click the field under Name and enter the Constant name (for example, Header).
- In the next field to the right, under Value, enter the Constant value (for example, Invoice#).
Use a constant expression
In the Designer, select the report’s control (for example, a TextBox).
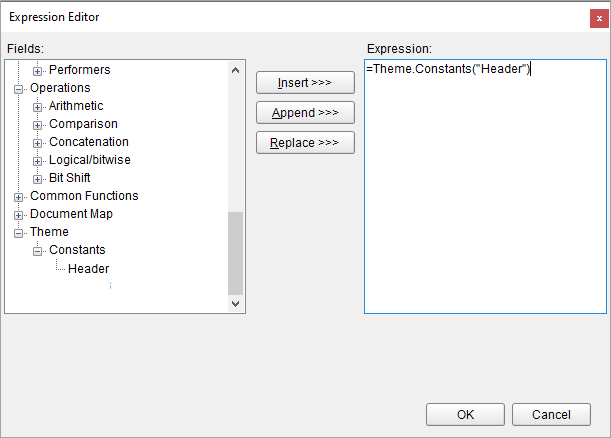
In the Properties Panel, go to the Values field and select the <Expression> option from the drop-down list to open the Expression Editor.
In the Expression Editor, expand the Themes node with the constant expressions defined in the report theme.
In the Themes node, select a constant and then click the Replace or Insert button.
Click OK to add the constant expression in the TextBox.
Use Dynamic Expressions in a theme
Dynamic expressions allow you to define themes based on some condition that is evaluated at run-time.
To add a dynamic expression in a theme
- In the Designer, click the gray area around the report page to select a report.
- In the Properties window, select the Themes property and click the ellipsis (…) button to open the Report - Themes dialog.
- In the Report - Themes dialog that opens, click Value and then <Expression..> icon.
- Enter the expression with dynamic condition and click OK.
See tutorial on how to Apply Theme at Runtime Using Dynamic Expression.
Set Up Collation
You can add multiple themes to a report. In this case, the report renders a combination of multiple outputs for each theme. For example, if a report has two themes, then the report output includes a combination of the first and the second themes, applied to each report page. You can control the combination rules of the report output in the CollateBy property.
type=warning
Caution: If you are using collation in a report, you cannot use interactive features, such as drill down, links, document map, and sorting.
You can control the page order of a rendered report with multiple themes by selecting the collation mode in the CollateBy property of the report:
type=note
Note: The collection of constant expressions must be the same in all themes of a report. See Use Constant Expressions in a Theme for further information.
In the Designer, click the gray area around the report page to select the report.
In the Properties Panel, go to the CollateBy property and select one of the available options:
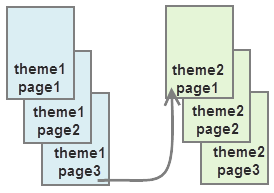
Simple. Renders report pages without any specific sorting. For example, if you have a report with 2 themes, the report renders all pages with theme 1, then all pages with theme 2.
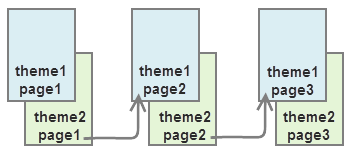
ValueIndex. Sorts report pages by page number. For example, if you have a report with 2 themes, the report renders page 1 for theme 1 and 2, then page 2 for theme 1 and 2, and so on.
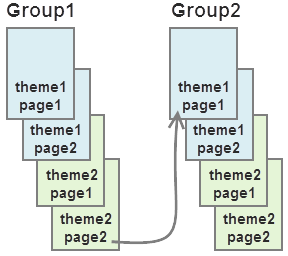
Value. Sorts report pages by the grouping expression that you specify in the report's FixedPage dialog. For example, if you have a report with 2 themes with grouping, the report renders group1 (pages 1 and 2 of theme1, then pages 1 and 2 of theme2), then group 2 (pages 1 and 2 of theme1, then pages 1 and 2 of theme2), and so on.
type=note
Note: In RDLX Reports, the Value collation mode is not available by design.
See Add Page Numbering for information on setting cumulative page count formats for Page Report.


