Master Report (RDLX Report)
Master Reports are like dynamic templates you can design for use with content reports. This assists users in creating reports that share common elements such as a logo in the page header or a web site link in the page footer. You design the master report with controls, code, data sources, and layout properties that cannot be modified from content reports.
Master Reports differ from templates in that they are loaded each time the report is executed. Therefore, you can modify a master report and the changes to the master report automatically appear in any reports that reference it.
In an RDLX report, you can create a master report and apply it to any number of content reports to keep common styles in one easy-to-maintain location.
Master reports help you perform the following tasks:
- Create a predefined layout with limited modification possibilities.
- Hide details of data sources.
Design a Master Report
When designing a master report, you use controls, code, data sources, and layout properties in the same way that you do in a normal report. A master report is valid on its own, and can be run without a content report. To prevent end users from modifying a master report, you can set permissions on the file to Read Only for that user or group.
In an RDLX Report, you can create a master report by saving it as an RDLX-master file. You can then apply it like a template to content reports.
A ContentPlaceHolder control appears in the toolbox when you convert an RDLX report to a Master Report. This control defines regions where users can add content after applying a master report template.
type=note
Note: These steps assume that you have already created a new RDLX report and connected it to a data source. The Master Report feature is only available with RDLX Reports.
- In the Standalone Designer, go to Report menu > Master Report > Convert to Master Report.

In WebDesigner, go to Report menu > Convert to Master Report.
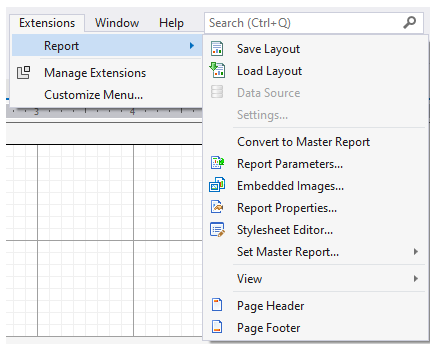
The same option in Visual Studio Integrated Designer can be accessed from Extensions > Report.
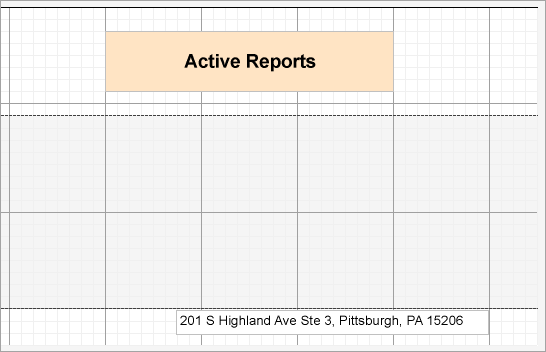
Right-click the ruler area to the top or left of the report and choose Page header. Repeat and choose Page footer.
From the toolbox, drag and drop controls into the page header and footer sections. These controls appear on every page of a content report when you apply the master report. For example, a company logo image, or a textbox with the company address.
 3. A ContentPlaceHolder control appears in the toolbox when you convert an RDLX report to a Master Report. This control defines regions where users can add content. Use the following instructions to add the ContentPlaceHolder control in the master report.
From the toolbox, drag and drop the ContentPlaceHolder control onto the report design surface.
Right-click the control and from the context menu that appears, select Properties to open the properties window.
Set the following properties for the ContentPlaceHolder control.
Property Description Location To position the control with respect to the top left corner of the container. Size To set the control size for determining the space available to design a content report. Text To add instructive text for the user. E.g. "Design your content report here." This caption appears in the design view and not in the final output.
Save the master report locally on your system. In the standalone designer, the option is in the File menu.
- In Visual Studio, select the report, and from the Extensions menu > Report > Save Layout.
- In the Save As dialog that appears, navigate to the location where you want to save the report and click Save to save the report in rdlx-master file format.
Use a Master Report to Create a Content report
The reports to which you apply the master report are content reports. A content report is not valid on its own, and cannot be run without its specified master report.
When the user creates a new report and sets a master report on it, the design view is effectively the opposite of the design view of the master report. Any report controls overlaid by ContentPlaceHolder controls are not visible in the content report at design time, but are visible at run time. These are the only areas where users can add report controls.
- With focus on the report to which you want to apply the master report, from the Report menu, select Set Master Report, then Open Local File.
- In the Open dialog that appears, navigate to the location where you saved the master report and open it. The master report layout is applied to the content report with all areas locked except for the region with the ContentPlaceHolder, which is available for use.
While designing a Content report, user can:
- Add elements that do not exist in the master report.
- Add new data sources that do not exist in the master report.
- Add new datasets from a data source in the master report.
- Add images to the EmbeddedImages collection.
- Add parameters to the ReportParameter collection.
- Add any number of report controls into placeholder rectangles designated by the master report.
- Modify the report name and description.
- Add new custom code that does not exist in the master report.
While designing a Content report, user cannot:
- Modify or remove elements that exist in the master report (disabled grey area).
- Remove a master report data source.
- Remove a master report dataset or modify its query.
- Modify the sort or filter on a master report dataset.
- Remove images from the EmbeddedImages collection.
- Remove parameters from the ReportParameter collection.
- Modify the margins or page settings of the master report.
type=note
Note: Code in the master report is hidden in the content report, so in order to allow content report users to access code, the master report developer must provide information.
Run-Time Sequence of Events
This is what happens behind the scenes when you run a content report.
- ActiveReports loads the content report.
- The loader parses the master report tag on the content report and requests the master report from the resource resolver.
- The master report is loaded into the definition.
- As each ContentPlaceHolder in the content report is parsed, it finds the corresponding placeholder in the master report and loads the content from the content report into it.
- Data sources, datasets, and fields are merged. The master report has higher priority if there is a conflict.
- Themes are merged. The master report has higher priority if there is a conflict.
- Report properties from the content report are added to those of the master report. For the following properties, the content report has a higher priority in case of conflict:
- Report Description
- Report Author
- Report AutoRefresh
- Report Custom
- Report Language
- Report DataTransform
- Report DataSchema
- Report ElementName
- Report DataElementStyle
- Dataset filters
- Report Theme
- Report Code
- All content inside the ContentPlaceHolder controls
Modifying an Aggregated Report Definition
When you run a content report, the content report and its master combine to form an aggregated report definition. Using the ReportDefinition API, you can save this aggregate at run time as a third report definition which has no master or content report. Once this aggregate is saved as a normal report definition (*.rdlx file) you can edit it like any other report definition.
Advantages of a Master Report
- Implement common report functionality such as adding consistent page headers and footers within master reports.
- Apply company-wide changes in information such as address changes to a single master instead of modifying each report individually.
- Apply widespread data-related changes (such as data source location) to a single master report instead of modifying each report.
- Create code, data sources, themes and page layouts that are shared across the application or enterprise.
- Hide report complexity from end users who can use the standalone designer application to create content reports.
Advantages of a Shared Master Report
Shared master reports offer the advantages of a local master report, plus:
- They make your reports portable
- They allow multiple authors to use them


