Page Report

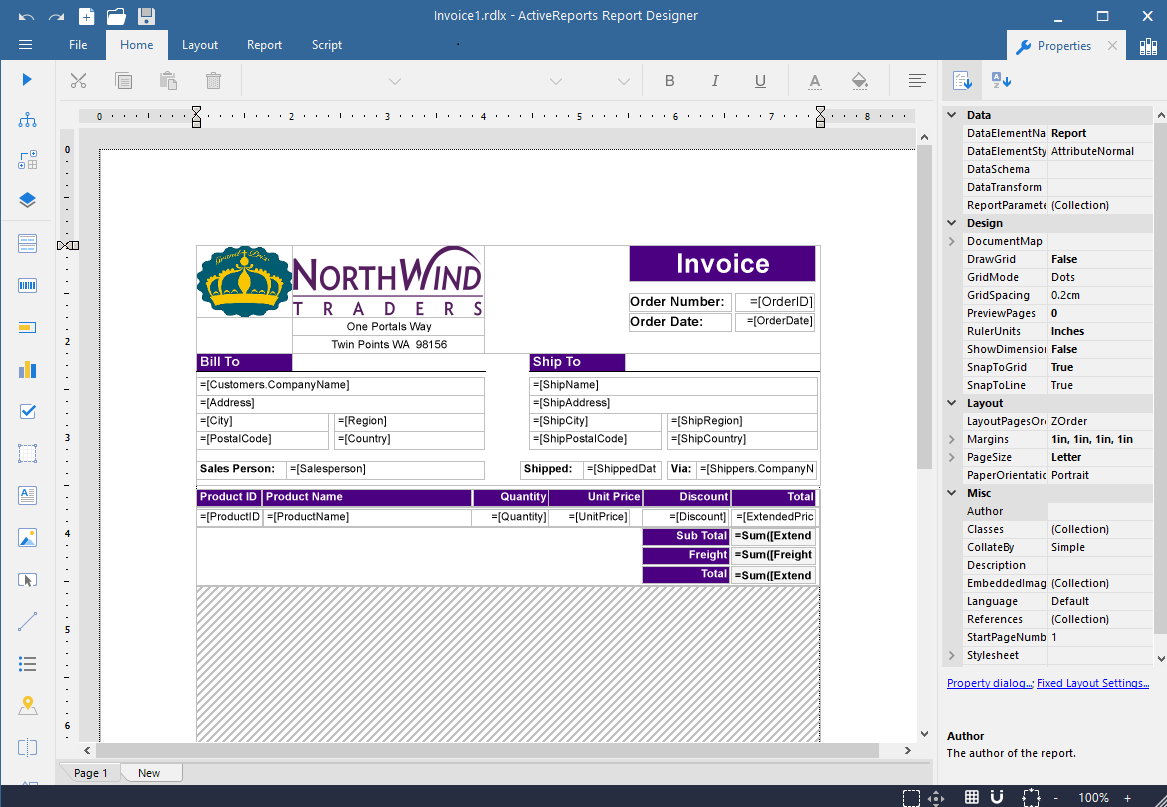
In a Page report (.rdlx) layout, you can create very specific styles of reports that are very difficult, if not impossible, in other .NET reporting tools. You design this type of report on a page where none of the report controls can grow or shrink at run time, making it ideal for duplicating legacy paper forms. This report type is great for billing statements, mail merge, catalogs, forms, and other reports with layout constrictions.
Page report controls do not change in size based on the data, but you can use an Overflow Place Holder to handle any extra data.
With Page reports, there is no need to use code or add measurements to make sure that everything fits. Unlike the RDLX report, the controls remain fixed at run time, so you can drop a table on the report, set a property to size it exactly how you want it, and have something very close to a WYSIWYG report at design time.
Key Features
Grouping
You can set page level grouping to render one row of data on each page. This is ideal for something like a tax form that you want to print for every client or every employee, or an invoice that you want to print for every customer.
OverflowPlaceholder
If there is data that does not fit within the space allocated for the data region at design time, you can assign it to flow into an OverflowPlaceholder control. This can go on the same page in a different area, for example, in the form of columns, or it can go on a separate page.
Themes
You can add multiple themes to a report. In this case, the report renders a combination of multiple outputs for each theme. For example, if a report has two themes, then the report output includes a combination of the first and the second themes, applied to each report page. You can control the combination rules of the report output in the CollateBy property.
Fixed Page Dialog

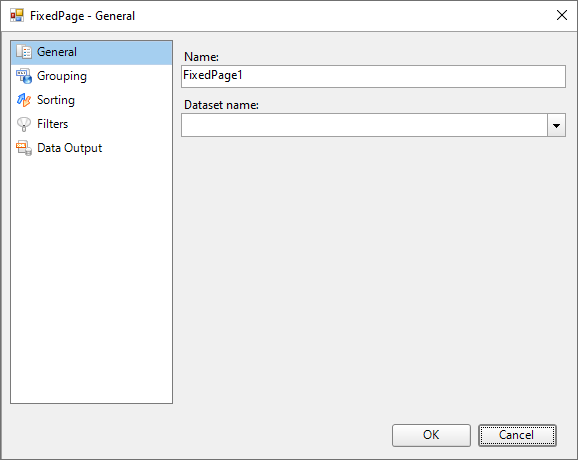
In a Page Report, you can set the basic properties for your page from the FixedPage dialog. You can access the FixedPage dialog by doing one of the following:
- Right-click the gray area outside the design surface and from the context menu that appears, select Fixed Layout Settings.
- Click the gray area outside the design surface to select the Report and in the commands section at the bottom of the Properties Panel, click the Fixed Layout Settings command.
- Click the design surface to select the Page and in the Commands section at the bottom of the Properties Panel, click the Property dialog command.
- In the Report Explorer, select the Report node or the page node and in the commands section at the bottom of the Properties Panel, click the Fixed Layout Settings or Property dialog command respectively.
General
The General page of the FixedPage dialog allows you to control the following properties:
- Name: Enter a name for the Page Report. This name is used to call the page in code so it should be unique within the report.
- Dataset name: Select a dataset to associate with the Page Report. The dropdown list is automatically populated with all the datasets in the report's dataset collection.
Grouping
The Grouping page is useful when you want to show data grouped on a field or an expression on report's pages. See Group Data for more information.
The Grouping page contains following tabs which provide access to various grouping properties:
General
- Name: Enter a name for the Fixed Layout group that is unique within the report. This property cannot be set until after a Group on expression is supplied. A name is created automatically if you do not enter one.
- Group On: Enter an expression to use for grouping the data.
- Document map label: Enter an expression to use as a label to represent this item in the table of contents (document map).
Filters
The Filters tab allows you to add and control the Filter collection for the Fixed Layout Group. Use the + button to add a filter and the X button to delete a filter. You need to provide three values to add a new filter to the collection:
- Expression: Enter the expression to use for evaluating whether data should be included in the group.
- Operator: Select from the following operators to decide how to compare the expression to the left with the value to the right:
- Equal Only choose data for which the value on the left is equal to the value on the right.
- Like Only choose data for which the value on the left is similar to the value on the right. For more information on using the Like operator, see the MSDN Web site.
- NotEqual Only choose data for which the value on the left is not equal to the value on the right.
- GreaterThan Only choose data for which the value on the left is greater than the value on the right.
- GreaterThanOrEqual Only choose data for which the value on the left is greater than or equal to the value on the right.
- LessThan Only choose data for which the value on the left is less than the value on the right.
- LessThanOrEqual Only choose data for which the value on the left is less than or equal to the value on the right.
- TopN Only choose items from the value on the left which are the top number specified in the value on the right.
- BottomN Only choose items from the value on the left which are the bottom number specified in the value on the right.
- TopPercent Only choose items from the value on the left which are the top percent specified in the value on the right.
- BottomPercent Only choose items from the value on the left which are the bottom percent specified in the value on the right.
- In Only choose items from the value on the left which are in the array of values specified on the right. Selecting this operator enables the Values list at the bottom.
- Between Only choose items from the value on the left which fall between the pair of values you specify on the right. Selecting this operator enables two Value boxes instead of one.
- Value: Enter a value to compare with the expression on the left based on the selected operator. For multiple values used with the Between operator, the lower two value boxes are enabled.
- Values: When you choose the In operator, you can enter as many values as you need in this list.
Data Output
The Data Output tab allows you to control the following properties when you export to XML:
- Element name: Enter a name to be used in the XML output for this group.
- Collection: Enter a name to be used in the XML output for the collection of all instances of this group.
- Output: Choose Yes or No to decide whether to include this group in the XML output.
Layout
Has own page numbering: Check this box to enable section page numbering like Page N of M (Section). See Add Page Numbering for further information on setting page numbering in Page Report.
Sorting
The Sorting page of the FixedPage dialog allows you to enter sort expressions for sorting data alphabetically or numerically.
Expression: Enter an expression by which to sort the data.
Direction: Select whether you want to sort the data in an Ascending or Descending order.
Filters
The Filters page of the FixedPage dialog allows you to control the Filter collection for the Fixed Layout. Use the + button to add filters and X buttons to delete them. You need to provide three values to add a new filter to the collection:
Expression: Enter the expression to use for evaluating whether data should be included in the Fixed Layout.
Operator: Select from the following operators to decide how to compare the expression to the left with the value to the right:
- Equal Only choose data for which the value on the left is equal to the value on the right.
- Like Only choose data for which the value on the left is similar to the value on the right. For more information on using the Like operator, see the MSDN Web site.
- NotEqual Only choose data for which the value on the left is not equal to the value on the right.
- GreaterThan Only choose data for which the value on the left is greater than the value on the right.
- GreaterThanOrEqual Only choose data for which the value on the left is greater than or equal to the value on the right.
- LessThan Only choose data for which the value on the left is less than the value on the right.
- LessThanOrEqual Only choose data for which the value on the left is less than or equal to the value on the right.
- TopN Only choose items from the value on the left which are the top number specified in the value on the right.
- BottomN Only choose items from the value on the left which are the bottom number specified in the value on the right.
- TopPercent Only choose items from the value on the left which are the top percent specified in the value on the right.
- BottomPercent Only choose items from the value on the left which are the bottom percent specified in the value on the right.
- In Only choose items from the value on the left which are in the array of values specified on the right. Selecting this operator enables the Values list at the bottom.
- Between Only choose items from the value on the left which fall between the pair of values you specify on the right. Selecting this operator enables two Value boxes instead of one.
Value: Enter a value to compare with the expression on the left based on the selected operator. For multiple values used with the Between operator, the lower two value boxes are enabled.
Values: When you choose the In operator, you can enter as many values as you need in this list.
Data Output
The Data Output page of the FixedPage dialog allows you to control the following properties when you export to XML:
- Element name: Enter a name to be used in the XML output for the Page Report.
- Output: Choose Auto, Yes, or No to decide whether to include the Page Report in the XML output. Choosing Auto exports the contents of the fixed layout.


