- Introduction
- Report Readers
-
Report Authors
- Standalone Designer
- WebDesigner
- Report Types
- Report Controls
- Report Wizard
- Data Binding
-
Design Reports
-
Design Page/RDLX Reports
- Layout
- Report Dialog
- Master Report (RDLX Report)
- Layers
- Expressions
- Data Visualizers
- Filters
- Groups
- Interactivity
- Scripts
- Report Appearance
-
Tutorials: Report Controls in Page/RDLX Reports
- TableofContent Control for Navigation
- BandedList Data Region for Free-form Bands
- Bullet Control to Visualize Sales against Target
- CheckBox Control
- OverflowPlaceholder Control for Columnar Reports
- InputField Control for Editable PDFs
- Line Control for Freehand Forms
- List Control for Hierarchical Relationships
- Table Data Region for a Tabular Report
- Shape Control for Enhanced Report Appearance
- Image Control
- Container Control for Enhanced Report Appearance
- FormattedText Control for Mail Merge
- Subreport Control for a Master-Detail Report
- Sparkline Control
- Tablix Data Region
- TextBox Control
- Map Data Region
- Tutorials: Page/RDLX Report Scenarios
- Design Section Reports
-
Design Page/RDLX Reports
- DevOps
- Developers
- Samples
- Troubleshooting
Map Data Region
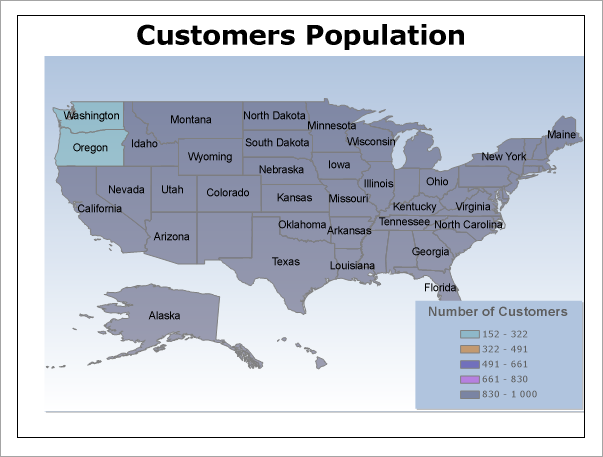
You can create a Page report that contains a map using the ActiveReports Map data region. The Map data region shows your data on a geographical background. This walkthrough illustrates how to create a report that uses a Map to display data.
The final report will be as shown.

Create a Report
In the ActiveReports Designer, create a new Page report.
Bind Report to Data
As you create a new report, you can configure the report data connection in the Report Wizard. You can also access the Report Data Source dialog by right-clicking the Data Sources node in the Report Explorer and then selecting the Add Data Source option. See SQLite for details.
On the Choose Data Source Type screen of the wizard, select SQLite and click Next.
To specify the DataBase Path, click the Browse button and navigate to the desired file on your system. For example, you can connect to the Reels.db sample data source which can be downloaded from GitHub.
Click Test Connection to test the connection.
Then click the Next option and configure the dataset by adding a valid query.
Enter Customers into the Name and an SQL query like the following into the text box:
SELECT Address.Region, Customer.CustomerID FROM (Address INNER JOIN Person ON Address.[AddressID] = Person.[AddressID]) INNER JOIN Customer ON Person.[PersonID] = Customer.[PersonID];Click Finish to successfully add the report with the SQLite data source.
Design Report
Drag and drop the Map data region on the design area.
In the Select a Map Template wizard that appears, select the USA Map template.
Click the Map to have the map panes appear.
In the layers pane, right-click PolygonLayer1 and select Layer Data to open Map Layer Data Properties dialog.
In the Map Layer Data Properties dialog that appears, go to the Analytical data page.
Select Customers from the Dataset property combo box and then click the Add (+) button located next to the Match label. This creates an empty match item and enables its Spatial and Analytical fields editor.
type=note
Note: It is necessary to set match fields if you want to use a spatial data field from analytical data, or if you want to visualize analytical data on the map layer. Match fields enable the report processor to build a relationship between the analytical data and the spatial data.
In the Spatial field property, select STATE_ABBR from the combo box; and similarly, select =Fields!Region.Value in the Analytical field property. This builds the match field expression and relates the analytical data to map elements on a polygon layer.
Click OK to close the dialog.
Configure the appearance of the Map
In the layers pane, right-click PolygonLayer1 and select Edit to open Map Polygon Layer dialog.
In the General page of the dialog, select #STATE_NAME from the Label Text combo box to display as a label inside polygons at run time.
Go to the Color Rule page of the dialog, and select Visualize data by using color palette option. This activates the tabs below.
On the General tab, enter the following expression =Count([CustomerID]) in the Data field property and set Palette property to SemiTransparent.
On the Distribution tab, set the Method property to EqualInterval.
On the Legends tab, click to select Show in legend.
In Legend name, select 'Legend'. This name relates to the default legend that appears in the Legend collection.
Click OK to close the dialog.
On the design surface, click the Map control to select it and go to the Properties Panel to set the following properties:
- BackgroundColor: White * BackgroundGradientEndColor: White * BorderStyle: Solid * ColorScale > Hidden: True * DistanceScale > Hidden: True * Size: 6.5in, 4.75in * ViewPort > BackgroundColor: LightSteelBlue * ViewPort > BackgroundGradientEndColor: White * ViewPort > BorderStyle: None * ViewPort > CoordinateSystem: Planar * ViewPort > Meridians > Hidden: True * ViewPort > Parallels > Hidden: True * ViewPort > View > Zoom: 115
- With the Map control selected, go to the Properties window, click the Legends (Collection) property and then click the ellipsis button that appears.
- In the LegendDesigner Collection Editor that appears, under the Members list, select the existing legend and set the following properties.
- BackgroundColor: LightSteelBlue * BackgroundGradientEndColor: White * Location > DockOutsideViewport: False * Location > DockPosition: RightBottom * Title > (Caption): Number of Customers
- Click OK to close the dialog.
- With the Map control selected, go to the Properties window, click the Titles (Collection) property and then click the ellipsis button that appears.
- In the MapTitleDesigner Collection Editor that appears, with Title selected in the Members list set the following properties.
- (Text): Customers Population * Color: Black
- Click OK to close the dialog.
- Preview the report.


