Creating Radial Menus
Using the C1RadialMenu control, you can create both top-level menus and submenus. Creating either type of menu is easy with C1RadialMenu:
Top-Level Menus
Complete the following steps to create a top-level menu:
Place the following XAML between the <Grid> and </Grid> tags:
<Xaml:C1ContextMenuService.ContextMenu>
     <Xaml:C1RadialMenu >
    </Xaml:C1RadialMenu>
</Xaml:C1ContextMenuService.ContextMenu>
The C1RadialMenu control is within a ContextMenuService. When you run your application, the menu will appear when you right-click or right-tap.
Place the following XAML between the <Xaml:C1RadialMenu> and </Xaml:C1RadialMenu> tags. This will create three top-level menu items:
<Xaml:C1RadialMenuItem Header="RadialMenuItem1" />
<Xaml:C1RadialMenuItem Header="RadialMenuItem2" />
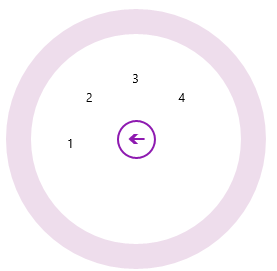
<Xaml:C1RadialMenuItem Header="RadialMenuItem3" />Run the program and observe the following:
Your top-level menu should resemble the following image:
Submenus
Complete the following steps to create a submenu that's attached to one of a C1RadialMenu's items:
Create a C1RadialMenu:
<Xaml:C1ContextMenuService.ContextMenu>
     <Xaml:C1RadialMenu >
    </Xaml:C1RadialMenu>
</Xaml:C1ContextMenuService.ContextMenu>
Place the following XAML between the <Xaml: C1RadialMenu> and </Xaml:C1RadialMenu> tags:
<Xaml:C1RadialMenuItem Header="Tap Here" >
<Xaml:C1RadialMenuItem Header="Item 1" />
<Xaml:C1RadialMenuItem Header="Item 2" />
<Xaml:C1RadialMenuItem Header="Item 3" />
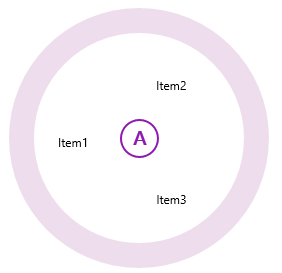
</Xaml:C1RadialMenuItem>Run the program.
This is the C1RadialMenu control after you tap or click the Tap Here item: