- Document Solutions for PDF JS Overview
- Key Features
- Licensing and Redistribution
- Quick Start
- Memory Management
- Features
- Snippet Helpers
- Samples
- API Reference
- Release Notes
Process Image
DsPdfJS provides a set of image processing capabilities that allow you to modify and transform images programmatically. You can resize, crop, rotate, flip, and clear images, as well as combine images and apply compositing and blending operations. These operations are primarily performed using the Bitmap class and its associated drawing context.
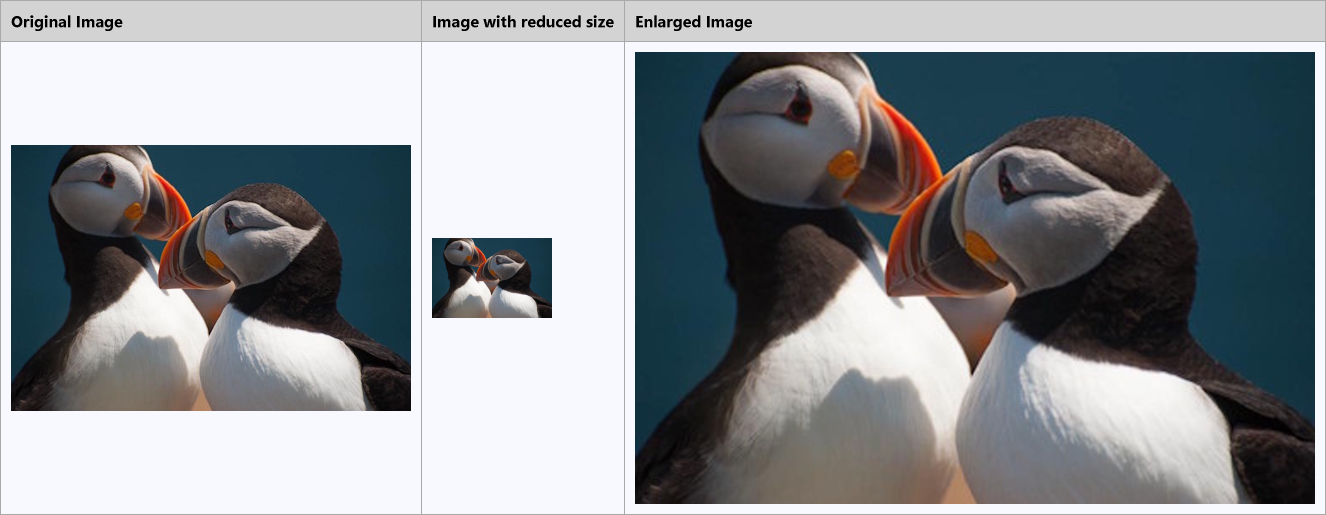
Resize Image
You can resize an image by loading it and converting it to a Bitmap, then calling the resize method with the desired resizing options. The resizing operation returns a new Bitmap instance containing the transformed image.
The scaling behavior can be controlled using the interpolationMode option, which specifies the interpolation mode to use when scaling.
To resize an image:
Load an image using the Image.load method.
Convert the loaded image to a bitmap using toBitmap.
Call the resize method on the Bitmap instance and specify the scaling options such as scale and interpolationMode.
Note: The examples on this page use helper functions from the Snippet Helpers module. These utilities are provided only to simplify the examples and are not part of the DsPdfJS API.
const bmpOrig = Image.load(await Util.loadFile("images/puffins.jpg")).toBitmap();

const bmpSmall = bmpOrig.resize({ scale: 0.3, interpolationMode: InterpolationMode.Downscale });
const bmpLarge = bmpOrig.resize({ scale: 1.7, interpolationMode: InterpolationMode.Cubic });

const bmp = await Util.combineThreeImages(
    bmpOrig, "Original Image",
    bmpSmall, "Image with reduced size",
    bmpLarge, "Enlarged Image"
);

const imgBytes = bmp.saveAsPng();
Util.saveFile("resizeImage.png", imgBytes, 'image/png');
Crop Image
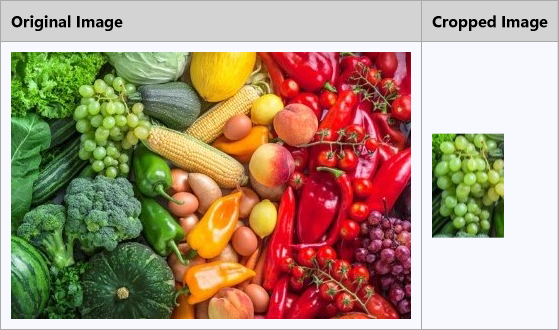
Image cropping is used to remove unwanted areas of an image, adjust its framing, or isolate a specific region. In DsPdfJS, you can crop an image using the clip method of the Bitmap class. This method returns a new Bitmap instance containing the cropped portion of the original image.
To crop an image:
Load an image using the Image.load method.
Convert the loaded image to a bitmap using toBitmap.
Define a rectangle specifying the region to crop.
Call the clip method on the Bitmap instance and pass the rectangle as a parameter.
const origBmp = Image.load(await Util.loadFile("images/color-vegetables.png")).toBitmap();

const clipRec = { x: 60, y: 25, width: 72, height: 104 };
const clipBmp = origBmp.clip(clipRec);

const bmp = await Util.combineTwoImages(
    origBmp, "Original Image",
    clipBmp, "Cropped Image"
);

const imgBytes = bmp.saveAsPng();
Util.saveFile("cropImage.png", imgBytes, 'image/png');
Rotate and Flip Image
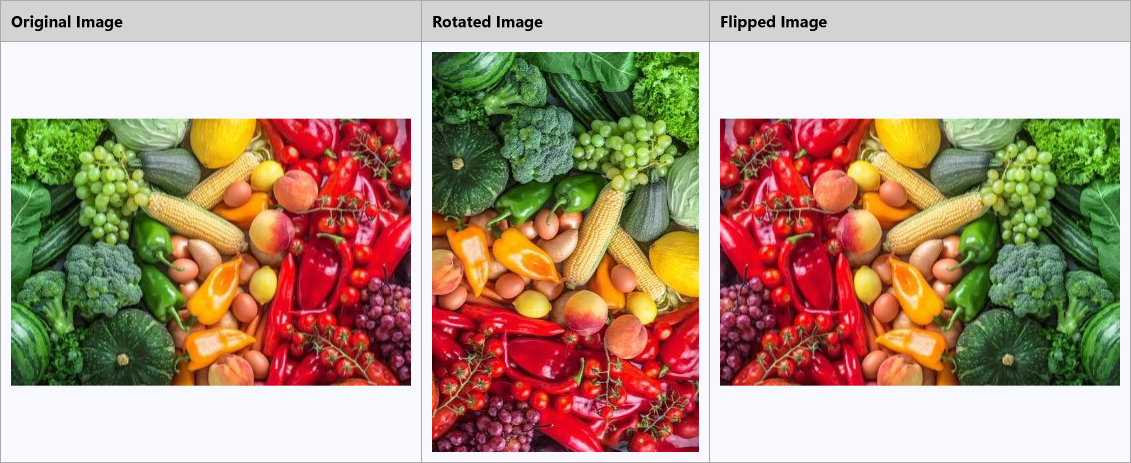
You can rotate or flip an image to change its orientation or create a mirrored version. In DsPdfJS, these operations are performed using the flipRotate method of the Bitmap class.
The flipRotate method applies a rotation or flip transformation to the image and returns a new Bitmap. The original bitmap remains unchanged. The transformation is specified using the FlipRotateAction enumeration, which supports rotation in 90‑degree increments and horizontal or vertical flipping.
Optionally, you can provide a clipping rectangle to apply the transformation only to a specific region of the image.
To rotate or flip an image:
Load an image using the Image.load method.
Convert the loaded image to a bitmap using toBitmap.
Call the flipRotate method on the Bitmap instance and specify the desired FlipRotateAction.
const origBmp = Image.load(await Util.loadFile("images/color-vegetables.png")).toBitmap();

const rotatedBmp = origBmp.flipRotate(FlipRotateAction.Rotate90);
const flippedBmp = origBmp.flipRotate(FlipRotateAction.FlipHorizontal);

const bmp = await Util.combineThreeImages(
    origBmp, "Original Image",
    rotatedBmp, "Rotated Image",
    flippedBmp, "Flipped Image"
);

const imgBytes = bmp.saveAsPng();
Util.saveFile("rotateAndFlip.png", imgBytes, 'image/png');
Clear Image
You can clear an image by filling the entire bitmap or a specific region with a specified color. In DsPdfJS, this operation is performed using the clear method of the Bitmap class.
The clear method fills the bitmap surface with the specified color. Optionally, you can provide a rectangle to clear only a specific region of the image.
To clear an image:
Create a Bitmap instance with the desired width and height.
Call the clear method on the Bitmap instance and specify the fill color.
Save the resulting image.
const bmp = new Bitmap(800, 600);

bmp.clear("LightBlue");

const imgBytes = bmp.saveAsPng();
Util.saveFile("clearImage.png", imgBytes, 'image/png');
Compositing Images
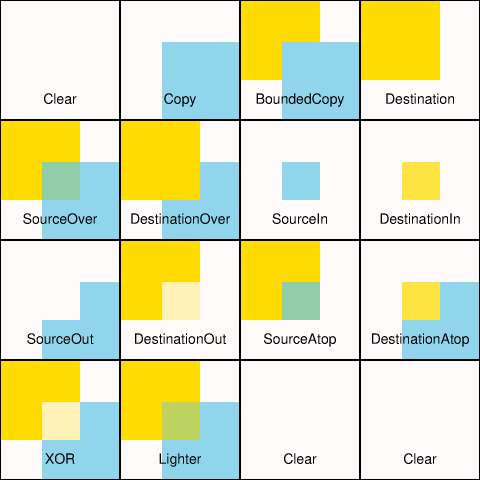
Compositing defines how two images are combined to produce a single result. In DsPdfJS, compositing is performed using the compositeAndBlend method of the Bitmap class.
This method applies the Porter–Duff compositing algorithm to combine a source bitmap with the destination bitmap. The compositing behavior is controlled by the compositeMode option, which determines how the pixels of the source and destination images are combined.
To composite two images:
Load the destination image using Image.load and convert it to a bitmap.
Load the source image and convert it to a bitmap.
Call the compositeAndBlend method on the destination bitmap and specify the compositeMode.
Save the resulting image.
const dst = Image.load(await Util.loadFile("images/flower.jpg")).toBitmap();
const src = Image.load(await Util.loadFile("images/spectrum2.png")).toBitmap();

dst.compositeAndBlend(src, 0, 0, { compositeMode: CompositeMode.SourceOver, blendMode: BlendMode.Color });

const imgBytes = dst.saveAsJpeg();
Util.saveFile("compositeAndBlend.jpeg", imgBytes, 'image/jpeg');
Blend Modes
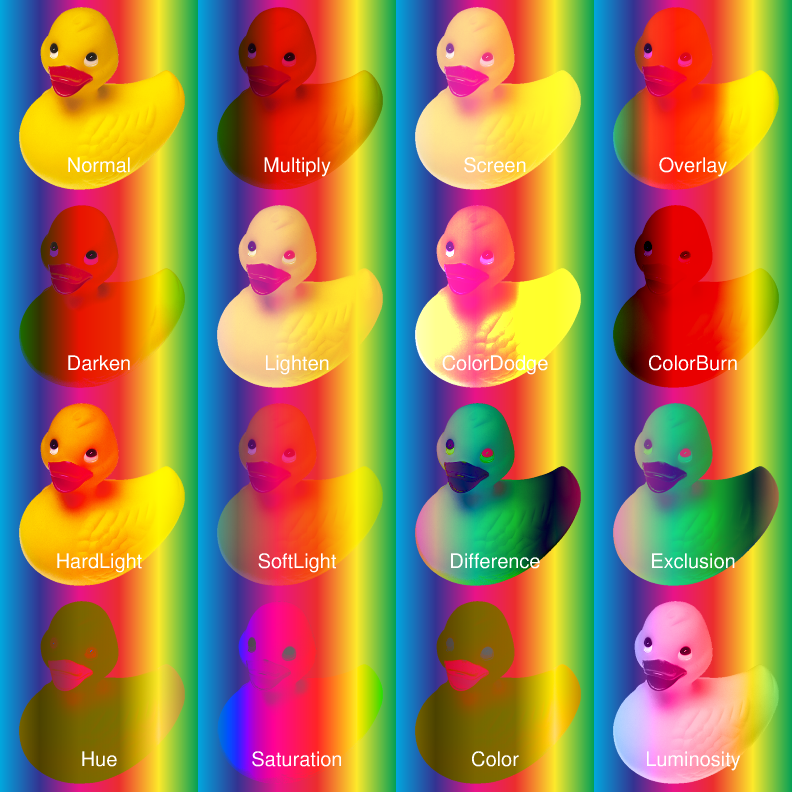
Blend modes determine how the colors of the existing pixels in an image are combined with the colors of shapes, images, or text drawn on top of it. In DsPdfJS, blend modes are specified using the BlendMode enumeration.
You can apply a blend mode by setting the blendMode property of the bitmap drawing context. The selected blend mode affects all subsequent drawing operations until it is changed.
To apply a blend mode when drawing on an image:
Load an image using the Image.load method.
Convert the image to a bitmap using toBitmap.
Obtain the drawing context from the bitmap using the context property.
Set the blendMode property of the context using a value from the BlendMode enumeration.
Draw graphics, text, or images on the bitmap.
const bmp = Image.load(await Util.loadFile("images/spectrum-pastel-500x500.png")).toBitmap();
const ctx = bmp.context;

const w = bmp.width / 2;
const h = bmp.height / 2;

const tf = new Format({
    font: Font.getPdfFont(StandardPdfFont.Helvetica),
    fontSize: 36,
    foreColor: "Gray"
});

const drawText = (x, y, bm) => {
    ctx.blendMode = BlendMode[bm];
    ctx.drawLayout({
        maxWidth: w,
        maxHeight: h,
        textAlignment: TextAlignment.Center,
        paragraphAlignment: ParagraphAlignment.Center,
        defaultFormat: tf,
        runs: [{ text: `This text is drawn using ${bm} blend mode.` }]
    }, x, y);
    ctx.drawRect(x + 2, y + 2, w - 4, h - 4, { lineColor: "Red" });
};

drawText(0, 0, "Multiply");
drawText(w, 0, "Screen");
drawText(0, h, "ColorBurn");
drawText(w, h, "ColorDodge");

const imgBytes = bmp.saveAsJpeg();
Util.saveFile("blendModes.jpeg", imgBytes, 'image/jpeg');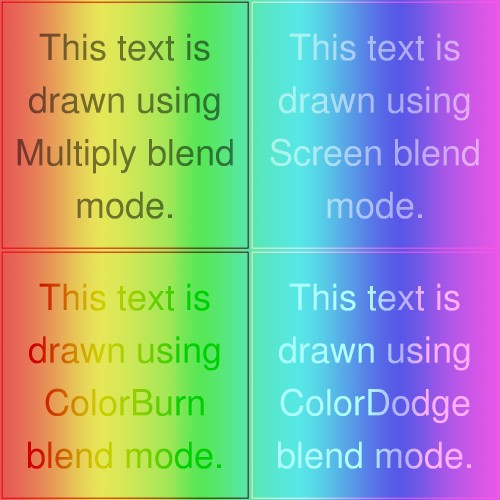
The following image demonstrates additional blend modes by combining two images using different blending methods.