
- Document Solutions for PDF JS Overview
- Key Features
- Licensing and Redistribution
- Quick Start
- Memory Management
- Features
- Snippet Helpers
- Samples
- API Reference
- Release Notes
Transparency Mask
DsPdfJS allows you to control the visibility of parts of an image or drawing operations by using transparency masks. A transparency mask determines which pixels of the target image are affected during drawing or processing. Transparent areas allow drawing to appear normally, while masked areas prevent the underlying pixels from being modified.
Apply Transparency Mask
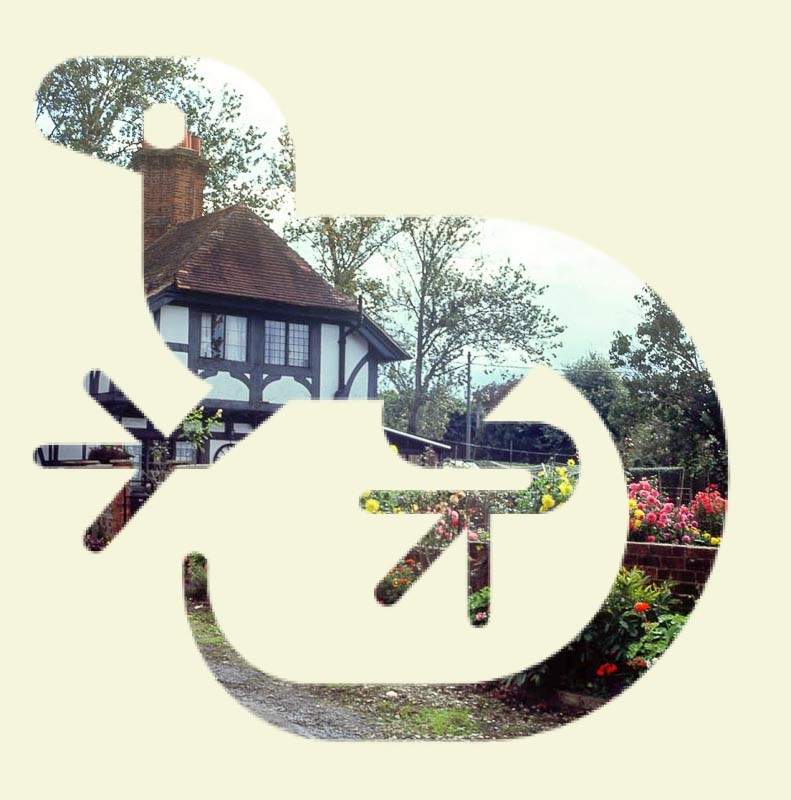
Transparency masks are commonly used to hide specific portions of an image while keeping the rest visible. In DsPdfJS, you can apply a mask directly to an image using the applyGrayscaleTransparencyMask or applyBilevelTransparencyMask methods of the Bitmap class.
A mask is typically created from another image and converted into a GrayscaleBitmap or BilevelBitmap. The mask is then applied to the target bitmap, controlling which pixels are affected.
To apply a transparency mask:
Load the image that will be used as the mask.
Convert the mask image to a grayscale bitmap.
Load the image on which the transparency mask will be applied.
Apply the transparency mask using the applyGrayscaleTransparencyMask or applyBilevelTransparencyMask method.
Optionally convert the result to an opaque image using convertToOpaque if you want to remove transparency.
Note: The examples on this page use helper functions from the Snippet Helpers module. These utilities are provided only to simplify the examples and are not part of the DsPdfJS API.
const mask = Image.load(await Util.loadFile("images/logo.png")).toBitmap();
const target = Image.load(await Util.loadFile("images/tudor.jpg")).toBitmap();

const gsMask = mask.toGrayscaleBitmap(ColorChannel.Blue, true);

target.applyGrayscaleTransparencyMask(gsMask);
target.convertToOpaque("Beige");

const imgBytes = target.saveAsJpeg();
Util.saveFile("applyMask.jpeg", imgBytes, 'image/jpeg');
Use Transparency Mask for Drawing
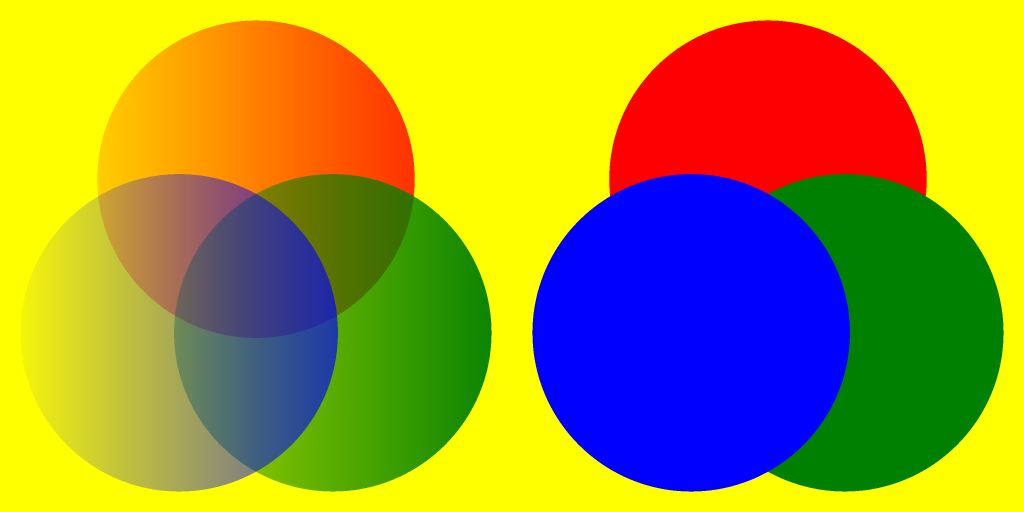
Instead of applying a mask directly to an image, you can assign a transparency mask to a drawing context. When a transparency mask is set on the BmpContext, it affects all subsequent drawing and filling operations.
Pixels in the mask control the transparency of drawing operations:
Pixels with value 0 completely mask drawing, leaving the original image unchanged.
Pixels with value 255 allow drawing to appear normally.
Values between 0 and 255 produce partial transparency.
To use a transparency mask for drawing:
Create or load an image that will serve as the transparency mask.
Convert the mask image to a GrayscaleBitmap.
Assign the mask to the transparencyMask property of the drawing context.
Perform drawing operations on the bitmap.
Reset the transparencyMask property when you no longer need the mask.
Note: The mask bitmap must have the same pixel dimensions as the target bitmap.
const h = 512;
const ctxMask = new BmpContext(h, h);
const grad = new LinearGradientBrush({ startColor: "Black", endColor: "White" });
ctxMask.drawRect(0, 0, ctxMask.width, ctxMask.height, { fillBrush: grad });
const gsb = ctxMask.bitmap.toGrayscaleBitmap();

const bmp = new Bitmap(h + h, h);

const bmpTemp = new Bitmap(h, h);
const ctxTemp = bmpTemp.context;

const fillCircles = () => {
    bmpTemp.clear("Yellow");
    const sz = h * 0.7;
    const d = h / 25;
    const wh = sz - d * 2;
    ctxTemp.drawEllipse((h - sz) / 2 + d, d, wh, wh, { fillColor: "Red" });
    ctxTemp.drawEllipse(h - sz + d, h - sz + d, wh, wh, { fillColor: "Green" });
    ctxTemp.drawEllipse(d, h - sz + d, wh, wh, { fillColor: "Blue" });
};

ctxTemp.transparencyMask = gsb;
fillCircles();
bmp.bitBlt(bmpTemp, 0, 0);

ctxTemp.transparencyMask = null;
fillCircles();
bmp.bitBlt(bmpTemp, h, 0);

const imgBytes = bmp.saveAsPng();
Util.saveFile("gradientMask.png", imgBytes, 'image/png');
Convert Transparent Image to Opaque
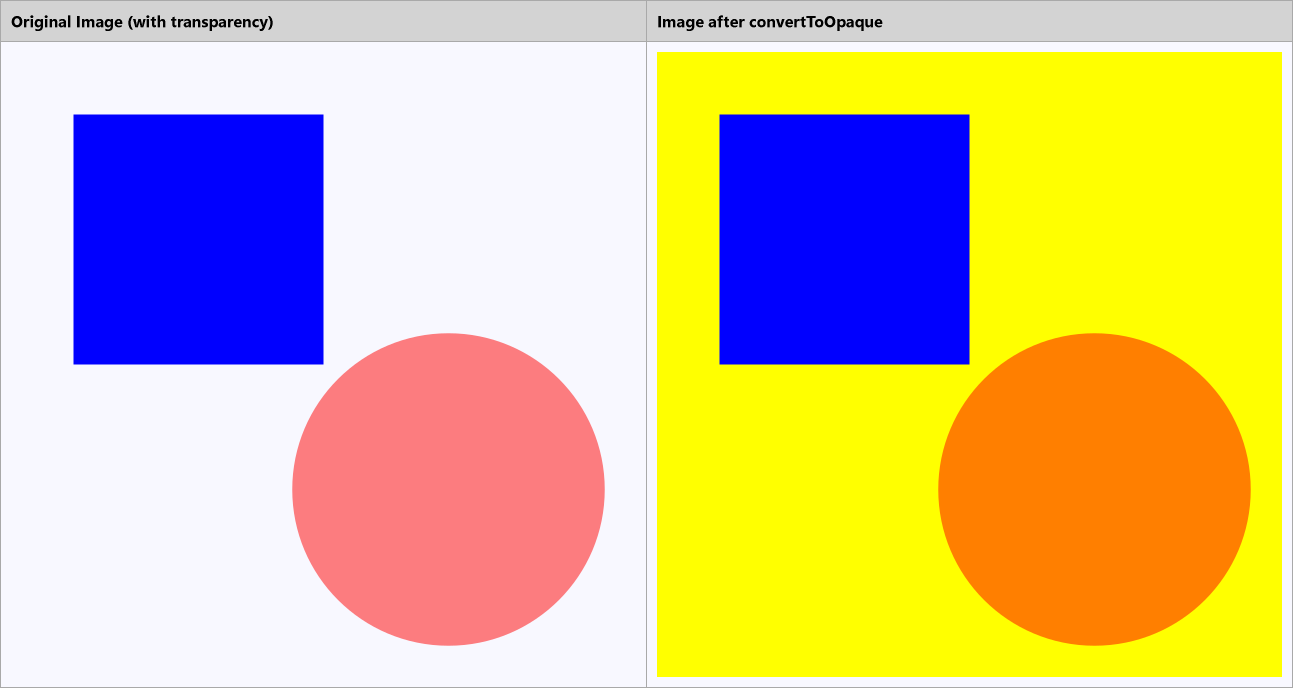
Images may contain transparent or semi‑transparent pixels. In some scenarios, you may want to remove transparency by replacing it with a solid background color. In DsPdfJS, this can be done using the convertToOpaque method of the Bitmap class.
The convertToOpaque method replaces transparent pixels with a specified background color, effectively converting the image to a fully opaque bitmap.
To convert a transparent image to opaque:
Load the image using the Image.load method.
Convert the image to a bitmap using toBitmap.
Call the convertToOpaque method and specify the background color to replace transparent pixels.
Save or display the resulting image.
const img = Image.load(await Util.loadFile("images/demo.png"));
const bmpOriginal = img.toBitmap();

const bmpOpaque = img.toBitmap();
bmpOpaque.convertToOpaque("Yellow");

const result = await Util.combineTwoImages(
    bmpOriginal, "Original Image (with transparency)",
    bmpOpaque, "Image after convertToOpaque"
);

const imgBytes = result.saveAsPng();
Util.saveFile("convertToOpaque.png", imgBytes, "image/png");
Background Bitmaps
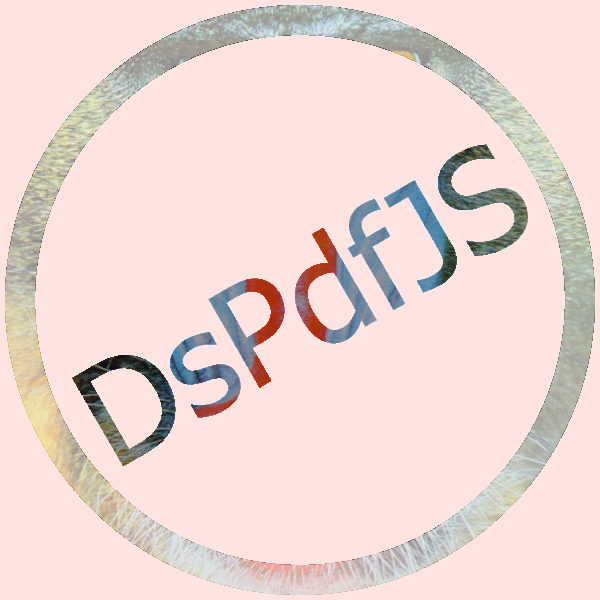
When drawing semi‑transparent shapes or images, the final color of a pixel is normally determined by blending the drawing with the pixels already present in the target bitmap. DsPdfJS allows you to change this behavior by specifying a background bitmap.
The backgroundBitmap property of the drawing context defines an image that will be used as the backdrop when blending semi‑transparent drawing operations. This allows you to control how transparency interacts with the background content.
To use a background bitmap:
Load or create an image that will be used as the background bitmap.
Assign the bitmap to the backgroundBitmap property of the drawing context.
Perform drawing operations such as shapes or text.
Save the resulting image.
Note: The background bitmap must have the same pixel dimensions as the target bitmap.
const w = 600;
const h = 600;
const bkBmp = new Bitmap(w, h);
bkBmp.context.drawImage(img, 0, 0, w, h);

const bmp = new Bitmap(w, h, "MistyRose");
const ctx = bmp.context;

ctx.backgroundBitmap = bkBmp;

ctx.drawEllipse(20, 20, w - 40, h - 40, { lineColor: "rgb(White, 50%)", lineWidth: 30 });

ctx.rotate(-30, AngleUnits.Degrees, w / 2, h / 2);
ctx.drawLayout({
    maxWidth: w,
    maxHeight: h,
    textAlignment: TextAlignment.Center,
    paragraphAlignment: ParagraphAlignment.Center,
    runs: [{
        text: "DsPdfJS",
        font: Font.load(await Util.loadFile("fonts/tahoma.ttf")),
        fontSize: 140,
        foreColor: "rgb(Black, 30%)"
    }]
}, 0, 0);

const imgBytes = bmp.saveAsPng();
Util.saveFile("backgroundBitmap.png", imgBytes, 'image/png');
Advanced Compositing
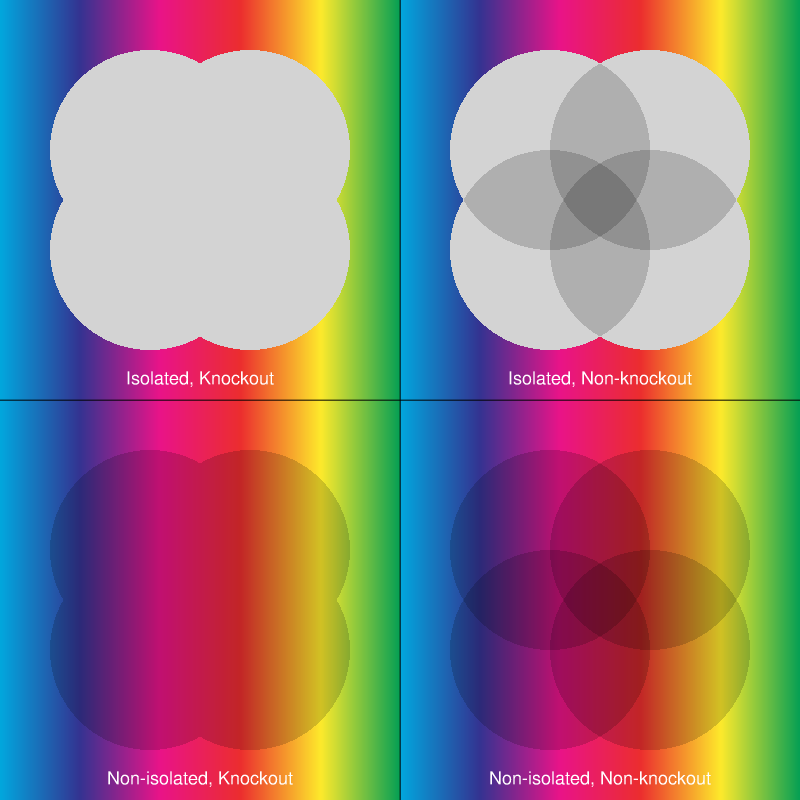
Advanced compositing allows you to control how semi‑transparent graphics interact with existing pixels on an image. In DsPdfJS, this behavior can be controlled using the backgroundBitmap property of the BmpContext class.
When a background bitmap is assigned, drawing operations use the pixels of the background bitmap as the backdrop when blending colors. This allows you to reproduce rendering scenarios such as isolated and knockout groups, concepts defined in the PDF specification for controlling how overlapping graphics interact.
To use a background bitmap for advanced compositing:
Load or create a bitmap that will be used as the drawing backdrop.
Assign the bitmap to the backgroundBitmap property of the drawing context.
Perform drawing operations such as shapes or text.
Save the resulting image.
Note: The background bitmap must have the same pixel dimensions as the target bitmap, and the same bitmap cannot be used as both the background and the drawing target.
The following code example demonstrates how different combinations of isolated and knockout rendering affect overlapping graphics.
const img = Image.load(await Util.loadFile("images/spectrum.png"));
const bmp0 = img.toBitmap();
img.free();
const bmp1 = bmp0.resize({ width: 400, height: 400 });
bmp0.free();

const bmpBackdrop = new Bitmap(400, 400);
const gB = bmpBackdrop.context;
gB.aliased = true;
gB.blendMode = BlendMode.Multiply;

const bmpInitial = new Bitmap(400, 400);
const gI = bmpInitial.context;
gI.aliased = true;
gI.blendMode = BlendMode.Multiply;

const bmp2 = new Bitmap(400 * 2, 400 * 2);
const rect1 = { x: 50, y: 50, width: 200, height: 200 };
const rect2 = { x: 150, y: 50, width: 200, height: 200 };
const rect3 = { x: 50, y: 150, width: 200, height: 200 };
const rect4 = { x: 150, y: 150, width: 200, height: 200 };

// Isolated, Knockout
bmpBackdrop.bitBlt(bmp1, 0, 0);
bmpInitial.clear("Transparent");
gB.backgroundBitmap = bmpInitial;
gB.drawEllipse(rect1, { fillColor: "LightGray" });
gB.drawEllipse(rect2, { fillColor: "LightGray" });
gB.drawEllipse(rect3, { fillColor: "LightGray" });
gB.drawEllipse(rect4, { fillColor: "LightGray" });
bmp2.bitBlt(bmpBackdrop, 0, 0);

// Isolated, Non-knockout
gI.drawEllipse(rect1, { fillColor: "LightGray" });
gI.drawEllipse(rect2, { fillColor: "LightGray" });
gI.drawEllipse(rect3, { fillColor: "LightGray" });
gI.drawEllipse(rect4, { fillColor: "LightGray" });
bmpBackdrop.bitBlt(bmp1, 0, 0);
bmpBackdrop.alphaBlend(bmpInitial, 0, 0);
bmp2.bitBlt(bmpBackdrop, 400, 0);

// Non-isolated, Knockout
bmpBackdrop.bitBlt(bmp1, 0, 0);
bmpInitial.bitBlt(bmp1, 0, 0);
gB.drawEllipse(rect1, { fillColor: "LightGray" });
gB.drawEllipse(rect2, { fillColor: "LightGray" });
gB.drawEllipse(rect3, { fillColor: "LightGray" });
gB.drawEllipse(rect4, { fillColor: "LightGray" });
bmp2.bitBlt(bmpBackdrop, 0, 400);

// Non-isolated, Non-knockout
bmpBackdrop.bitBlt(bmp1, 0, 0);
gB.backgroundBitmap = null;
gB.drawEllipse(rect1, { fillColor: "LightGray" });
gB.drawEllipse(rect2, { fillColor: "LightGray" });
gB.drawEllipse(rect3, { fillColor: "LightGray" });
gB.drawEllipse(rect4, { fillColor: "LightGray" });
bmp2.bitBlt(bmpBackdrop, 400, 400);

const ctx = bmp2.context;
ctx.drawLine(0, 400, 800, 400, { color: "Black" });
ctx.drawLine(400, 0, 400, 800, { color: "Black" });
const h = 35;
const tl = new Layout({
    maxWidth: 400,
    maxHeight: h,
    textAlignment: TextAlignment.Center,
    defaultFormat: new Format({
        font: Font.getPdfFont(StandardPdfFont.Helvetica),
        foreColor: "White",
        fontSize: 18
    })
});
ctx.drawLayout(new Layout(tl, { runs: [{ text: "Isolated, Knockout" }] }), 0, 400 - h);
ctx.drawLayout(new Layout(tl, { runs: [{ text: "Isolated, Non-knockout" }] }), 400, 400 - h);
ctx.drawLayout(new Layout(tl, { runs: [{ text: "Non-isolated, Knockout" }] }), 0, 800 - h);
ctx.drawLayout(new Layout(tl, { runs: [{ text: "Non-isolated, Non-knockout" }] }), 400, 800 - h);

const imgBytes = bmp2.saveAsPng();
Util.saveFile("isolatedKnockout.png", imgBytes, 'image/png');