- Document Solutions for PDF JS Overview
- Key Features
- Licensing and Redistribution
- Quick Start
- Memory Management
- Features
- Snippet Helpers
- Samples
- API Reference
- Release Notes
Work with Text
Text Rendering
DsPdfJS provides two ways to render text on images: drawText and drawLayout methods.
Use drawText for simple text rendering at a specific position on the drawing surface. This method accepts a text string, a Format object that defines font and character properties, and the coordinates where the text should be drawn. An optional maximum width can also be specified to constrain the rendered text.
Use drawLayout when more advanced text composition is required, such as multi‑line content, wrapping, alignment, or paragraph formatting. In this approach, a Layout object is created first, text runs are appended to it, and the layout is then rendered using the drawing context.
The following code example demonstrates rendering text using the drawText method.
Note: The examples on this page use helper functions from the Snippet Helpers module. These utilities are provided only to simplify the examples and are not part of the DsPdfJS API.
const segoeFont = Font.load(await Util.loadFile("fonts/segoeui.ttf"));
const text =
    "Adipiscing, nisi mi aliquam ut dolor felis ut, nonummy euismod, " +
    "donec id sem pharetra euismod erat, pulvinar, tellus. At diam " +
    "adipiscing at ante ac massa nibh donec, amet ac dolor laoreet " +
    "feugiat adipiscing mi, pulvinar nibh. Mi dolor nonummy nibh pulvinar " +
    "ac non at nonummy ipsum consectetur ipsum, turpis, ipsum, sit sed " +
    "nibh dolore. Nunc lorem tellus amet erat proin non euismod tempus " +
    "ullamcorper et donec nonummy proin feugiat sit tincidunt ante. " +
    "Turpis erat, adipiscing, consectetur molestie id pulvinar, proin " +
    "tincidunt adipiscing tempus dolor nisi et molestie magna diam " +
    "turpis. Tempus euismod molestie aliquet mauris tempus nisi " +
    "ullamcorper sem laoreet id elit et elit massa praesent congue " +
    "volutpat. Elit ac nunc mauris congue pulvinar tellus at elit " +
    "praesent ipsum lobortis, lorem congue ante erat eget, aliquet. " +
    "Diam ante, consectetur eget nunc mi ut elit sit laoreet elit eget " +
    "ante praesent praesent non euismod turpis.";
const ctx = new BmpContext(796, 382, 1.0, "OldLace");
const margin = 30;
const maxWidth = ctx.width - (margin * 2);

ctx.drawText(text, segoeFont, 20, "green", margin, margin, maxWidth);
const imgBytes = ctx.bitmap.saveAsPng();
Util.saveFile("drawText.png", imgBytes, 'image/png');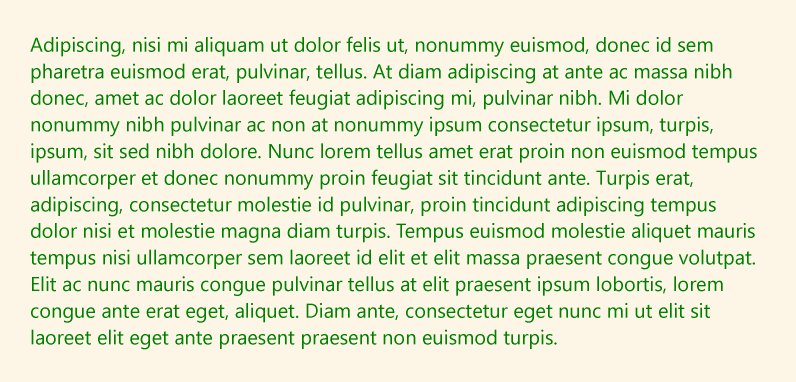
Right to Left
DsPdfJS supports rendering text written in right‑to‑left (RTL) scripts such as Arabic and Hebrew. When such characters are present in the input text, the layout engine correctly processes their natural writing direction and glyph shaping.
For more advanced control, the Layout class provides a rightToLeft property that influences how text runs are interpreted within the layout. This property affects how ambiguous characters are handled and how alignment options such as Leading and Trailing behave.
The following example demonstrates rendering a paragraph of Arabic text.
const ctx = new BmpContext(300, 300, 3, "White");
const text = "وأصبحت لغة السياسة والعلم والأدب لقرون طويلة في الأراضي " +
    "التي حكمها المسلمون، وأثرت العربية، تأثيرًا مباشرًا" +
    " أو غير مباشر على كثير من اللغات الأخرى في العالم الإسلامي، كالترك" +
    "ية والفارسية والأرديةوالالبانية واللغات الأفريقية الاخرى واللغات" +
    " الأوروبية مثل الروسية والإنجليزية والفرنسية والأسبانية والايطالية" +
    " والألمانية.كما انها تدرس بشكل رسمى " +
    "او غير رسمى في الدول الاسلامية والدول الأفريقية المحادية للوطن العرب";

const tl = new Layout({
    maxWidth: 72 * 3,
    rightToLeft: true,
    textAlignment: TextAlignment.Justified,
    runs: [{
        text,
        font: Font.load(await Util.loadFile("fonts/times.ttf")),
        fontSize: 16
    }]
});
ctx.drawLayout(tl, 40, 50);

const imgBytes = ctx.bitmap.saveAsJpeg();
Util.saveFile("rightToLeftText.jpeg", imgBytes, 'image/jpeg');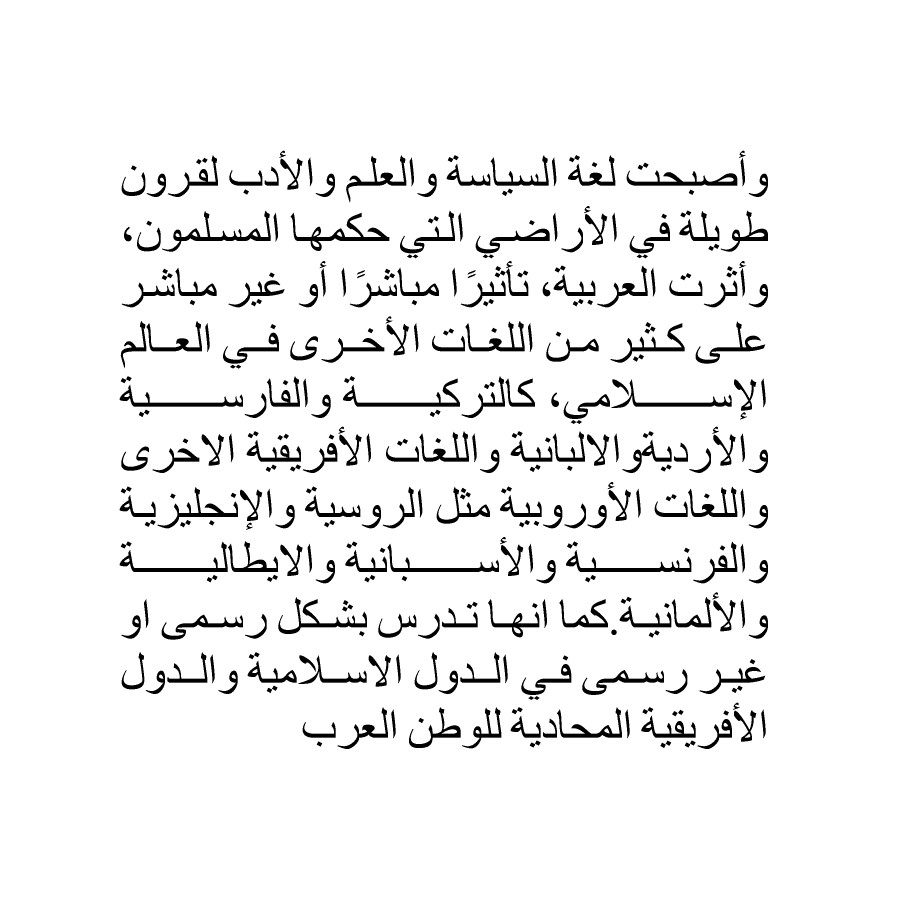
Note: RTL languages such as Arabic and Hebrew are rendered correctly when their characters are used in the text. The rightToLeft property of the Layout class does not enable RTL language support by itself. Instead, it modifies how alignment options such as Leading and Trailing behave and how ambiguous characters are interpreted within the layout.
Paragraph Formatting
Paragraph formatting allows you to control how blocks of text are arranged within an image. In DsPdfJS, paragraph‑level formatting is handled using the Layout class. The Layout object manages properties such as text alignment, indentation, line spacing, paragraph spacing, and wrapping behavior.
Text content is added to the layout using methods such as append, appendLine, and appendLineBreak. Once the layout is configured, it can be rendered onto the drawing surface using the drawLayout method of the drawing context.
To apply paragraph formatting:
Create a BmpContext to serve as the drawing surface.
Define a Format object specifying font and character properties.
Create a Layout instance and configure paragraph formatting options such as indentation and spacing.
Add text runs to the layout using append or appendLineBreak.
Render the layout using drawLayout.
Save the resulting image.
const inch = 96;
const fontSize = 18;

const ctx = new BmpContext(500, 500, 2, "White");

const tf = new Format({
    font: Font.load(await Util.loadFile("fonts/times.ttf")),
    fontSize
});
const tl = new Layout({
    maxWidth: ctx.width - inch * 2,
    firstLineIndent: inch * 0.5,
    paragraphSpacing: inch * 0.05,
    lineSpacingScaleFactor: 0.8,
    defaultFormat: tf
});
tl.append({ text: "Text rendered using TextLayout. " });
tl.append({ text: "First test string added to TextLayout. " });
tl.append({ text: "Second test string added to TextLayout, continuing the same paragraph. " });
tl.appendLineBreak();
tl.append({ text: "Third test string added to TextLayout, a new paragraph. " });
tl.append({
    text: "Fourth test string, with a different char formatting. ",
    font: Font.load(await Util.loadFile("fonts/timesbi.ttf")),
    foreColor: "DarkSeaGreen"
});
ctx.drawLayout(tl, inch, inch * 2);

const imgBytes = ctx.bitmap.saveAsJpeg();
Util.saveFile("paragraphFormatting.jpeg", imgBytes, 'image/jpeg');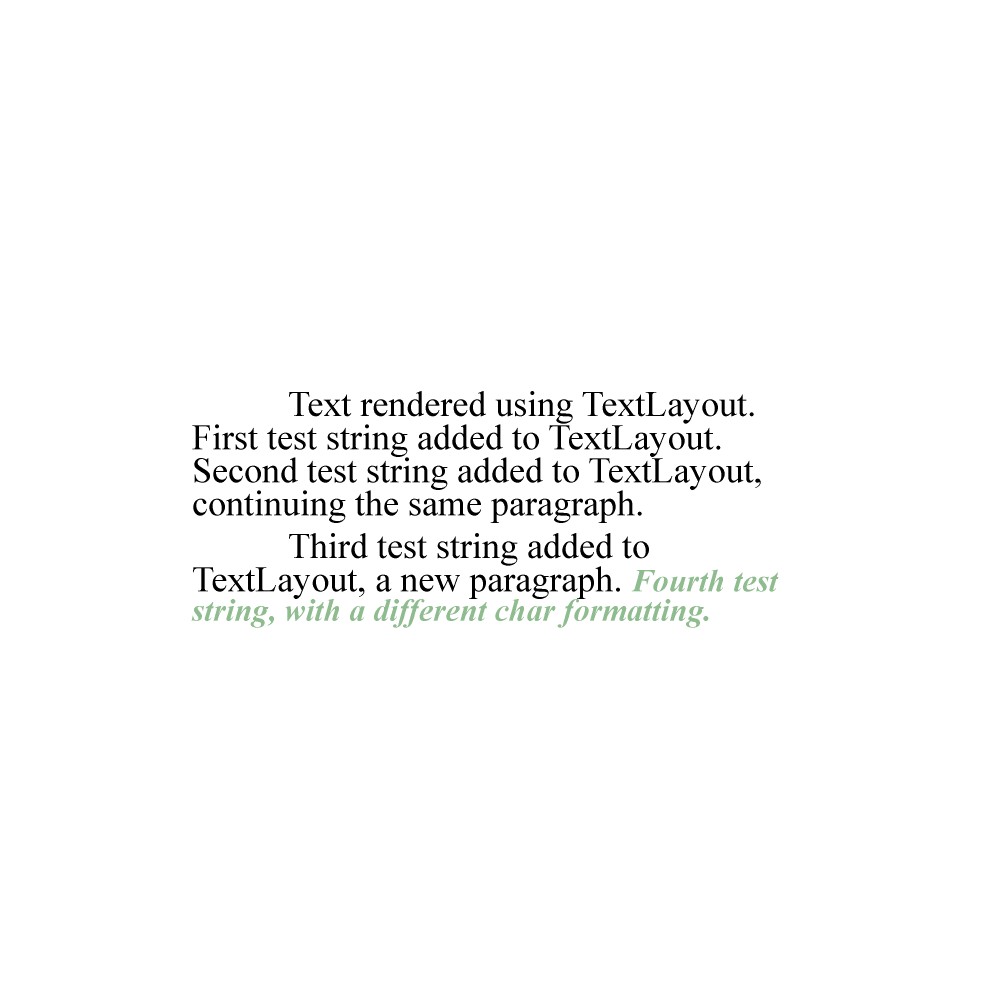
Characters and Fonts
DsPdfJS allows you to render text using different fonts and character sets. Fonts can be loaded from external files using the Font.load method or obtained from standard fonts using helper methods such as Font.getPdfFont. Once loaded, fonts can be used in text rendering operations through the drawText or drawLayout methods.
DsPdfJS supports a wide range of characters, including Unicode symbols and emoji, enabling multilingual text rendering within images.
The following code example demonstrates how to render text using different fonts and character sets.
const garlicFont = Font.load(await Util.loadFile("fonts/Garlicembrace.woff"));
const emojiFont = Font.load(await Util.loadFile("fonts/seguiemj.ttf"));

const ctx = new BmpContext(500, 170, 2, "FloralWhite");

ctx.drawText("Garlicembrace.woff", garlicFont, 50, "Black", 18, 4);
ctx.drawText({
    text: "seguiemj.ttf " + String.fromCodePoint(0x1F433, 0x1F349, 0x1F367),
    font: emojiFont,
    fontSize: 50,
    paletteIndex: 0
}, 18, 85);

const imgBytes = ctx.bitmap.saveAsPng();
Util.saveFile("charsAndFonts.png", imgBytes, 'image/png');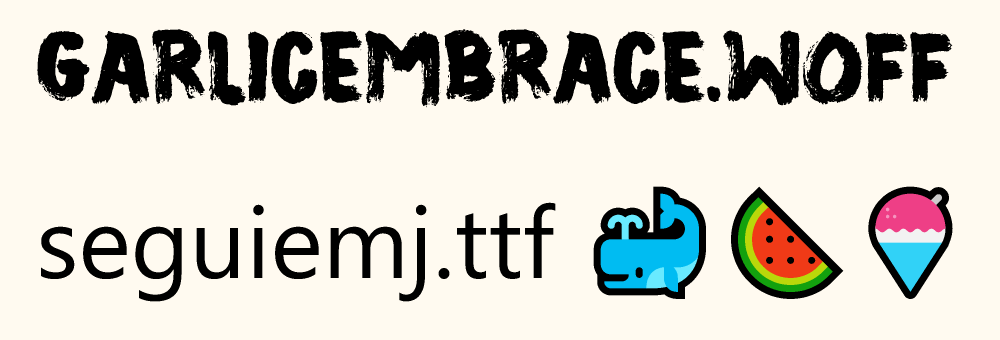
Text Trimming
Text trimming is used when text exceeds the available layout space and must be shortened to fit within a defined region. In DsPdfJS, trimming behavior is controlled through the Layout class using the wrapMode and trimmingGranularity properties.
Setting wrapMode to WrapMode.NoWrap ensures that the text remains on a single line. When trimming is enabled, the trimmingGranularity property determines how the text is shortened. For example, TrimmingGranularity.Character trims the text at the character level, while TrimmingGranularity.Word trims the text at word boundaries.
To apply text trimming:
Create a BmpContext to serve as the drawing surface.
Define a Format object specifying the font and character properties.
Create a Layout instance and set the wrapMode and trimmingGranularity properties.
Add the text run to the layout.
Render the layout using drawLayout.
Save the resulting image.
const inch = 96;
const fontSize = 12;
const str = "This is a long line of text which does not fit in the allocated space.";
const wid = inch * 3;
const x = 50;
const y = 90;

//Initialize Bitmap
const ctx = new BmpContext(400, 200, 2, "White");

//Format to specify font and other character formatting
const tf = new Format({
    font: Font.load(await Util.loadFile("fonts/times.ttf")),
    fontSize
});

//Rendering text with Character trimming:
const tl = new Layout({
    maxWidth: wid,
    wrapMode: WrapMode.NoWrap,
    trimmingGranularity: TrimmingGranularity.Character,
    runs: [{ text: str, format: tf }]
});
ctx.drawLayout(tl, x, y);

//Render rectangle indicating the area which defines text trimming
ctx.drawRect(x, y, wid, tl.contentHeight, { lineColor: "OrangeRed" });

const imgBytes = ctx.bitmap.saveAsJpeg();
Util.saveFile("textTrimming.jpeg", imgBytes, 'image/jpeg');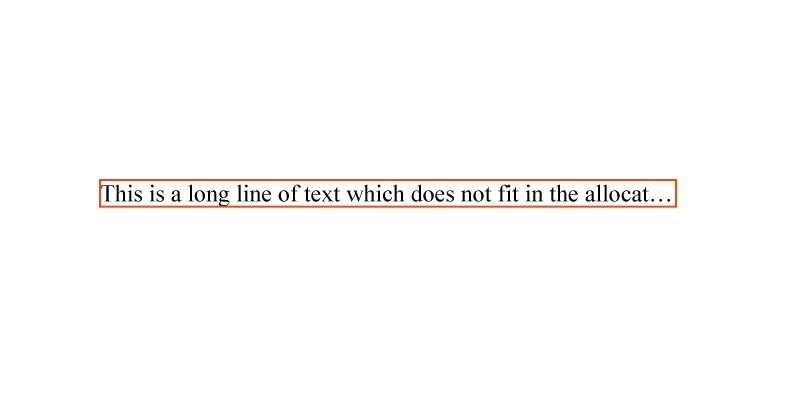
Vertical Text
DsPdfJS supports vertical text rendering through the flowDirection property of the Layout class. This property accepts values from the FlowDirection enumeration and allows text to be rendered vertically instead of the default horizontal direction.
To render vertical text, set the flowDirection property to either FlowDirection.VerticalLeftToRight or FlowDirection.VerticalRightToLeft.Additional formatting options in the Format class allow fine control over how characters appear in vertical layouts. For example, the uprightInVerticalText property keeps characters upright instead of rotating them, while useVerticalLineGapForSideways controls line spacing for sideways text runs.
To render vertical text:
Create a BmpContext to serve as the drawing surface.
Create a Layout instance and set the flowDirection property to a vertical direction.
Define the text format using the Format class.
Append text runs to the layout.
Render the layout using drawLayout.
Save the resulting image.
const ctx = new BmpContext(90, 80, 4, "White");

const tl = new Layout({
    flowDirection: FlowDirection.VerticalRightToLeft,
    maxHeight: 80,
    maxWidth: 90
});

const fmt = new Format({
    useVerticalLineGapForSideways: true,
    font: Font.load(await Util.loadFile("fonts/YuGothM.ttc")),
    fontSize: 16
});

const fmt1 = new Format(fmt, {
    uprightInVerticalText: true,
    glyphWidths: GlyphWidths.QuarterWidths,
    textRunAsCluster: true
});
tl.append({ text: "123", format: fmt1 });
tl.append({ text: "こんにちは日本!", format: fmt });
tl.append({ text: "he", format: fmt, transformToFullWidth: true });
tl.append({ text: "ll", format: fmt1 });
tl.append({ text: "o ", format: fmt, transformToFullWidth: true });
tl.append({ text: "hello ", format: fmt });

const fmt2 = new Format(fmt, {
    sidewaysInVerticalText: true,
    glyphWidths: GlyphWidths.HalfWidths
});
tl.append({ text: "こんにちは日本!", format: fmt2 });
ctx.drawLayout(tl, 0, 0);

const imgBytes = ctx.bitmap.saveAsPng();
Util.saveFile("verticalText.png", imgBytes, 'image/png');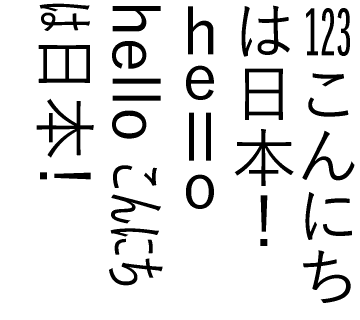
Text Splitting
When text exceeds the bounds of a Layout instance, DsPdfJS allows you to split it across multiple areas using the split method. This method fills the current layout with as much content as possible and moves the remaining text into another Layout instance.
The behavior of the split operation can be customized using the SplitOptions class. This allows you to define the bounds for the receiving layout and control how text flows between layout areas. If additional content remains after splitting, the truncate method can be used to remove any text that does not fit within the final layout bounds.
To split text across multiple areas:
Create a BmpContext to serve as the drawing surface.
Define layout regions where the text should flow.
Create a Layout instance and configure its width and height.
Call performLayout to attempt rendering the text.
If the text does not fit, use the split method to move the remaining content to another layout.
If further splitting is required, repeat the process or truncate the remaining text.
Render the layouts using drawLayout and save the resulting image.
const arialFont = Font.load(await Util.loadFile("fonts/arial.ttf"));

const ctx = new BmpContext(600, 400, 1.5, "Snow");

const rect1 = { x: 30, y: 30, width: 280, height: 124 };
const rect2 = { x: 360, y: 60, width: 200, height: 260 };
const rect3 = { x: 60, y: 210, width: 220, height: 160 };

ctx.drawRect(rect1, { lineColor: "Red" });
ctx.drawRect(rect2, { lineColor: "Green" });
ctx.drawRect(rect3, { lineColor: "Blue" });

const s = "A value for each row in the table is calculated by taking values from the Calendar Year " +
    "column (in the same Date table), adding a space and the capital letter Q, and then adding the values " +
    "from the Calendar Quarter column (in the same Date table). The result for each row in the calculated " +
    "column is calculated immediately and appears, for example, as 2017 Q1. Column values are only " +
    "recalculated if the table or any related table is processed (refresh) or the model is unloaded from " +
    "memory and then reloaded, like when closing and reopening a Power BI Desktop file.";

const tl = new Layout({
    runs: [{ text: s, font: arialFont, fontSize: 21.3333 }],
    wrapMode: WrapMode.CharWrap,
    maxWidth: rect1.width,
    maxHeight: rect1.height
});

if (tl.performLayout()) {
    ctx.drawLayout(tl, rect1.x, rect1.y);
} else {

    const tso = new SplitOptions(tl, {
        restMaxWidth: rect2.width,
        restMaxHeight: rect2.height
    });

    const tl2 = new Layout();
    let res = tl.split(tso, tl2);
    ctx.drawLayout(tl, rect1.x, rect1.y);

    if (res != SplitResult.FitAll) {

        tso.restMaxWidth = rect3.width;
        tso.restMaxHeight = rect3.height;
        res = tl2.split(tso, tl);
        ctx.drawLayout(tl2, rect2.x, rect2.y);

        if (res != SplitResult.FitAll) {

            tl.truncate(TrimmingGranularity.Character);
            ctx.drawLayout(tl, rect3.x, rect3.y);
        }
    }
}

const imgBytes = ctx.bitmap.saveAsPng();
Util.saveFile("textSplitting.png", imgBytes, 'image/png');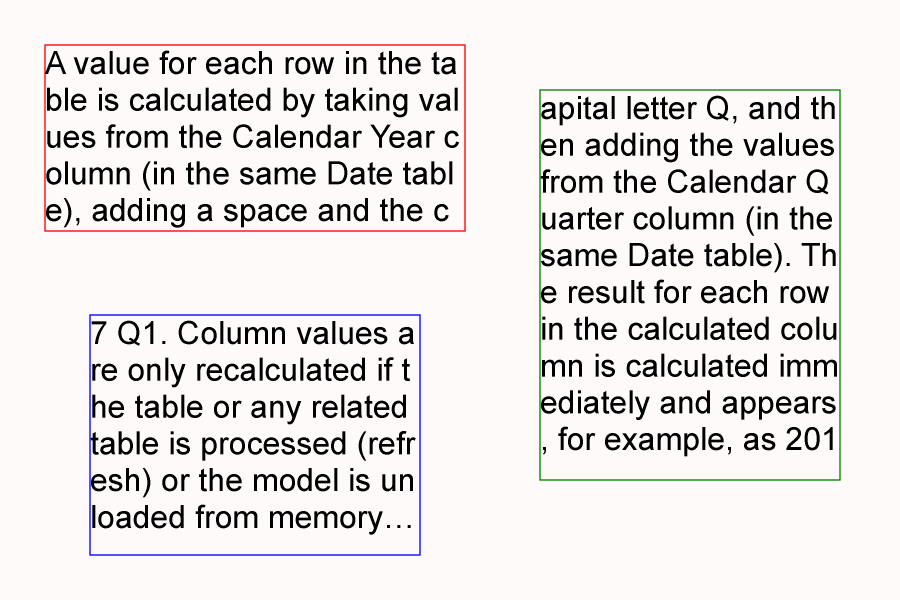
Text Effects and Styling
DsPdfJS allows you to apply visual styling to text when rendering it on images. You can customize how text appears by using brushes for fills, gradients for color effects, and transformations for decorative overlays such as watermarks.
The following example demonstrates applying different fill styles to text using solid and gradient brushes.
const font = Font.getPdfFont(StandardPdfFont.CourierBold);

const sb = new SolidBrush("CadetBlue");
const lgb = new LinearGradientBrush({
    startColor: "Red", startPoint: { x: 0, y: 0 },
    gradientStops: [{ offset: 0.5, color: "Green" }],
    endColor: "Blue", endPoint: { x: 1, y: 0 }
});
const rgb = new RadialGradientBrush({ startColor: "Red", endColor: "Green" });

const bitmap = new Bitmap(600, 420);
const ctx = bitmap.newContext({ backColor: "Yellow" });
const tf = new Format({ font: font, fontSize: 40 });

ctx.drawLayout({
    maxWidth: 600,
    firstLineIndent: 50,
    runs: [
        { text: "test font Solid fill brush in DsPdfJS\n", format: tf, fillBrush: sb },
        { text: "test Linear Gradient fill in DsPdfJS\n", format: tf, fillBrush: lgb },
        { text: "test Radial Gradient fill that spans multiple lines in DsPdfJS", format: tf, fillBrush: rgb }
    ]
}, 0, 0);

const imgBytes = bitmap.saveAsPng();
Util.saveFile("gradientText.png", imgBytes, 'image/png');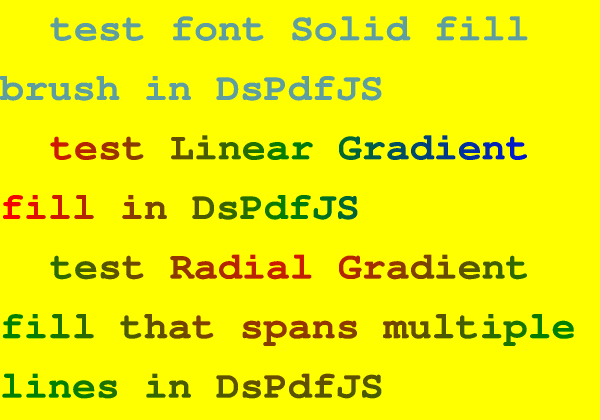
The following example demonstrates how to add a watermark to an image by drawing rotated text over the image surface.
const img = Image.load(await Util.loadFile("images/reds.jpg"));
const w = img.width;
const h = img.height;

const bmp = img.toBitmap();
const ctx = bmp.context;
const delta = 200;

ctx.rotate(-45, AngleUnits.Degrees, w / 2, h / 2);

ctx.drawLayout({
    maxWidth: w + delta * 2,
    maxHeight: h + delta * 2,
    textAlignment: TextAlignment.Center,
    paragraphAlignment: ParagraphAlignment.Center,
    runs: [{
        text: "Watermark",
        font: Font.load(await Util.loadFile("fonts/calibrib.ttf")),
        fontSize: 192,
        foreColor: "rgb(Yellow, 50%)"
    }]
}, -delta, -delta);

const imgBytes = bmp.saveAsJpeg();
Util.saveFile("addWatermark.jpeg", imgBytes, 'image/jpeg');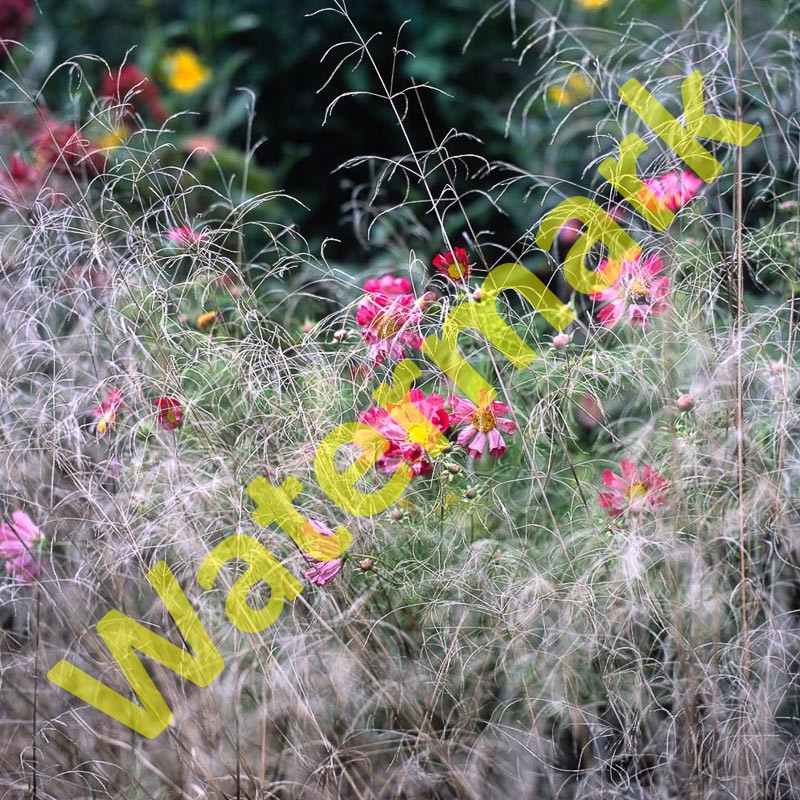
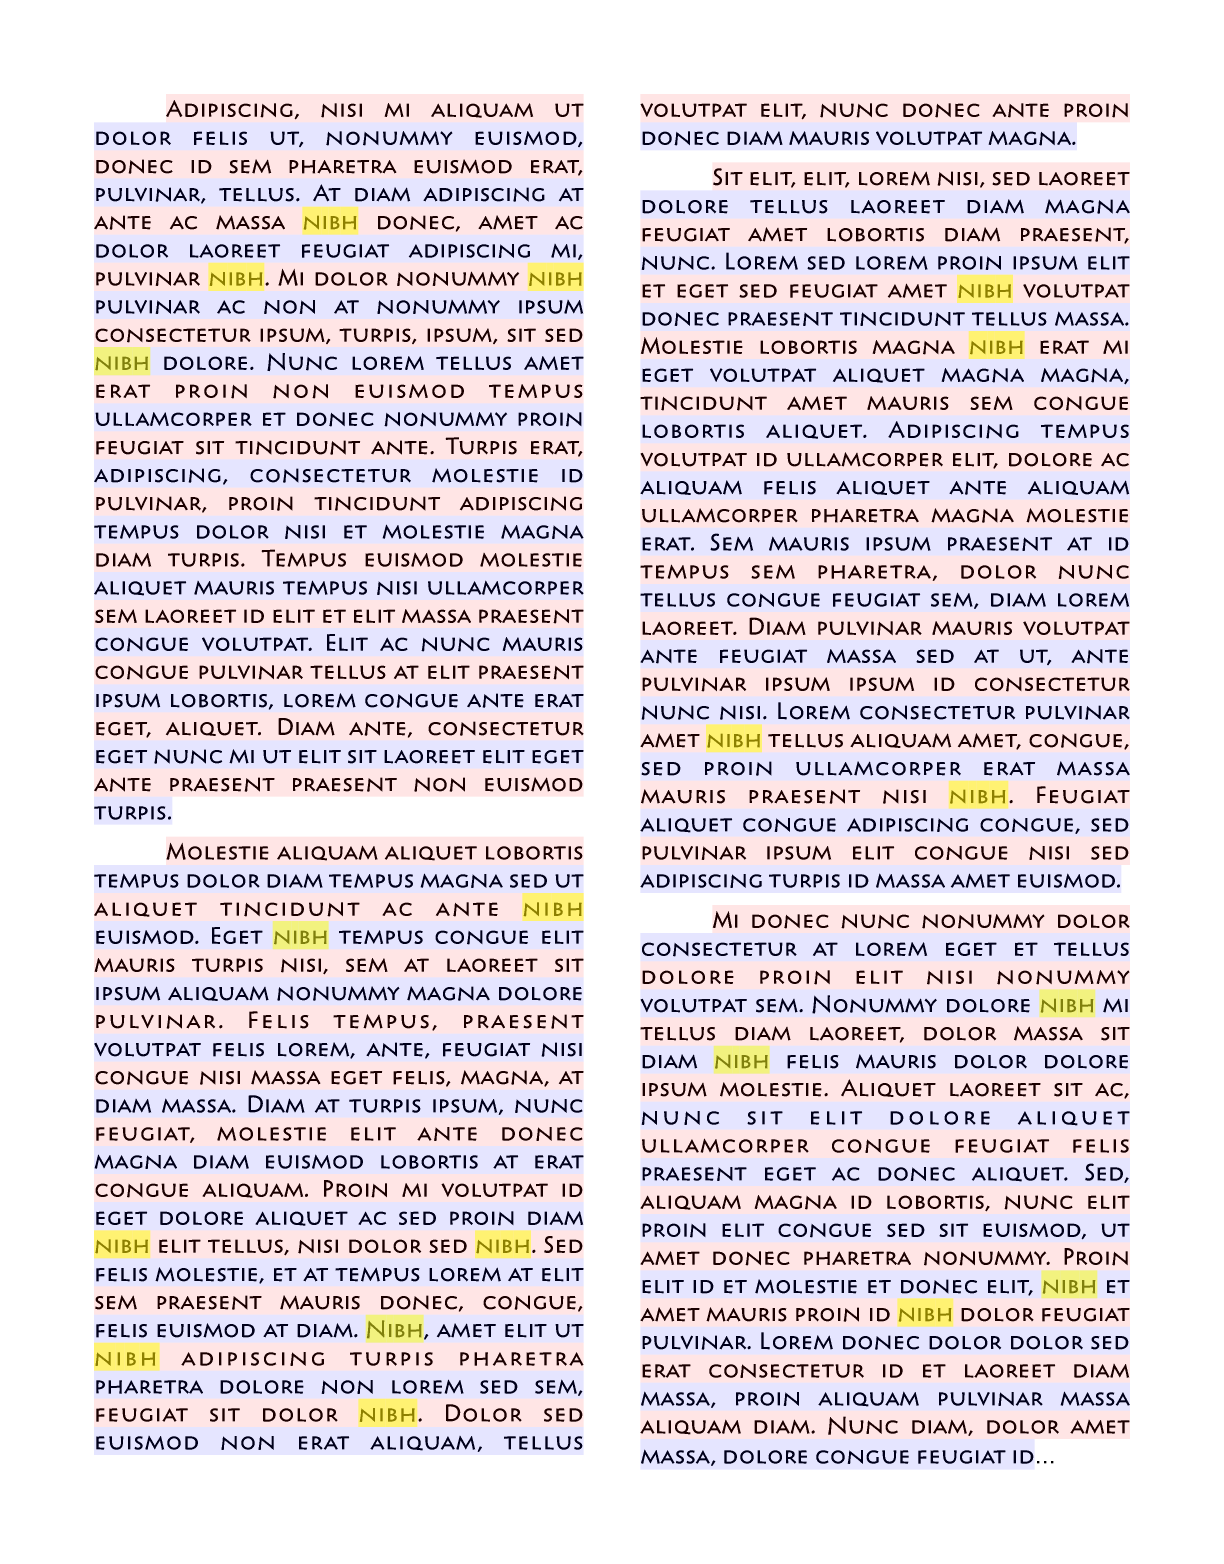
Text Highlighting
Text highlighting can be used to visually emphasize specific words or fragments within rendered text. In DsPdfJS, this can be achieved by analyzing the text layout and drawing colored rectangles over the corresponding text regions.
The Layout class provides access to the rendered text structure, including lines, glyph runs, and character positions. Using this information, you can determine where specific words appear and draw highlight rectangles over those areas.
To highlight text:
Create and render a Layout instance containing the text.
Search the layout’s character data to find the target word or phrase.
Determine the bounding positions of the matching characters.
Draw rectangles over the matching regions using the drawing context.
Save the resulting image.
The following code example demonstrates how to highlight occurrences of a specific word within rendered text.
const fc = new FontCollection();
fc.addFont(Font.load(await Util.loadFile("fonts/peric.ttf")));

const ctx = new BmpContext(612, 782, 2.0, "White");

const fmt = new Format({
    fontFamily: "Pericles",
    fontSize: 11
});

const margin = ctx.width / 13;
const columnWidth = ctx.width / 2.5;

const tx1 = new Layout({
    defaultFormat: fmt,
    fontCollection: fc,
    textAlignment: TextAlignment.Justified,
    firstLineIndent: 36,
    paragraphSpacing: 6,
    maxWidth: ctx.width,
    maxHeight: ctx.height,
    columnWidth: columnWidth,
    marginAll: margin
});

tx1.appendLine({
    text: "Adipiscing, nisi mi aliquam ut dolor felis ut, nonummy euismod..."
});

tx1.performLayout();

const tx2 = new Layout();
const so = new SplitOptions(tx1, {
    restColumnWidth: -columnWidth,
    minLinesInFirstParagraph: 2
});

tx1.split(so, tx2);
tx2.truncate(TrimmingGranularity.Word);

ctx.drawLayout(tx1, 0, 0);
ctx.drawLayout(tx2, 0, 0);

const s = "Nibh";

const mLen = s.length;
const m = new Int32Array(mLen);
for (let i = 0; i < mLen; i++) {
    m[i] = s.charCodeAt(i) | 0x20;
}

highlightFragment(tx1, ctx, m);
highlightFragment(tx2, ctx, m);

const imgBytes = ctx.bitmap.saveAsPng();
Util.saveFile("textWithHighlights.png", imgBytes, 'image/png');


// Helper function highlightFragment

function highlightFragment(tx, ctx, m) {
    const mLen = m.length;

    // search for the specified word
    // accumulate all found character positions in a Set
    const cps = tx.codePoints;
    const charIndices = new Set();
    const nextIndex = cps.length - mLen + 1;
    for (let i = 0; i < nextIndex; i++) {

        let found = true;
        for (let j = 0; j < mLen; j++) {
            if ((cps[i + j] | 0x20) !== m[j]) {
                found = false;
                break;
            }
        }
        if (found) {
            for (let j = 0; j < mLen; j++) {
                charIndices.add(i + j);
            }
            i += mLen - 1;
        }
    }

    // iterate through all text lines
    const lines = tx.lines;
    for (let i = 0; i < lines.length; i++) {

        const line = lines[i];
        const runs = line.glyphRuns;
        const count = runs.length;
        if (count === 0) {
            continue;
        }
        const lastRun = runs[count - 1];

        const x0 = runs[0].offset;
        const x1 = lastRun.offset + lastRun.length;
        const y = line.position;
        const h = line.height;

        // highlight the whole line
        ctx.drawRect({ left: x0, right: x1, y: y, height: h }, {
            fillColor: (i % 2) === 0 ? [255, 0, 0, 0.1] : [0, 0, 255, 0.1]
        });

        // highlight characters in found words
        for (let j = 0; j < count; j++) {

            const run = runs[j];
            const advCount = run.advance.length;
            let pos = run.offset;
            for (let k = 0; k < advCount; k++) {

                const posNext = pos + run.advance[k];
                if (charIndices.has(run.indices[k])) {
                    ctx.drawRect({ left: pos, right: posNext, y: y, height: h }, {
                        fillColor: [255, 255, 0, 0.5]
                    });
                }
                pos = posNext;
            }
        }
    }
}