
- Document Solutions for PDF JS Overview
- Key Features
- Licensing and Redistribution
- Quick Start
- Memory Management
- Features
- Snippet Helpers
- Samples
- API Reference
- Release Notes
Work with Image Colors
DsPdfJS provides APIs for manipulating the color characteristics of images. You can automatically adjust color intensity to improve contrast, manually remap histogram levels to control tonal range, and work directly with individual color channels. These operations are performed using methods of the Bitmap class and related image‑processing types.
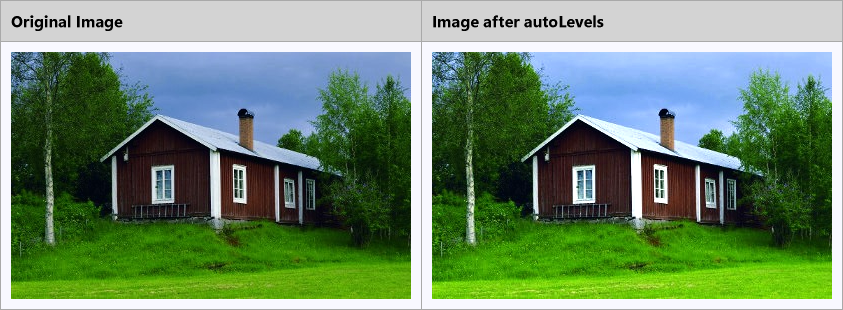
Adjust Color Intensity of an Image
You can improve the color intensity of an image by automatically adjusting the range of RGB channel intensities. In DsPdfJS, this is done using the autoLevels method of the Bitmap class. The method modifies color intensities so that the full range of values (0–255) is utilized, improving contrast and correcting highlights and shadows. It can also optionally preserve the relative intensities of color channels while clipping extremely low or high values.
To adjust the color intensity of an image:
Load the image using the Image.load method.
Convert the image to a bitmap using toBitmap.
Call the autoLevels method to automatically adjust the color intensities.
Save the resulting image.
Note: The examples on this page use helper functions from the Snippet Helpers module. These utilities are provided only to simplify the examples and are not part of the DsPdfJS API.
const img = Image.load(await Util.loadFile("images/house.jpg"));
const bmp = img.toBitmap();

bmp.autoLevels(true, 2, 2);

const result = await Util.combineTwoImages(
    img, "Original Image",
    bmp, "Image after autoLevels"
);

const imgBytes = result.saveAsPng();
Util.saveFile("autoLevels.png", imgBytes, "image/png");
Adjust Histogram Levels
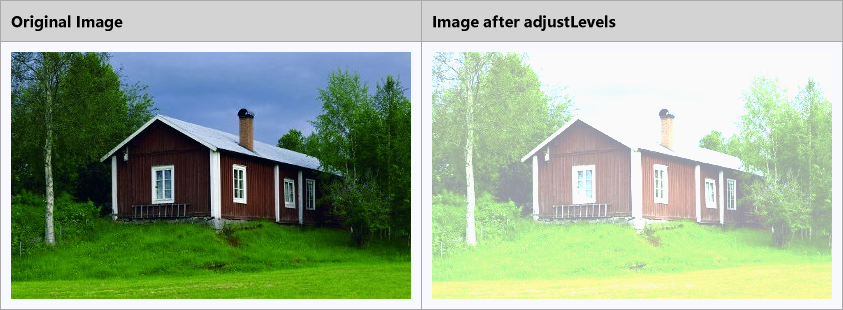
Adjusting histogram levels allows you to control the tonal range and brightness distribution of an image. DsPdfJS provides the adjustLevels method of the Bitmap class to map the input color range to a new output range using optional gamma correction.
To adjust histogram levels of an image:
Load the image using the Image.load method.
Convert the image to a bitmap using toBitmap.
Call the adjustLevels method and specify the input and output color ranges.
Save the resulting image.
const img = Image.load(await Util.loadFile("images/house.jpg"));
const bmp = img.toBitmap();

bmp.adjustLevels("Black", "#646464", "#969696", "#FAFAFA");

const result = await Util.combineTwoImages(
    img, "Original Image",
    bmp, "Image after adjustLevels"
);

const imgBytes = result.saveAsPng();
Util.saveFile("adjustLevels.png", imgBytes, "image/png");
Color Channels
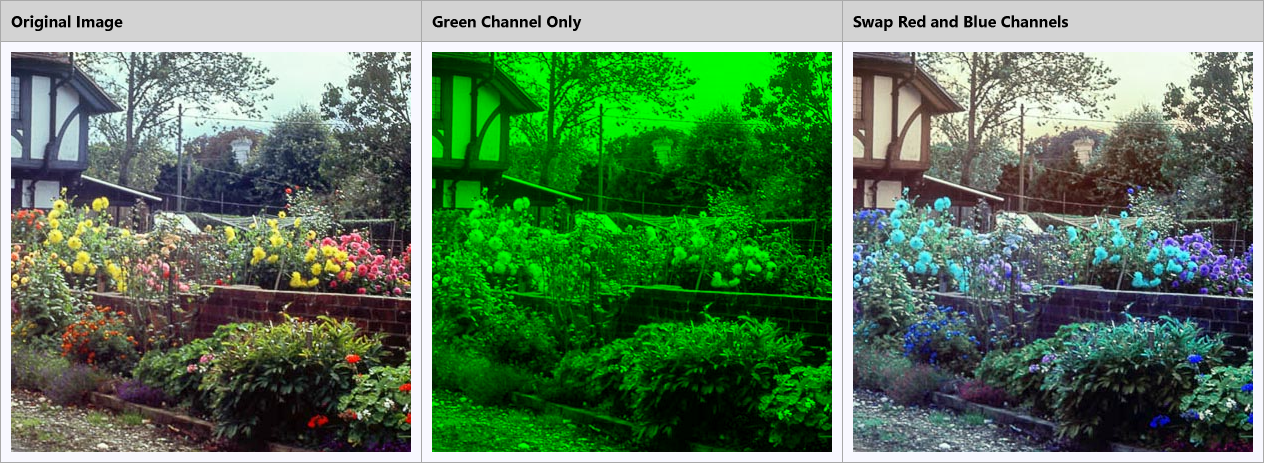
Digital images are composed of color channels that represent primary colors. In the RGB color model, each pixel contains red, green, and blue channel data. DsPdfJS allows you to work with these channels individually using the exportColorChannel and importColorChannel methods of the Bitmap class.
The exportColorChannel method extracts data for a specific color channel from an image and stores it in a grayscale bitmap. The importColorChannel method copies channel data from a grayscale bitmap back into a color bitmap. This makes it possible to analyze individual channels or reconstruct images by combining channel data.
To work with color channels:
Load the image using the Image.load method.
Convert the image to a bitmap using toBitmap.
Export channel data using the exportColorChannel method.
Create or modify a bitmap by importing channel data using importColorChannel.
Save the resulting image.
const original = Image.load(await Util.loadFile("images/tudor.jpg")).toBitmap();
const imgW = 400;
const imgH = 400;

const bmp1 = original.clip({ x: 300, y: 300, width: imgW, height: imgH });

const gsRed = new GrayscaleBitmap(imgW, imgH);
const gsGreen = new GrayscaleBitmap(imgW, imgH);
const gsBlue = new GrayscaleBitmap(imgW, imgH);

bmp1.exportColorChannel(gsRed, ColorChannel.Red);
bmp1.exportColorChannel(gsGreen, ColorChannel.Green);
bmp1.exportColorChannel(gsBlue, ColorChannel.Blue);

const bmp2 = new Bitmap(imgW, imgH, "Black");
bmp2.importColorChannel(gsGreen, ColorChannel.Green);

const bmp3 = new Bitmap(imgW, imgH, "White");
bmp3.importColorChannel(gsBlue, ColorChannel.Red);
bmp3.importColorChannel(gsGreen, ColorChannel.Green);
bmp3.importColorChannel(gsRed, ColorChannel.Blue);

const bmp = await Util.combineThreeImages(
    bmp1, "Original Image",
    bmp2, "Green Channel Only",
    bmp3, "Swap Red and Blue Channels"
);

const imgBytes = bmp.saveAsPng();
Util.saveFile("colorChannels.png", imgBytes, "image/png");