
Having trouble configuring my default DockControl layout

Posted by: jacob.a.buchanan6.ctr on 17 July 2026, 1:44 pm EST

    • Post Options:
    • Link

    Posted 17 July 2026, 1:44 pm EST - Updated 17 July 2026, 2:05 pm EST

    I’ve had many post this week or so diagnosing issues in my transition from the C1’s .NET Framework build to their .NET package from v5.6.20251.877 to v9.0.20251.1133. This is the last issue I have to resolve before finalizing this transition!

    In short, I am trying to setup an XElement to serve as the default/initial state of our app to mimic the picture below:
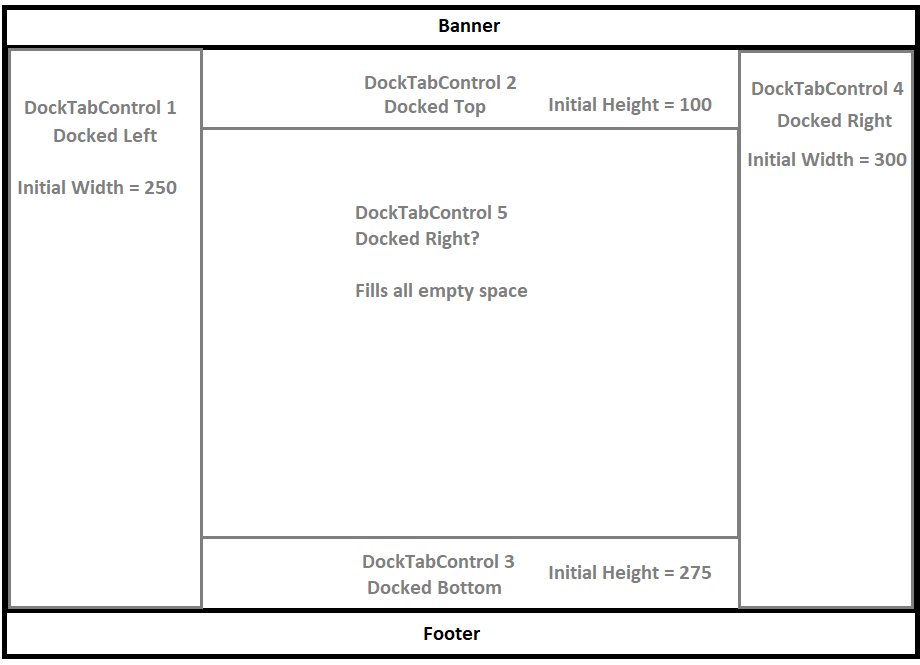
    Our app has a main shell with some fixed areas, but most of the app is one big C1DockControl.

    In our old setup using the .NET Framework build we have a DefaultProject.json layout that we load when starting a new project and it looked like this:

    {
      "dockControl": {
        "dockTabControl": [
          {
            "@Dock": "Left",
            "@DockWidth": "45",
            "@DockMode": "Docked"
          },
          {
            "@Dock": "Right",
            "@DockWidth": "45",
            "@DockMode": "Hidden"
          },
          {
            "@Dock": "Top",
            "@DockHeight": "30",
            "@DockWidth": "100",
            "@DockMode": "Hidden"
          },
          {
            "@Dock": "Bottom",
            "@DockHeight": "80",
            "@DockWidth": "100",
            "@DockMode": "Hidden"
          }
        ]
      }
    }

    We would deserialize this to an XElement and call docker.Load(xElement) which gives us DockTabControl 1 through 4. Then once that loads and some other stuff in our app finishes initializing, we open some startup tools to DockTabControl1 (which is why it isn’t hidden by default), then we add DockTabControl5 manually and set its content to our apps main control by essentially just doing this:

    var centerDock = new C1DockTabControl();
    centerDock.Items.Add(mainControl);
    docker.Items.Add(centerDock);

    So, this would give us 5 C1DockTabControls in total on startup with 3 of them still hidden. The idea is these DockTabControls are hidden but predefined to serve as initial states for our various tools. We have numerous tools in our app and we set their initial launch location to Top, Bottom, Left, or Right. We then ‘unhide’ the DockControl if it was hidden and then add the tool as a new DockTabItem. The setup follows that the center DockTabControl 5 fills all the empty space while the 4 DockTabControls surrounding it have a small initial width/height. Most of the screen is taken up by DockTabControl5.

    We have saved ‘projects’ for our app in which we save the state of the dock. When you start a brand new ‘project’ in our app it loads our default layout (DefaultProject.json), otherwise we load the existing layout from the saved file.

    I honestly don’t know how this worked in the old version of C1. I think we just got lucky that it just so happened to work how we wanted? In the updated version of C1 the center DockTabControl5 is now really tiny. It seems that DockTabControl3 is filling all the vertical space in the center of the app and DockTabControl4 is filling all the horizontal space to the right of the app.

    This was resulting in an initial layout that looked like this:
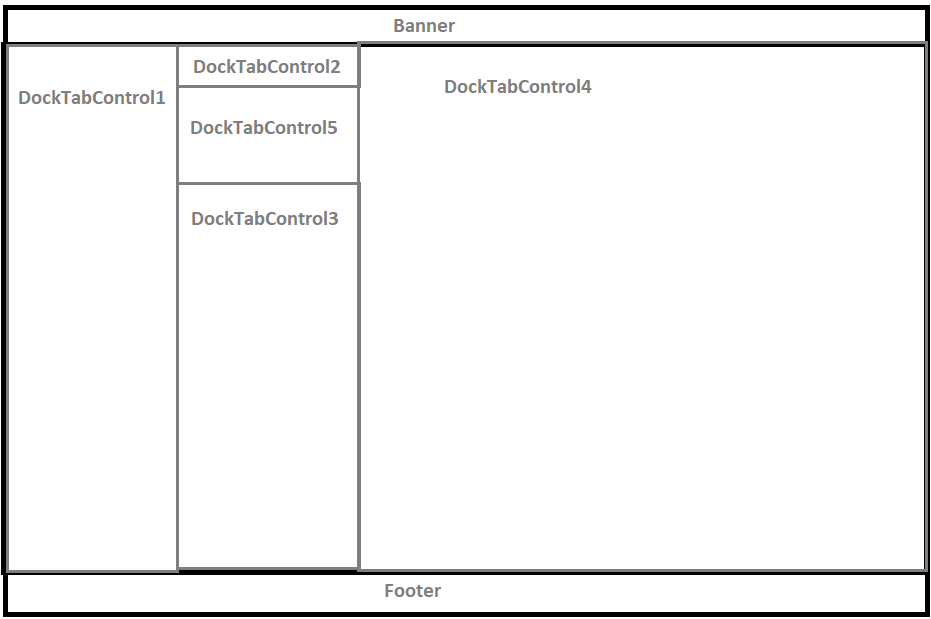
    I’ve been playing around with the JSON to get a default setup that works, but I just can’t work it out. I tried setting up the DockTabControl5 that gets added on startup to have HorizontalFill and VerticalFill set to true, but this breaks when resizing tabs. For example, if I start resizing DockTabControl1 then DockTabControl4 will also start resizing/growing until it overtakes DockTabControl5 and throws some exceptions.

    It also seems that the intended values for DockWidth and DockHeight are pixels, so I don’t know how our old values like 45 or 30 ever worked? The actual width/height values on a 1080p monitor are the values in that first pic I linked.

    Again, the objective is to have DockTabControl5 fill all the empty space with thin controls on all sides of it following the layout from that first picture I linked. Nothing ever gets docked to the center DockTabControl5. We always just open tools directly to one of the existing DockTabControls at one of the 4 dock positions around the main center DockTabControl5. We essentially do something like the code below to get the first matching DockTabControl (Top, Bottom, Left, or Right) that doesn’t contain our main content control:

    docker.NestedItems.FirstOrDefault(dc => dc.Dock == targetDock && !dc.Items.SourceCollection.OfType<C1DockTabItem>().Any(dti => dti.Content.GetType().TypeEquals(typeof(MainContent)))

    Any advice for configuring this DefaultProject.json would be greatly appreciated!

  • Posted 20 July 2026, 6:38 am EST

    Hi Jacob,

    Apologies for the delay in responding, and thank you for sharing the complete details.

    To create a layout similar to your requirement (first screenshot), we created a JSON file similar to yours, with the DockHeight and DockWidth properties defined for the DockTabControls. When we tested this JSON with v9.0.20251.1133, we observed behavior similar to your second screenshot, where DockTabControl4 appeared too wide.

    We then tested the same JSON file with later versions and found that this behavior appears to have been fixed starting with v10.0.20252.1321. In this version and later releases, all four DockTabControls are laid out correctly.

    Regarding the fifth DockTabControl, which is added through code and is expected to fill the remaining space in the center, we observed that it does not completely fill the available space by default. However, simply setting its HorizontalFill property to true resolves this issue as well.

    We have attached a sample project demonstrating the complete implementation using the latest version. Could you please run it and let us know if this matches the layout you are trying to achieve? We have also attached a screenshot showing the layout on our end for reference.

    Attachments:

    DockControlLayout.zip

    Final_Layout_NET.zip

    Best Regards,

    Kartik

  • Posted 20 July 2026, 11:10 am EST

    Thanks again for your help Kartik, I’ll work with an admin on updating to v10.0.20252.1321 and will report back if there are any issues.

  • Posted 22 July 2026, 12:34 pm EST

    Hi Kartik, I have updated my C1 NuGet packages to v10.0.20252.1321, but when I build my app it says it can’t find the .sa3licx file used for licensing. The MESCIUS License Manager says I have an active studio enterprise license for v2025.2.0.0. I’ve cleared my bin/obj folders and my NuGet cache, but it still shows this issue. Did I miss something or do I need to get a new license key?

    Sorry if this is the wrong place to ask this.

  • Posted 22 July 2026, 5:48 pm EST

    Ok after quite a bit of trial-and-error, we fixed the “missing .sa3licx file” issue by registering the sa3client NuGet package as a tool. We did this by moving the sa3client NuGet package folder from “C:\ProgramData\SA3.store\sa3client\1.3.0\sa3client\1.3.0” into our teams shared NuGet directory and then doing “dotnet tool install -g sa3client” in powershell.

    This got past that initial error, and I can now build/run my app, but it takes a very, very long time to build due to build it repeatadly throwing build exceptions. Every time I build it throws exceptions during the build process stating it doesn’t have access to ‘C:\ProgramData\SA3\products\C1P.info’. I believe it’s looking for licensing info there and trying to write to this file for some reason? But since our sys admin was the one who activated our keys, he is the only one with write perms to that file, so this process fails over and over when building.

    We can contact our sys admin to give us write permissions for this file, but this is a lot of extra steps to go through for any new users we bring on board. Is this the intended route for resolving this issue? Did the licensing process change between v2025.1.0 and v2025.2.0 since we didn’t have this issue prior to this release?

    Again, for added clarification, our environment is fully disconnected from the internet, so all of our licensing and package installs are done manually.

  • Posted 23 July 2026, 5:55 am EST

    Hi Jacob,

    Thank you for sharing the complete details. Yes, your understanding is correct. Our licensing model changed starting with the 2025v2(1308) Hotfix 1 release.

    Previously, license activation and validation were performed using the C:\ProgramData\GrapeCity\gclm\gclm.exe tool. However, starting with the 2025v2(1308) release, this process is handled by the newer C:\ProgramData\SA3\sa3client-ui.exe tool.


    Coming to your issue, if your system had been connected to the internet and had write permissions for the C:\ProgramData folder, our NuGet packages would have automatically installed the required SA3Client tool along with the necessary C1 product registration.

    However, in your current environment, these steps will need to be performed manually.

    1. Install the latest version of the SA3Client tool by downloading the NuGet package locally (which, based on your message, you have already done using the dotnet tool install -g sa3client command).

    2. Run the “sa3client” command in PowerShell or Command Prompt. This will install sa3client-ui.exe under C:\ProgramData\SA3

    3. Activate your license key using the command - sa3client activate “license-key” --force

    Now, your project should build and run successfully.

    Please note that this process requires administrator privileges (with write access to the C:\ProgramData folder). This is because the required product information is not currently registered in the SA3Client folder.

    Normally, this is a one-time setup performed automatically by our NuGet packages or installer. However, since the process does not have write access, the build fails with the “No access to C:\ProgramData\SA3\products\C1P.info” error

    Best Regards,

    Kartik

  • Posted 23 July 2026, 1:05 pm EST

    Hi Kartik,

    Regarding the licensing issues, thanks for confirming our procedure and the steps we need to take. We have reached out to a sys admin to hopefully give us permissions to that SA3 folder, so we won’t have this issue in the future.

    However, for the time being I have reverted back to v9.0.20251.1133 due to a crash I encountered in v10.0.20252.1321. It seems if you dock a C1DockTabControl inside of another C1DockTabControl then it creates a C1DockGroup with both controls inside. Then when resizing this control using the splitter it crashes due to TabControl being null in the UpdateTabSplitter method in C1DockSplitter. Between v9.0.20251.1133 and v10.0.20252.1321 the method was rewritten to set TabControl.RetainedWidth/Height properties, but TabControl is null here. It looks like when C1DockTabControl sets the Splitter property it sets TabControl to ‘this’, but C1DockGroup only sets the orientation. So, I believe the TabControl property is always null in a C1DockGroup?

    I don’t know if this was addressed in a release newer than v10.0.20252.1321, so for now I’ve just reverted to v9.0.20251.1133 since the only real issue is the initial size of the controls. Otherwise, the Docking stuff works good enough to get the job done, I just won’t be able to utilize the Horizontal/VerticalFill properties.

  • Posted 24 July 2026, 3:01 am EST

    Hello Jacob,

    It is good to hear that you have contacted your system admin to resolve the licensing issue on your end.

    Thank you for providing the additional details regarding your issue. We are looking into it and will get back to you with the updates soon.

    In the meantime, if you can share a stripped-down sample or modify our last attached sample, DockControlLayout.zip, to showcase the issue as per your use case, it will speed up our investigation.

    Regards,

    Prabhat Sharma.

  • Posted 24 July 2026, 9:30 am EST

    Hi Prabhat,

    To duplicate the issue you can take your sample and add C1DockTabItems to each control with this code in the ctor after adding the center dock:

    for (int i = 0; i < dock.Items.Count; i++)
    {
    	if (dock.Items[i] is C1DockTabControl dtc)
    	{
    		dtc.Items.Add(new C1DockTabItem() { Header = $"Tab {i + 1}" });
    	}
    }

    Then drag “Tab 5” on to the right side of the C1DockTabControl that “Tab 1” is in, then resize “Tab 5” from the right.

    The issue can be duplicated with any setup containing a C1DockGroup. If you have a C1DockControl with at least 1 C1DockGroup and at least 1 other C1DockGroup or C1DockTabControl, then all you need to do is drag the splitter between the two controls.

  • Posted 27 July 2026, 3:41 am EST

    Hi Jacob,

    Thank you for sharing the complete steps to reproduce the issue. We can confirm that this was a known issue in the 2025v2 release, and it has already been fixed in the latest 2026v1(38) release.

    We verified the behavior using the exact same steps in our sample project with the latest 2026v1(38) release, and the exception no longer occurs.

    Best Regards,

    Kartik

Need extra support?

Upgrade your support plan and get personal unlimited phone support with our customer engagement team

Learn More

Forum Channels