Hi,
Thank you for your patience and for providing detailed context about your setup in React/TypeScript inside an Atlassian Forge macro iframe.
First, we would like to apologize for any confusion caused by our previous suggestion to use spread.contextMenu.onOpenMenu combined with setTimeout(…, 0). We may have misunderstood your exact requirement—onOpenMenu is designed for a different use case, and relying on setTimeout(0) to query the DOM after rendering is prone to timing/race condition issues, especially inside sandboxed iframe environments.
Below is a complete explanation answering each of your questions, along with the three possible solutions (including the official, recommended approach to inject React icons directly during the rendering lifecycle).
Clarifications on your Four Core Questions
Is onOpenMenu a post-render event?
No. spread.contextMenu.onOpenMenu is a pre-open interceptor hook, not a post-render callback.
It fires synchronously immediately upon right-click, before SpreadJS creates or mounts the context menu DOM elements.
Using setTimeout(…, 0) relies on JavaScript macrotask scheduling. Inside nested iframe environments (like Confluence / Forge macros), event loop latency and frame paint boundaries frequently cause the timer to execute before SpreadJS finishes rendering into the DOM, resulting in document.querySelector returning null.
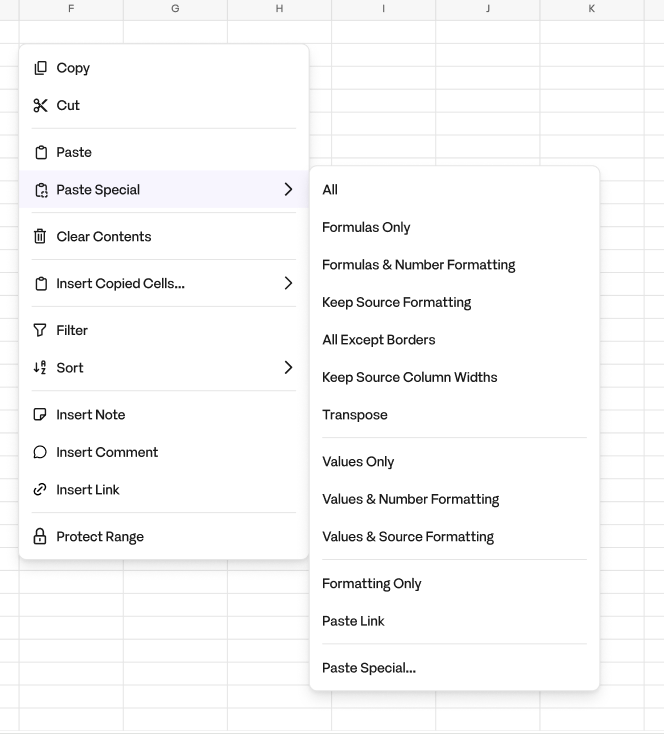
Furthermore, SpreadJS context submenus (e.g., Paste Special) are generated lazily on hover, so querying the DOM upfront on menu open will miss submenu items regardless of timing.
Is there an “after menu rendered” event?
No. SpreadJS does not provide events such as onMenuOpened or menuRendered because manipulating menu DOM via post-render query selectors is not the supported architectural pattern. Instead, SpreadJS provides lifecycle-level view customization through the GC.Spread.Sheets.ContextMenu.MenuView class.
Where is SpreadJS rendering the context menu DOM?
SpreadJS creates and appends .gc-ui-contextmenu-container directly to the document.body of the iframe window where your workbook is mounted.
Can you add React content directly through the SpreadJS API?
Yes, by extending GC.Spread.Sheets.ContextMenu.MenuView and overriding the createMenuItemElement method. SpreadJS calls this method synchronously as each menu item’s DOM is created. You can mount your React component directly into the item’s icon placeholder using React 18’s ReactDOM.createRoot. Refer to this demo: https://developer.mescius.com/spreadjs/demos/features/worksheet/context-menu/custom-menu-view/purejs
Solution 1 (Recommended): Custom MenuView with React Components
This is the cleanest and most robust approach. It hooks directly into item creation, eliminating any need for setTimeout, global DOM queries, or timing workarounds.
Implementation (React 18 + TypeScript):
import React from 'react';
import ReactDOM from 'react-dom/client';
import * as GC from '@mescius/spread-sheets';
import '@mescius/spread-sheets/styles/gc.spread.sheets.excel2013white.css';

// Import your custom React icons (e.g., Lucide React, FontAwesome, or custom SVGs)
import {
  Copy,
  Scissors,
  Clipboard,
  MessageSquarePlus,
  Trash2,
  Filter,
  ArrowUpDown
} from 'lucide-react';

// 1. Map SpreadJS built-in item names to your React icon components
const MENU_ICON_MAP: Record<string, React.ReactNode> = {
  'gc.spread.copy': <Copy size={16} color="#2563eb" />,
  'gc.spread.cut': <Scissors size={16} color="#dc2626" />,
  'gc.spread.paste': <Clipboard size={16} color="#16a34a" />,
  'gc.spread.pasteAll': <Clipboard size={16} color="#16a34a" />,
  'gc.spread.pasteSpecial': <Clipboard size={16} color="#059669" />,
  'gc.spread.insertComment': <MessageSquarePlus size={16} color="#d97706" />,
  'gc.spread.clearContents': <Trash2 size={16} color="#9333ea" />,
  'gc.spread.filter': <Filter size={16} color="#0284c7" />,
  'gc.spread.sort': <ArrowUpDown size={16} color="#4f46e5" />,
};

// 2. Subclass MenuView and override createMenuItemElement
export class CustomReactMenuView extends GC.Spread.Sheets.ContextMenu.MenuView {
  createMenuItemElement(menuItemData: GC.Spread.Sheets.ContextMenu.IMenuItemData): any {
    // super.createMenuItemElement returns an internal array-like wrapper of HTMLElements
    const elements = super.createMenuItemElement(menuItemData);

    if (menuItemData?.name && MENU_ICON_MAP[menuItemData.name]) {
      // Safely access the root DOM element (elements[0])
      const rootElement = (elements as any)[0] || elements;

      if (rootElement && typeof rootElement.querySelector === 'function') {
        const iconContainer = rootElement.querySelector('.gc-ui-contextmenu-icon') as HTMLElement;

        if (iconContainer) {
          // Clear default SpreadJS sprite background and configure container layout
          iconContainer.className = 'gc-ui-contextmenu-icon custom-react-icon';
          iconContainer.style.background = 'transparent';
          iconContainer.style.backgroundImage = 'none';
          iconContainer.style.display = 'inline-flex';
          iconContainer.style.alignItems = 'center';
          iconContainer.style.justifyContent = 'center';
          iconContainer.style.width = '20px';
          iconContainer.style.height = '20px';

          // Mount your React component synchronously
          const root = ReactDOM.createRoot(iconContainer);
          root.render(MENU_ICON_MAP[menuItemData.name]);
        }
      }
    }

    // Always return the original elements structure back to SpreadJS
    return elements;
  }
}

// 3. Assign to your workbook instance during initialization
export function initializeSpread(spread: GC.Spread.Sheets.Workbook) {
  spread.contextMenu.menuView = new CustomReactMenuView();
}
Solution 2: CSS / iconClass Mapping (If Only Graphic/CSS Customization is Needed)
If your custom icons can be expressed as CSS classes (e.g., FontAwesome classes or SVG background images), you don’t need React component mounting. You can directly update the iconClass property in spread.contextMenu.menuData:
export function updateMenuIconClasses(spread: GC.Spread.Sheets.Workbook) {
  const iconClassMap: Record<string, string> = {
    'gc.spread.copy': 'my-custom-copy-class',
    'gc.spread.cut': 'my-custom-cut-class',
    'gc.spread.paste': 'my-custom-paste-class',
  };

  spread.contextMenu.menuData.forEach((item) => {
    if (item.name && iconClassMap[item.name]) {
      item.iconClass = iconClassMap[item.name];
    }
  });
}
Solution 3: Full Custom React Context Menu via onOpenMenu
If your goal is to replace SpreadJS’s context menu entirely with a 100% native React context menu component (such as Radix UI, MUI, or Ant Design):
This is where spread.contextMenu.onOpenMenu is actually intended to be used:
Capture the right-click coordinates (hitInfo.x, hitInfo.y) and visible menu items (itemsDataForShown).
Return true to cancel SpreadJS’s default menu rendering.
Open your React Context Menu component.
spread.contextMenu.onOpenMenu = function (menuData, itemsDataForShown, hitInfo, spread) {
  // 1. Pass coordinates and items to your React state
  setCustomMenuState({
    isOpen: true,
    position: { x: hitInfo.x, y: hitInfo.y },
    items: itemsDataForShown,
  });

  // 2. Return true to prevent SpreadJS from rendering its default context menu
  return true;
};
Summary & Recommendation
For adding custom React icons to SpreadJS’s built-in context menu items, Solution 1 (CustomReactMenuView) is the officially supported, robust method. It executes synchronously within the SpreadJS rendering cycle and is immune to iframe timing or macrotask delays. Refer to the attached sample: New folder.zip
Regards,
Priyam