What's New in Document Solutions for Imaging v7
DsImaging v7.2 - August 21, 2024
Document Solutions Image Viewer (DsImageViewer)
New Secondary Toolbar – ‘Effects’
You can now add effects to your images using a convenient ‘Effects’ secondary toolbar in the viewer. The toolbar provides the following useful tools allowing you to make any needed adjustments to all or part of the image:
- Brightness
- Contrast
- Vibrancy
- Blur
- Pixelate
If a part of the image is selected, the effect is applied to the selected area only. Otherwise, it is applied to the whole image.

The ‘Effects’ toolbar can be added via PaintToolsPlugin options using the effectsTools toolbar layout property:
You can also apply various customizations on the toolbar items by modifying the array of toolbar item types above.
Blur and Pixelate Tools
DsImageViewer now includes new Blur and Pixelate tools, designed to blur or pixelate all or part of the image. These tools can be applied to selected regions to effectively blur/pixelate parts of an image, making them ideal for tasks such as blurring vehicle license plates or confidential information.
Blur and Pixelate tools are available by default in the ‘Effects' secondary toolbar. See how to activate the Effects toolbar in the section above. You can either apply the filter over the whole image or apply the filter on a selected area of the image.
The button keys for the Blur and Pixelate tools are ‘Blur’ and ‘Pixelate.’ You can customize the Effects toolbar to have only these two items as well.

v7.1 - April 17, 2024
Document Solutions for Imaging (DsImaging)
Draw Rotated Text within Unrotated Rectangular Bounds
Drawing rotated text within unrotated rectangular bounds offers several advantages, such as allowing better space utilization, consistency in layout, efficiency with responsive designs without major disruptions to the design, and more. DsImaging now supports drawing rotated text within unrotated rectangular bounds. With DsImaging, users can now employ the DrawRotatedText and MeasureRotatedText methods within the GcGraphics class to draw rotated text within unrotated rectangular bounds, similar to how MS Excel draws rotated text inside borderless cells. DrawRotatedText facilitates the drawing of text at an angle within a specified rectangle, while MeasureRotatedText calculates the bounds for accurate text placement. DsImaging also enables a user to set the alignment of the rotated text using RotatedTextAlignment enumeration, which is used as one of the parameters in the above methods. These new methods are applicable to all classes derived from GcGraphics, including those involved in drawing to PDF, SVG, and bitmaps.
The following code draws rotated text at a negative angle within unrotated rectangular bounds with the following parameters:
Rotation angle: -45°, Text alignment: Leading, Rotated text alignment: BottomLeft, Is vertical stacking: False
var doc = new GcPdfDocument();
var page = doc.Pages.Add();
var g = page.Graphics;
Draw(g, new RectangleF(10,10,100,100), angle: -45, false, RotatedTextAlignment.BottomLeft, TextAlignment.Leading);

static void Draw(GcGraphics g, RectangleF rect, int angle, bool verticalStacking, RotatedTextAlignment rotatedAlign, TextAlignment textAlign)
 {
            // Draw a legend stating the current DrawRotatedText arguments' values:
            var tlLegend = g.CreateTextLayout();

            // The target rectangle for the DrawRotatedText call:
            var d = tlLegend.ContentHeight + 12;
            rect.Y += d;
            rect.Height -= d;

            // Text layout to draw:
            var tl = g.CreateTextLayout();
            tl.DefaultFormat.FontName = "Calibri";
            tl.DefaultFormat.FontSize = 12;
            tl.Append("The quick brown fox jumps over the lazy dog. ");
            tl.Append("The quick brown fox jumps over the lazy dog.");
            tl.TextAlignment = textAlign;

            // Outline the target rectangle in green:
            g.DrawRectangle(rect, new GCDRAW::Pen(Color.PaleGreen, 3));
            // Outline the actual text rectangle in red:
            var tlCopy = tl.Clone(true);
            var tlRect = g.MeasureRotatedText(tlCopy, angle, verticalStacking, rect, rotatedAlign);
            g.DrawRectangle(tlRect, new GCDRAW::Pen(Color.Red, 1));

            // Draw rotated text:
            g.DrawRotatedText(tl, angle, verticalStacking, rect, rotatedAlign);
}
When saved as an image, the above code generates the following output (find full code here).

Drawing Text in Slanted Rectangles
Text can also be rotated within slanted rectangles, similar to how MS Excel draws rotated text in cells with borders. To achieve this layout, DsImaging also added a special method: the DrawSlantedText method, which is very similar to the DrawRotatedText method except for the last parameter of the SlantedTextAlignment type that specifies the alignment of slanted text within the target rectangle. There are six modes for this enum type: BelowRotatedInside, BelowRotatedOutside, AboveRotatedInside, AboveRotatedOutside, CenterInsideOutside, and CenterOutsideInside.
The following is a basic code on using the DrawSlantedText method to draw text in a slanted rectangle (see the following image) in a PDF document (find full source code here)—the SlantedTextAlignment.CenterInsideOutside enum option makes the text appear at the center between the rectangle sides rotated at the same angle as the text. The side above the text is rotated inside the rectangle.
static void RText(GcGraphics g, int angle, float x1, float y1, float x2, float y2, string s)
{
    var tl = g.CreateTextLayout();
    tl.TextAlignment = TextAlignment.Center;
    tl.Append(s, new TextFormat
    {
        FontName = "Segoe UI",
        FontSize = 27,
        FontSizeInGraphicUnits = true,
        FontBold = true
    });
    var rc = new RectangleF(x1, y1, x2 - x1, y2 - y1);
    g.DrawSlantedText(tl, angle, false, rc, SlantedTextAlignment.CenterInsideOutside);
}

Look at our Demos to see how to draw rotated text within unrotated rectangular bounds or within slanted rectangles. Use the various options of the DrawRotatedText and the SlantedTextAlignment enum.
Demos: Draw Rotated Text | Draw Slanted Text | Draw a Table with Slanted Column Headers in an Image
Document Solutions Image Viewer (DsImageViewer)
Save an Image in JavaScript Image Viewer to Different Format
Converting images from one format to another is pivotal in empowering users to customize their visual content to adhere to various requirements and standards. Users can now transform images into alternative formats in DsImageViewer, ensuring compatibility across various devices, platforms, and applications. The enhanced "Save" button now includes the "Save As" feature, presenting a convenient "Save As" dropdown menu, which will be available by default in the Viewer. This dropdown menu enables users to effortlessly convert and save images in alternative formats, enhancing the overall user experience.

The save method allows users to programmatically save images in various formats using the convertToFormat option. The supported image formats for conversion include PNG, JPEG, WEBP, BMP, and GIF (image/png, image/jpeg, image/webp, image/bmp, image/gif).
// Example: Save the modified image in PNG format.
const viewer = DsImageViewer.findControl("#root");
viewer.save({ convertToFormat: "image/png" });
Users can also now utilize the saveButton option to customize the behavior and appearance of the save button or to enable or disable the Save button drop-down menu. The following code restricts "Save As" Image Formats to PNG and BMP.
var viewer = new DsImageViewer("#root", { saveButton: { saveAsMenu: { availableFormats: ["image/png", "image/bmp"] } } });v7 - December 13, 2023
Document Solutions for Imaging (DsImaging)
Important Information: A Shift from ‘GrapeCity Documents’ to Document Solutions
In tandem with our commitment to continuous improvement, GrapeCity Documents has rebranded to Document Solutions. This change extends to the APIs and controls within the Document Solutions suite. Below, you'll find the updated nomenclature:
Document Solutions for Imaging (DsImaging) (previously GrapeCity Documents for Imaging (GcImaging))
Document Solutions Image Viewer (DsImageViewer) (previously GrapeCity Documents Image Viewer (GcImageViewer))
We've made it easy to upgrade your existing packages to the new packages using the Documents Migration tool. This tool is included in the trial Downloads zip file found on the above product links. For the v7.0 release cycle, packages with the previous product and/or company names will be provided separately, ensuring access to the same v7 new feature updates. This approach is designed to facilitate a seamless transition for users.
It's important to emphasize that despite the adoption of new package names, only the package names themselves are altered. The namespace and type names remain unchanged, eliminating the need for any immediate modifications in your C#/VB user codes.
Document Solutions Image Viewer (DsImageViewer)
Select Parts of Image, Cut, Copy, and Paste
Experience a new level of precision in image editing with DsImageViewer's latest update, featuring an array of selection tools and the ability to cut, copy, and paste from images. This enhancement is designed to streamline the image editing process, making it both easier and faster to select specific regions, focus on particular elements within an image to perform detailed analyses.

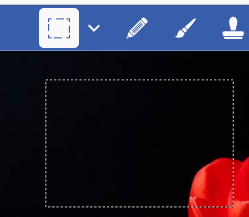
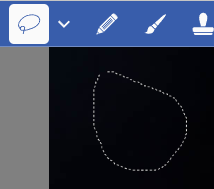
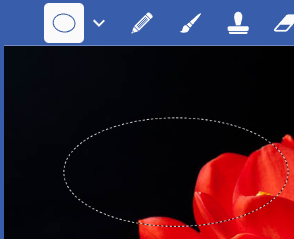
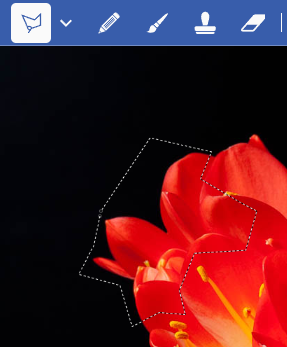
The Selection tool dropdown has been added to the secondary toolbar of ‘Paint tools’ plugin.
Here are the following Selection tools added to the editor -
-
Rectangular Marque Tool: Ideal for making square and rectangular selections, this tool ensures accuracy in defining specific areas within the image.

-
Lasso Tool (Free Selection):Empowering creativity, the Lasso Tool allows you to draw freehand selections, giving you the flexibility to highlight intricate details or irregular shapes.

- Elliptical Marque Tool: Perfect for creating round and elliptical selections, this tool adds a touch of sophistication to your editing capabilities.

-
Polygonal Lasso Tool: For more intricate selections, the Polygonal Lasso Tool enables you to draw polygonal and jagged outlines, providing precise control over the chosen area.

Effortless Editing Workflow
Following the selection process, DsImageViewer equips you with a set of intuitive commands for seamless editing:
- Cut, Copy, and Paste: Execute these fundamental actions within the editor using standard keyboard shortcuts: Ctrl + X, Ctrl + C, and Ctrl + V (or Cmd + X, Cmd + C, and Cmd + V on macOS). This functionality allows you to effortlessly move and duplicate selected portions of the image.
- Painting Inside a Selected Part: Customize your brush settings, including size, hardness, and opacity, and select your preferred color to paint within the selected part of image.
Add Brightness and Contrast to Your Images
Image filters have become indispensable tools for elevating your photos and delivering a comprehensive editing experience. From social media feeds to news articles, magazines, and books, filtered images have become ubiquitous, enriching visual content across various platforms. In its latest iteration, DsImageViewer, included with Document Solutions for Imaging, introduces two powerful additions to its repertoire of filters: Brightness and Contrast. These filters help users to enhance images, allowing for precise adjustments to highlight specific features and achieve the desired visual impact.
Brightness Filter: The Brightness filter is a versatile tool designed to modify the luminosity of an image by fine-tuning the intensity of each pixel's color channels. Operating within an 'Intensity' range from -100 to 100, this filter provides users with unparalleled control over their images. Setting the 'Intensity' to 0 preserves the image's original brightness, while positive values elevate brightness, imparting a lighter and more illuminated quality. Conversely, negative values dim the brightness, creating a captivating, darker aesthetic.
Contrast Filter: Complementing the Brightness filter, the Contrast filter is a game-changer in image editing. This filter enhances or diminishes the distinction between light and dark areas, infusing depth and impact into every element. The adjustment of contrast with a specified 'Intensity' level transforms the image's tonal range. Bright areas become more vibrant, while dark areas acquire a heightened intensity. Leveraging the 'Intensity' slider within a range of -100 to 100, users can tailor their contrast adjustments to achieve subtle enhancements or make pronounced alterations, aligning with their unique creative vision.
The Contrast filter operates by adjusting pixel values' intensity, fostering clearer separation between elements within the image. This sophisticated process ensures a refined and polished final result, regardless of whether you're aiming for nuanced enhancements or bold visual statements.
Also refer to - How to add Image Filters plugin panel.

Updates
v7.1 - April 17, 2024
v7 - December 13, 2023
Related Links


