- FlexGrid for WPF Overview
- Feature Comparison
- Quick Start
- Object Model Summary
- Data Binding
-
Features
- Columns
- Row
- Scrolling Modes
- Selection
- Sorting
- Cell Merging
- Custom Editors
- Custom Icon
- Transpose Data in Grid
- Data Grouping
- Data Filtering
- Data Aggregation
- Custom Cells
- Virtualization
- Paging
- TreeGrid
- Print Support
- Row Details Template
- Layout and Appearance: ClearStyle Technology
- Freezing and Pinning
- Import Data from Excel
- Export to Excel
- Clipboard Operations
- Validation
- FlexGrid Samples
Node Operations
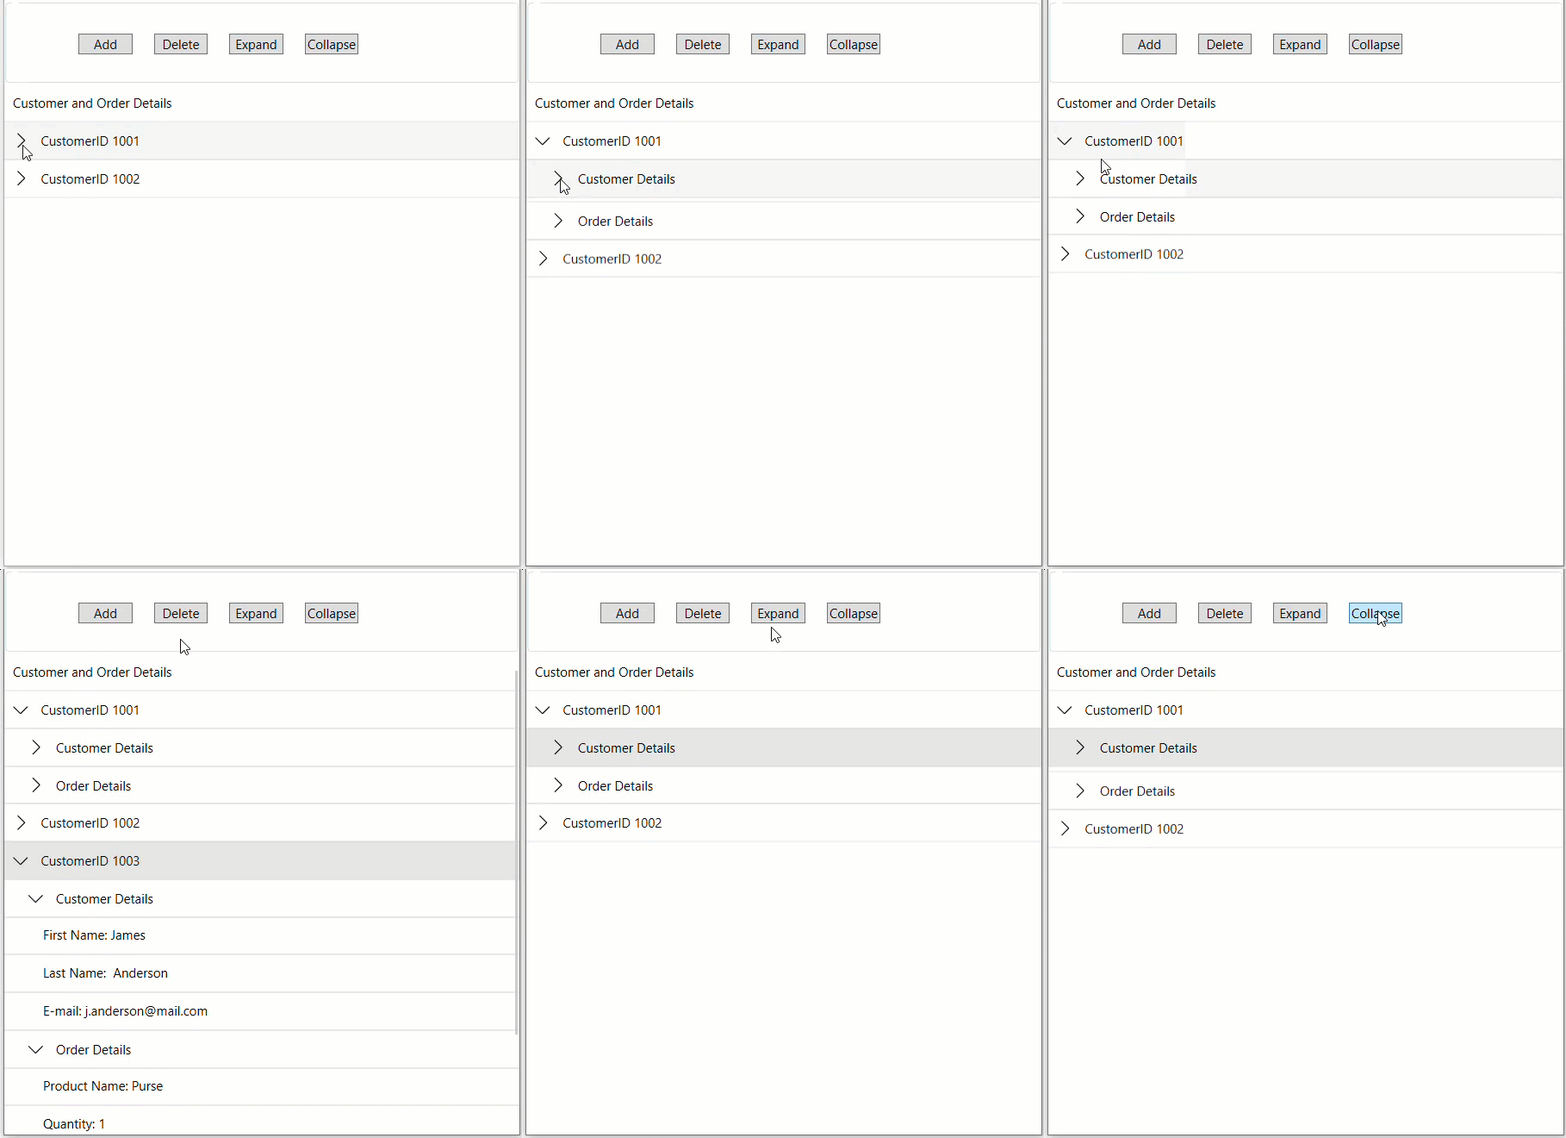
TreeGrid not only allows you to present the data in a structured form but it also supports performing various operations with the nodes. You can add, delete, expand, and collapse nodes by using various methods provided by the FlexGrid (or C1FlexGrid) class in bound and Unbound Mode.

You can add a new node to the TreeGrid using the Add method of the Collection class. This method appends a new node row to the collection. The code below shows how to add a node in TreeGrid at the end on the Click event of a button control:
Add a Node
Bound Mode
You can add a new node to the TreeGrid using the Add method of the Collection class. This method appends a new node row to the collection. The code below shows how to add a node in TreeGrid at the end on the Click event of a button control:
private void btnBoundAdd_Click(object sender, RoutedEventArgs e)
{
    var pn = flexGridBound.ItemsSource as ObservableCollection<CustomerInfo>;
    var newcn = new CustomerInfo()
    {
        parentName = "CustomerID 1003",
        childName = new ObservableCollection<CustomerInfo>()
        {
          new CustomerInfo
                {
                    parentName = "Customer Details",
                    childName = new ObservableCollection<CustomerInfo>
                    {
                        new CustomerInfo { parentName = "First Name: James"},
                       new CustomerInfo { parentName = "Last Name:  Anderson"},
                       new CustomerInfo { parentName = "E-mail: j.anderson@mail.com"}
                    }
                },
          new CustomerInfo
          {
                    parentName = "Order Details",
                    childName = new ObservableCollection<CustomerInfo>
                    {
                        new CustomerInfo { parentName = "Product Name: Purse"},
                        new CustomerInfo { parentName = "Quantity: 1"},
                        new CustomerInfo { parentName = "Order Date: 28-5-2024"},
                        new CustomerInfo { parentName = "Price: $60" }
                    }
          }
        }
    };
    pn.Add(newcn);
}
Unbound Mode
You can add a node at a specific position in the TreeGrid using the object of the GridGroupRow class, with Level property indicating their hierarchy level. Further, you can add the parent and child rows to the Rows collection of the Flexgrid control using the Add method. Finally, you can assign data to the cells of each row, setting the first column (index 0) of each row to the appropriate text. This appends a new node row to the collection. The code below shows how to add a node in TreeGrid at the end on the Click event of a button control::
private void btnUnboundAdd_Click(object sender, RoutedEventArgs e)
{
    var pn = new GridGroupRow() { Level = 0 };
    var cn1 = new GridGroupRow() { Level = 1 };
    var cn2 = new GridGroupRow() { Level = 2 };
    var cn3 = new GridGroupRow() { Level = 2 };
    var cn4 = new GridGroupRow() { Level = 2 };
    var cn5 = new GridGroupRow() { Level = 1 };
    var cn6 = new GridGroupRow() { Level = 2 };
    var cn7 = new GridGroupRow() { Level = 2 };
    var cn8 = new GridGroupRow() { Level = 2 };
    var cn9 = new GridGroupRow() { Level = 2 };
    flexGridUnbound.Rows.Add(pn);
    flexGridUnbound.Rows.Add(cn1);
    flexGridUnbound.Rows.Add(cn2);
    flexGridUnbound.Rows.Add(cn3);
    flexGridUnbound.Rows.Add(cn4);
    flexGridUnbound.Rows.Add(cn5);
    flexGridUnbound.Rows.Add(cn6);
    flexGridUnbound.Rows.Add(cn7);
    flexGridUnbound.Rows.Add(cn8);
    flexGridUnbound.Rows.Add(cn9);
    flexGridUnbound[pn.Index, 0] = "CustomerID 1003";
    flexGridUnbound[cn1.Index, 0] = "Customer Details";
    flexGridUnbound[cn2.Index, 0] = "First Name: James";
    flexGridUnbound[cn3.Index, 0] = "Last Name:  Anderson";
    flexGridUnbound[cn4.Index, 0] = "E-mail: j.anderson@mail.com";
    flexGridUnbound[cn5.Index, 0] = "Order Details";
    flexGridUnbound[cn6.Index, 0] = "Product Name: Purse";
    flexGridUnbound[cn7.Index, 0] = "Quantity: 1";
    flexGridUnbound[cn8.Index, 0] = "Order Date: 28-5-2024";
    flexGridUnbound[cn9.Index, 0] = "Price: $60";
}
Delete a Node
Bound Mode
You can delete a selected node from the TreeGrid using the RemoveAt method of the Collection class. Following code demonstrates how to delete a node from the TreeGrid on the Click event of a button control:
private void btnBoundDelete_Click(object sender, RoutedEventArgs e)
{
    var pn = flexGridBound.ItemsSource as ObservableCollection<CustomerInfo>;
    if (pn.Count > 0)
    {
        pn.RemoveAt(pn.Count - 1);
    }
}
Unbound Mode
You can delete a node from TreeGrid using the RemoveAt method of the FlexGrid control. Following code demonstrates how to delete a node from TreeGrid in the FlexGrid control on the Click event of a button control:
private void btnUnboundDelete_Click(object sender, RoutedEventArgs e)
{
    var rowIndex = -1;
    for (int i = flexGridUnbound.Rows.Count - 1; i >= 0; i--)
    {
        if (flexGridUnbound.Rows[i] is GridGroupRow groupRow && groupRow.Level == 0)
        {
            rowIndex = i;
            break;
        }
    }
    if (rowIndex > -1)
    {
        var count = flexGridUnbound.Rows.Count;
        for (int i = rowIndex; i < count; i++)
        {
            flexGridUnbound.Rows.RemoveAt(rowIndex);
        }
    }
}
Expand and Collapse Nodes
Bound Mode
You can expand and collapse all nodes in your Tree Grid application using the IsCollapsed property of the GridGroupRow class. This feature makes it convenient to navigate through node headers as a group when required. Following code shows how to expand and collapse nodes in TreeGrid on the Click event of a button control.
private void btnBoundExpand_Click(object sender, RoutedEventArgs e)
{
    if (flexGridBound.Selection is null) return;
    int row = flexGridBound.Selection.Row;
    if (flexGridBound.Rows.Count > 0 && row >= 0 && flexGridBound.Rows[row] is GridGroupRow groupRow)
    {
        groupRow.IsCollapsed = false;
    }
}
private void btnBoundCollapse_Click(object sender, RoutedEventArgs e)
{
    if (flexGridBound.Selection is null) return;
    int row = flexGridBound.Selection.Row;
    if (flexGridBound.Rows.Count > 0 && row >= 0 && flexGridBound.Rows[row] is GridGroupRow groupRow)
    {
        groupRow.IsCollapsed = true;
    }
}
Unbound Mode
You can expand and collapse all nodes in your Tree Grid application using the IsCollapsed property of the GridGroupRow class. This feature makes it convenient to navigate through node headers as a group when required. Following code shows how to expand and collapse nodes of TreeGrid in the FlexGrid control on the Click event of a button control.
private void btnUnboundExpand_Click(object sender, RoutedEventArgs e)
{
    if (flexGridUnbound.Selection is null) return;
    int row = flexGridUnbound.Selection.Row;
    if (flexGridUnbound.Rows.Count > 0 && row >= 0 && flexGridUnbound.Rows[row] is GridGroupRow groupRow)
    {
        groupRow.IsCollapsed = false;
    }
 }
private void btnUnboundCollapse_Click(object sender, RoutedEventArgs e)
{
   if (flexGridUnbound.Selection is null) return;
   int row = flexGridUnbound.Selection.Row;
   if (flexGridUnbound.Rows.Count > 0 && row >= 0 && flexGridUnbound.Rows[row] is GridGroupRow groupRow)
   {
      groupRow.IsCollapsed = true;
   }
}
type=note
You can use the CollapseGroups and CollapseGroupsToLevel methods to either collapse the whole tree or collapse the nodes to a certain level in .NET and .NET Framework respectively.
Sort and Filter Nodes
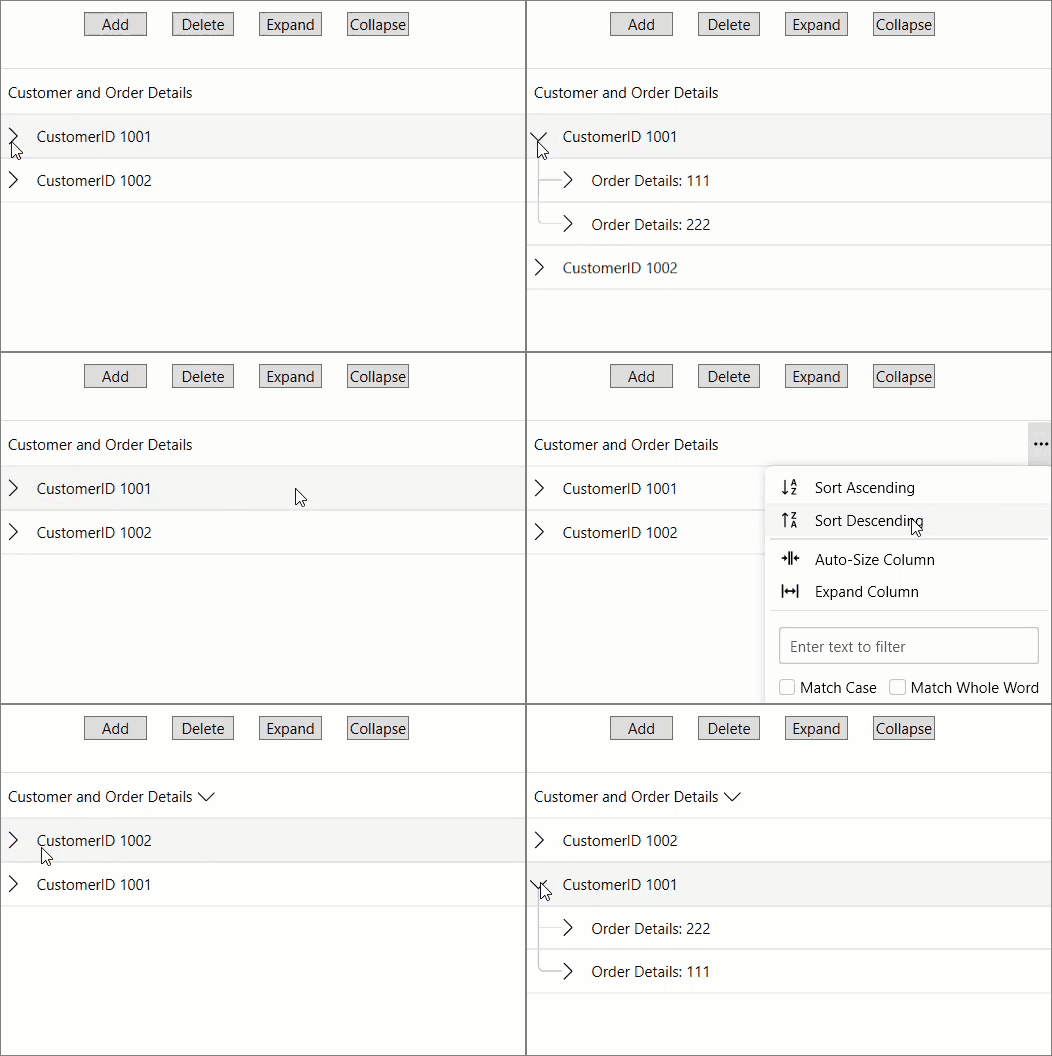
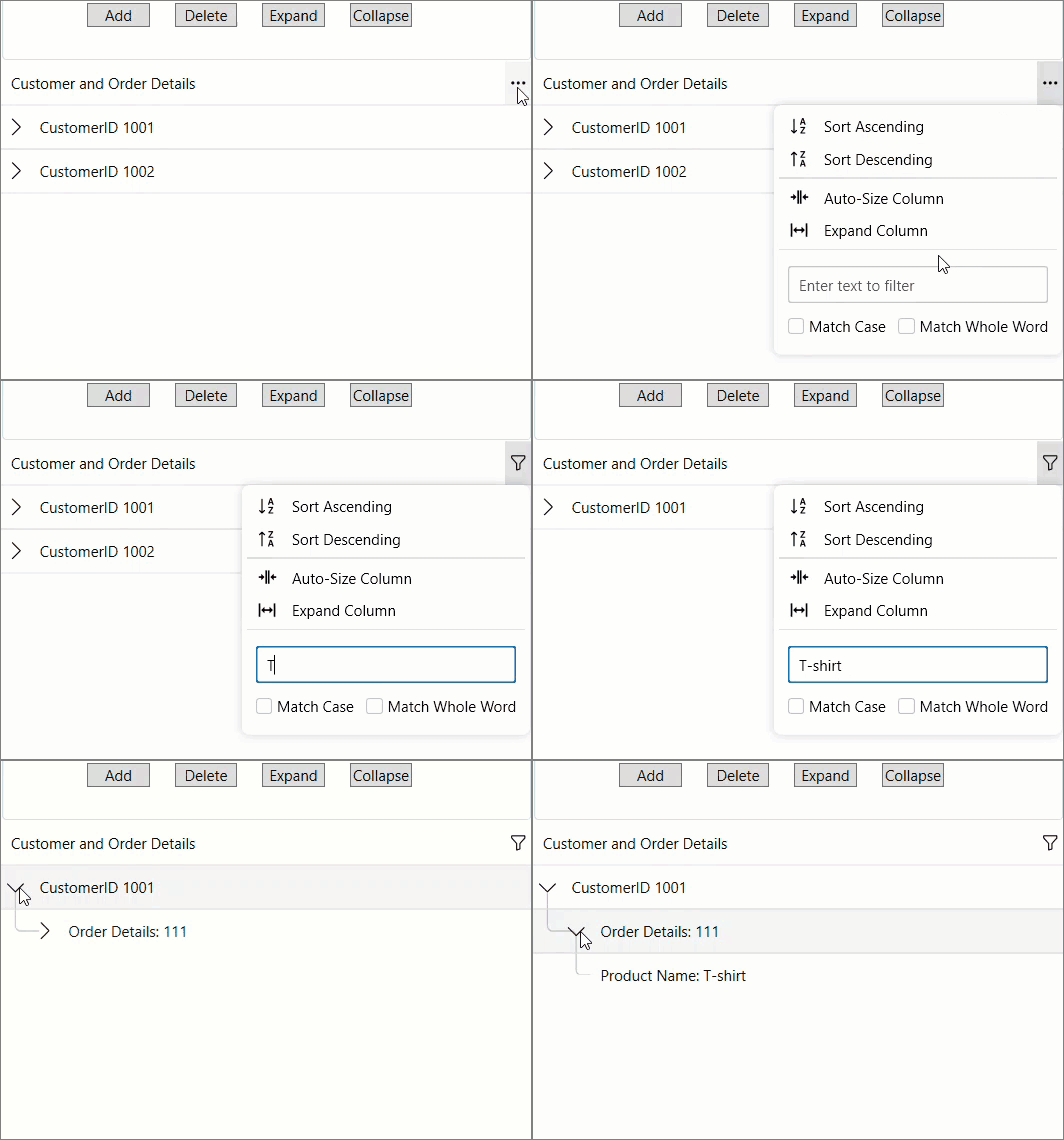
The TreeGrid includes sorting and filtering capabilities for efficiently organizing data and searching the relevant information. You can easily sort and filter data at runtime in a tree grid using the column header menu.
When sorting the TreeGrid. it ensures that not only the parent nodes are organized but also the child nodes follow the same order while maintaining their parent-child relationships. This keeps the hierarchical structure intact.

With filtering in the TreeGrid, an item remains visible if either the item itself or any of its children match the filter criteria. This not only preserves the hierarchical integrity of the data but also improves user experience by ensuring that relevant items are easily accessible.

In other words, both sorting and filtering operations provide a comprehensive view of the data.


