
- FlexGrid for WPF Overview
- Feature Comparison
- Quick Start
- Object Model Summary
- Data Binding
-
Features
- Columns
- Row
- Scrolling Modes
- Selection
- Sorting
- Cell Merging
- Custom Editors
- Custom Icon
- Transpose Data in Grid
- Data Grouping
- Data Filtering
- Data Aggregation
- Custom Cells
- Multiple Cell Factory
- Virtualization
- Paging
- TreeGrid
- Print Support
- Row Details Template
- Layout and Appearance: ClearStyle Technology
- Freezing and Pinning
- Import Data from Excel
- Export to Excel
- Clipboard Operations
- Validation
- FlexGrid Samples
Row Details Template
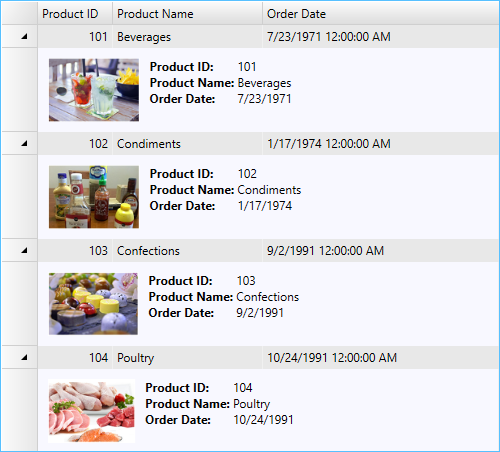
Row details template is a data panel that can be added to each row for displaying details. FlexGrid provides the flexibility to show information about each row through a template. You can embed text, UI elements, and data-bound controls, such as InputPanel, in the row details template. For each row, you can insert a data template to present its summary and show/provide details in other controls, such as text box, without affecting the dimensions of the grid. You can also use this template to create hierarchical grids displaying grouped data. In this example, we use row details template to display product-related information in FlexGrid.
The following image shows details of each row displayed through a row details template.
In the the following section learn how to implement Row Details in FlexGrid .NET and .NET Framework versions.
.NET Framework
To add row details template in FlexGrid
Drag a grid control onto the XAML designer in a WPF application.
Create three columns in the grid to display Product ID, Product Name and Order Date data fields.
<c1:C1FlexGrid.Columns>
    <c1:Column Header="Product ID" Binding="{Binding ProductId}" Width="75" />
    <c1:Column Header="Product Name" Binding="{Binding ProductName}" Width="150" />
    <c1:Column Header="Order Date" Binding="{Binding OrderDate}" Width="300" />
</c1:C1FlexGrid.Columns>
Create a row details template in XAML that embeds an image control and six text block controls within a DockPanel.
<c1:C1FlexGrid.RowDetailsTemplate>
      <DataTemplate>
          <DockPanel Background="GhostWhite">
              <Image DockPanel.Dock="Left" Name="img" Source="{Binding ImgSource}"
                     Height="64" Margin="10" />
              <Grid Margin="0, 10">
                  <Grid.ColumnDefinitions>
                      <ColumnDefinition Width="Auto" />
                      <ColumnDefinition Width="*" />
                  </Grid.ColumnDefinitions>
                  <Grid.RowDefinitions>
                      <RowDefinition Height="Auto" />
                      <RowDefinition Height="Auto" />
                      <RowDefinition Height="Auto" />
                  </Grid.RowDefinitions>
                  <TextBlock Text="Product ID: " FontWeight="Bold" />
                  <TextBlock Text="{Binding ProductId}" Grid.Column="1" />
                  <TextBlock Text="Product Name: " FontWeight="Bold" Grid.Row="1" />
                  <TextBlock Text="{Binding ProductName}" Grid.Column="1" Grid.Row="1" />
                  <TextBlock Text="Order Date: " FontWeight="Bold" Grid.Row="2" />
                  <TextBlock Text="{Binding OrderDate, StringFormat=d}"
                             Grid.Column="1" Grid.Row="2" />
              </Grid>
          </DockPanel>
      </DataTemplate>
  </c1:C1FlexGrid.RowDetailsTemplate>
In the MainWindow.xaml.cs file, create a class, User, to add data in the grid.
Public Class User
    Public Property ProductId() As Integer
        Get
            Return m_ProductId
        End Get
        Set
            m_ProductId = Value
        End Set
    End Property
    Private m_ProductId As Integer
    Public Property ProductName() As String
        Get
            Return m_ProductName
        End Get
        Set
            m_ProductName = Value
        End Set
    End Property
    Private m_ProductName As String
    Public Property OrderDate() As DateTime
        Get
            Return m_OrderDate
        End Get
        Set
            m_OrderDate = Value
        End Set
    End Property
    Private m_OrderDate As DateTime
    Public Property ImgSource() As ImageSource
        Get
            Return m_ImgSource
        End Get
        Set
            m_ImgSource = Value
        End Set
    End Property
    Private m_ImgSource As ImageSource
End Class
public class User { public int ProductId { get; set; } public string ProductName { get; set; } public DateTime OrderDate { get; set; } public ImageSource ImgSource{ get; set; } }
Populate the grid by creating a list, and bind the grid to the list using the ItemsSource property.
Public Sub New()
    InitializeComponent()
    'Create a list
    Dim users As New List(Of User)()
    'Add items to the list
    users.Add(New User() With {
    .ProductId = 101,
    .ProductName = "Beverages",
    .OrderDate = New DateTime(1971, 7, 23),
    .ImgSource = New BitmapImage(New Uri("pack://application:,,,/Resources/Beverage.png"))
})
    users.Add(New User() With {
    .ProductId = 102,
    .ProductName = "Condiments",
    .OrderDate = New DateTime(1974, 1, 17),
    .ImgSource = New BitmapImage(New Uri("pack://application:,,,/Resources/Condiments.png"))
})
    users.Add(New User() With {
    .ProductId = 103,
    .ProductName = "Confections",
    .OrderDate = New DateTime(1991, 9, 2),
    .ImgSource = New BitmapImage(New Uri("pack://application:,,,/Resources/Confections.png"))
})
    users.Add(New User() With {
    .ProductId = 104,
    .ProductName = "Poultry",
    .OrderDate = New DateTime(1991, 10, 24),
    .ImgSource = New BitmapImage(New Uri("pack://application:,,,/Resources/Poultry.png"))
})
    'Populate the grid
    grid.ItemsSource = users
End Sub
public MainWindow() { InitializeComponent(); //Create a list List<User> users = new List<User>(); //Add items to the list users.Add(new User() { ProductId = 101, ProductName = "Beverages", OrderDate = new DateTime(1971, 7, 23), ImgSource = new BitmapImage(new Uri(@"pack://application:,,,/Resources/Beverage.png")) }); users.Add(new User() { ProductId = 102, ProductName = "Condiments", OrderDate = new DateTime(1974, 1, 17), ImgSource = new BitmapImage(new Uri(@"pack://application:,,,/Resources/Condiments.png")) }); users.Add(new User() { ProductId = 103, ProductName = "Confections", OrderDate = new DateTime(1991, 9, 2), ImgSource = new BitmapImage(new Uri(@"pack://application:,,,/Resources/Confections.png")) }); users.Add(new User() { ProductId = 104, ProductName = "Poultry", OrderDate = new DateTime(1991, 10, 24), ImgSource = new BitmapImage(new Uri(@"pack://application:,,,/Resources/Poultry.png")) }); //Populate the grid grid.ItemsSource = users; }
.NET 5
To add row details template in FlexGrid
Drag a grid control onto the XAML designer in a WPF core application.
Create three columns in the grid to display Product ID, Product Name and Order Date data fields.
<c1:FlexGrid.Columns>
    <c1:GridColumn Header="ProductID" Binding="ProductId" Width="75" />
    <c1:GridColumn Header="Product Name" Binding="ProductName" Width="150" />
    <c1:GridColumn Header="Order Date" Binding="OrderDate" Width="300" />
</c1:FlexGrid.Columns>
Create a row details template in XAML that embeds an image control and six text block controls within a DockPanel.
<DataTemplate>
      <DockPanel Background="GhostWhite">
          <Image DockPanel.Dock="Left" Name="img" Source="{Binding ImgSource}"
   Height="64" Margin="10" />
          <Grid Margin="0, 10">
              <Grid.ColumnDefinitions>
                  <ColumnDefinition Width="Auto" />
                  <ColumnDefinition Width="*" />
              </Grid.ColumnDefinitions>
              <Grid.RowDefinitions>
                  <RowDefinition Height="Auto" />
                  <RowDefinition Height="Auto" />
                  <RowDefinition Height="Auto" />
              </Grid.RowDefinitions>
              <TextBlock Text="Product ID: " FontWeight="Bold" />
              <TextBlock Text="{Binding ProductId}" Grid.Column="1" />
              <TextBlock Text="Product Name: " FontWeight="Bold" Grid.Row="1" />
              <TextBlock Text="{Binding ProductName}" Grid.Column="1" Grid.Row="1" />
              <TextBlock Text="Order Date: " FontWeight="Bold" Grid.Row="2" />
              <TextBlock Text="{Binding OrderDate, StringFormat=d}"
           Grid.Column="1" Grid.Row="2" />
          </Grid>
      </DockPanel>
  </DataTemplate>
In the MainWindow.xaml.cs file, create a class, User, to add data in the grid.
public class User
{
    public int ProductId { get; set; }
    public string ProductName { get; set; }
    public DateTime OrderDate { get; set; }
    public ImageSource ImgSource { get; set; }
}
Populate the grid by creating a list, and bind the grid to the list using the ItemsSource property.
InitializeComponent();
//Create a list
List<User> users = new List<User>();
//Add items to the list
users.Add(new User()
{
    ProductId = 101,
    ProductName = "Beverages",
    OrderDate = new DateTime(1971, 7, 23),
    ImgSource = new BitmapImage(new Uri(@"pack://application:,,,/Resources/Beverage.png"))
});
users.Add(new User()
{
    ProductId = 102,
    ProductName = "Condiments",
    OrderDate = new DateTime(1974, 1, 17),
    ImgSource = new BitmapImage(new Uri(@"pack://application:,,,/Resources/Condiments.png"))
});
users.Add(new User()
{
    ProductId = 103,
    ProductName = "Confections",
    OrderDate = new DateTime(1991, 9, 2),
    ImgSource = new BitmapImage(new Uri(@"pack://application:,,,/Resources/Confections.png"))
});
users.Add(new User()
{
    ProductId = 104,
    ProductName = "Poultry",
    OrderDate = new DateTime(1991, 10, 24),
    ImgSource = new BitmapImage(new Uri(@"pack://application:,,,/Resources/Poultry.png"))
});
//Populate the grid
grid.ItemsSource = users;