
How to Import and Export Excel XLSX Using Vue
This tutorial shows how to import and export Excel XLSX files in a Vue application using SpreadJS, a Vue spreadsheet component. You’ll learn how to set up a Vue project, add a spreadsheet component, and enable Excel import/export.
Try Out an Import and Export Sample
You can also download the full sample to run locally, or check out our online interactive IO demo.
Set Up the Vue Spreadsheet Project
Run the following NPM command to create a new Vue app:
npm create vue@latest 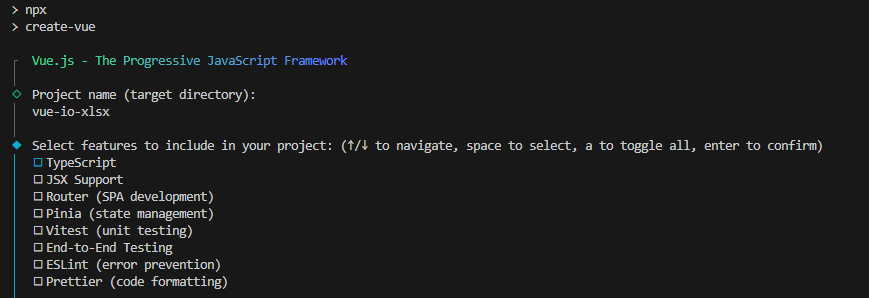
Install the required npm packages:
npm install @mescius/spread-sheets
npm install @mescius/spread-sheets-io
npm install @mescius/spread-sheets-vue
npm install file-saver
@mescius/spread-sheets – base SpreadJS library
@mescius/spread-sheets-io – Excel import/export
@mescius/spread-sheets-vue – Vue spreadsheet components
file-saver – lets users save files locally
Import and register the Vue spreadsheet components in src/main.js:
import './assets/main.css'

import { createApp } from 'vue'
import App from './App.vue'
import {
  GcSpreadSheets,
  GcWorksheet,
  GcColumn,
} from "@mescius/spread-sheets-vue";

let app = createApp(App);
app.component("gc-spread-sheets", GcSpreadSheets);
app.component("gc-worksheet", GcWorksheet);
app.component("gc-column", GcColumn);
app.mount("#app");
Add Spreadsheet to App Vue Component
Now, its time to build our spreadsheet into our App.vue component (or component of your choice).
In src/App.vue, import the JavaScript (and CSS) modules in the<script setup>:
import '@mescius/spread-sheets/styles/gc.spread.sheets.excel2013white.css'
import * as GC from '@mescius/spread-sheets';
import '@mescius/spread-sheets-io';
import 'file-saver';
In the <template> markup, declare the SpreadJS Workbook component:
<gc-spread-sheets class="spread-host" @workbookInitialized="initSpread">
</gc-spread-sheets>
In <script setup>, declare the needed variables and the initSpread handler to populate the workbook variable when the SpreadJS instance is initialized.
let workbook = null;
let file = null;
let exportFileName = 'export.xlsx';

function initSpread(spread) {
  workbook = spread;
}
With the steps so far, the Vue app renders a basic spreadsheet.
Add Excel Import Code to a Vue App
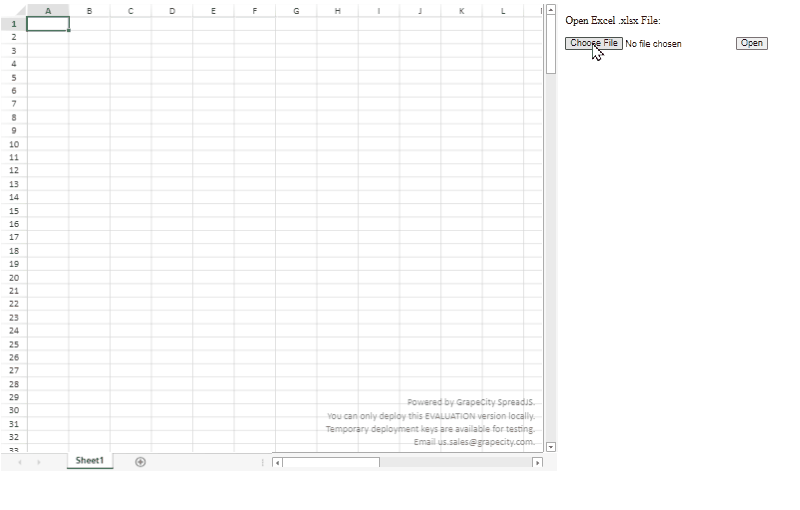
Add an input element and a button to allow users to select their Excel (XLSX) file. Set accept=".xlsx" so only Excel (.xlsx) files can be selected.
<input type="file" id="selectedFile" accept=".xlsx" @change="handleFileChange" />
<button id="btnImport" @click="handleImport">Import</button>
The input has a change event handler that updates the file variable to the most recently selected file. The file change handler is quite simple:
function handleFileChange(e) {
  file = e.target.files[0];
}
The button has a click handler that triggers the file import.
To make that work, add a function to import a file using spreads import method. These handlers are also added to the<script setup> in src/App.vue.
function handleImport(e) {
  //let file = document.querySelector('#selectedFile').files[0];
  if (!file) {
    return;
  }
  workbook.import(file);
}
An Excel (.xlsx) file can now be imported and viewed in the Vue spreadsheet component like so:
Add Excel Export Code to a Vue App
Add a button to export the file by invoking the Spreadsheet’s export method in its click event handler:
function handleExport(e) {
  if (exportFileName.substr(-5, 5) !== '.xlsx') {
    exportFileName += '.xlsx';
  }

  workbook.export(
    function (blob) {
      // save blob to a file
      saveAs(blob, exportFileName);
    },
    function (e) {
      console.log(e);
    },
    {
      fileType: GC.Spread.Sheets.FileType.excel,
    }
  );
}
The export file name is bound to the exportFileName variable using v-model. Define an input field to let users enter a file name:
<input type="text" id="exportFileName" v-model="exportFileName" />Add an Export File button that calls the handleExport function on click.
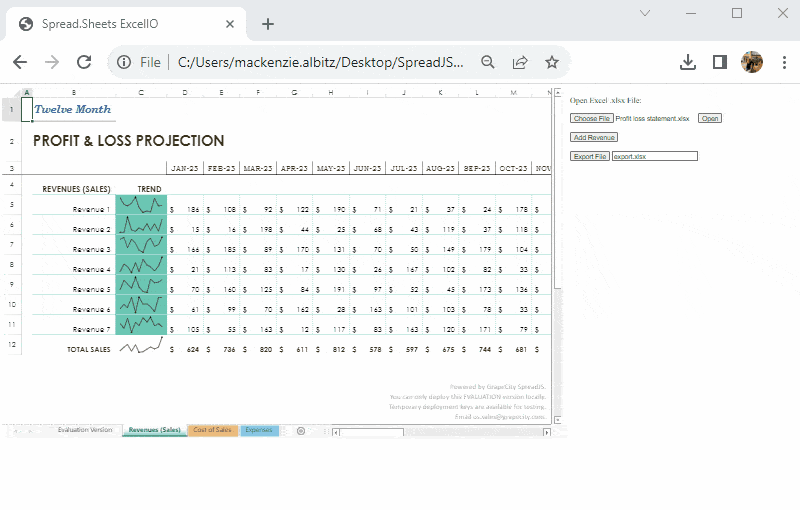
<button id="btnExport" @click="handleExport">Export File</button> Users can now edit the spreadsheet within the Vue app and export it with the Export File button. The exported file opens in Excel with all changes preserved.
This is just one example of how you can use SpreadJS Vue spreadsheets to add data to your Excel files and then export them back to Excel with simple Vue code.
Include Extra Features
If you want to import and export Excel files with Charts, Shapes and PivotTables, make sure to include those optional add-on modules for SpreadJS (@mescius/spread-sheets-charts, @mescius/spread-sheets-shapes and @mescius/spread-sheets-pivot-addon).
Import and Export Excel FAQs
Do I need to have Excel installed for this import or export in JavaScript to work?
No! SpreadJS is a stand-alone JavaScript component that can import and export Excel files without depending on Excel at all.
Can my end users changes be included in the export?
Yes! SpreadJS allows users to modify spreadsheets in an Excel-like experience. Those changes will be included when the spreadsheet is exported.
What types of files can be imported or exported?
SpreadJS supports import and export of .xlsx, .xlsm, .xltm file types. It can even import .csv files and has a custom SpreadJS (.sjs)file format for optimized performance and app development.
Do you support Excel files with macros?
The macros will not run, but Excel files with macros can be imported and exported without losing the macros. The macros simply will be ignored when the spreadsheet runs in SpreadJS. Note: most macro use cases can be replicated in custom JavaScript code using SpreadJS