Data Engine WebApi using C1 Template
To add data to the DataEngine service, complete the following steps:
Step1: Create a new WebAPI application
- In Visual Studio, select File | New | Project to create a new Web API Service Project.
- Under installed templates, select C1 | Visual C# | Web | C1 Web API Application to create a new C1 Web API Service application.
- Set a Name and Location for your application, and then Click OK.
- In the ComponentOne ASP.NET Web API Application Wizard, select Data engine services checkbox.
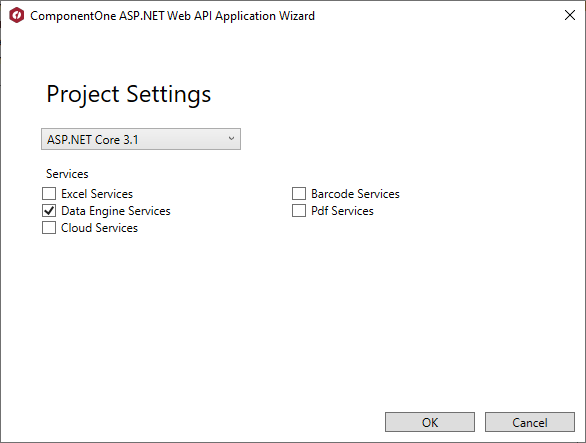
- Once you have selected the Services from the wizard, click OK to create a new C1 Web API Service application.
Back to Top
Step 2: Create a new Model
Create a new class inside the Models folder to create Product data source for the Olap control.
- Add a new class to the folder Models (for example:
ProductData.cs). For more information about how to add a new model, see Adding controls.
- Add the following code to the model to define the data for Olap.
using System;
using System.Collections.Generic;
using System.Data;
using System.Linq;
using System.Web;

namespace DataEngineWebpi.Models
{
    public class ProductData
    {
        private static Random r = new Random();

        public int ID { get; set; }
        public string Product { get; set; }
        public string Country { get; set; }
        public DateTime Date { get; set; }
        public int Sales { get; set; }
        public int Downloads { get; set; }
        public bool Active { get; set; }
        public double Discount { get; set; }

        private static int randomInt(int max)
        {
            return (int)Math.Floor(r.NextDouble() * (max + 1));
        }

        public static IEnumerable<ProductData> GetData(int cnt)
        {
            string[] countries = "China,India,Russia,US,Germany,UK,Japan,Italy,Greece,Spain,Portugal".Split(',');
            string[] products = "Wijmo,Aoba,Xuni,Olap".Split(',');
            List<ProductData> result = new List<ProductData>();
            for (var i = 0; i < cnt; i++)
            {
                result.Add(new ProductData
                {
                    ID = i,
                    Product = products[randomInt(products.Length - 1)],
                    Country = countries[randomInt(countries.Length - 1)],
                    Date = new DateTime(2015, randomInt(5) + 1, randomInt(27) + 1),
                    Sales = randomInt(10000),
                    Downloads = randomInt(10000),
                    Active = randomInt(1) == 1 ? true : false,
                    Discount = r.NextDouble()
                });
            }
            return result;
        }
    }
}
Back to Top
Step3: Configure Startup.cs file
In the Startup.cs file, register the data source, that will be later accessed by the client application.
- From the Solution Explorer, select and open Startup.cs file.
- Replace the code inside Startup1 class.
| Example Title |
Copy Code
|
using System;
using System.Threading.Tasks;
using Microsoft.Owin;
using Owin;
using System.IO;
using C1.DataEngine;
using C1.Web.Api;
using DataEngineWebpi.Models;

[assembly: OwinStartup(typeof(DataEngineWebpi.Startup1))]

namespace DataEngineWebpi
{
    public class Startup1
    {
        private static string DATAPATH = Path.Combine(System.Web.HttpRuntime.AppDomainAppPath, "Data");
        public void Configuration(IAppBuilder app)
        {
            app.UseDataEngineProviders()
                .AddDataEngine("complex10", () =>
                {
                    return ProductData.GetData(100000);
                })
                .AddDataEngine("complex50", () =>
                {
                    return ProductData.GetData(500000);
                })
                .AddDataEngine("complex100", () =>
                {
                    return ProductData.GetData(1000000);
                })
                .AddDataSource("dataset10", () => ProductData.GetData(100000).ToList())
                .AddDataSource("dataset50", () => ProductData.GetData(500000).ToList())
                .AddDataSource("dataset100", () => ProductData.GetData(1000000).ToList());
        }
    }
}
|
Once you have added the above code in Startup1.cs, you can register the DataEngine data and the memory data by the extended methods RegisterDataEngine and RegisterDataSet.
Note: If you want your WebAPI server to support cross domain requests, you can add the following code in the Configuration method of Startup1.cs file.
app.UseCors(CorsOptions.AllowAll);
Back to Top
Step 4: Build and Run the Project
- Click Build | Build Solution to build the project.
- Press F5 to run the project.
Back to Top