How to Create an iOS Framework for a Custom Control
iOS Frameworks are a mechanism for packaging classes that's easy to use and distribute. Apple provides a number of its own Frameworks—such as UIKit, Foundation, and CoreData—that all iOS developers will be familiar with. These shared resources can be static or dynamic libraries that, when incorporated into your application, provide expanded functionality. They improve cross-project code reuse, and they're the preferred delivery method for third-party libraries. In this article, we'll cover creating an iOS framework from our custom checkbox control.
Static vs. Dynamic iOS Frameworks
There's a long-running computer science debate on the benefits of static vs. dynamic libraries. Static iOS frameworks are composed of static libraries that are linked at compile time and do not change (hence the name). On the other hand, dynamic frameworks (also referred to as embedded frameworks on iOS) are composed of dynamic units of code that are linked at runtime and thus can change. For a long time, static frameworks were the only option for iOS developers, but since Xcode 6, developers targeting iOS 8 or greater finally have the ability to create dynamic frameworks. Both types can bring different advantages inherently, but on iOS, some factors will make the framework decision for you. For instance, if you're interested in building a framework using Swift, dynamic frameworks are the only option. On the other hand, if you're concerned about broad compatibility—like supporting pre-iOS 8 devices—then static frameworks are your best option. (Here's a brief summary of static versus dynamic libraries.) Before we get too far along, you might want to read my blog about the custom checkbox control example, as it's the basis for the examples for the rest of this article.
Creating a Static iOS Framework
The process of creating a static iOS framework is quite involved, with a lot of steps. Here's a high-level view: First, we must create a static library. Then, we'll create an aggregate target that will create binaries for all of the architectures we'll need to support.
- Finally, we'll be able to package these files into our framework.
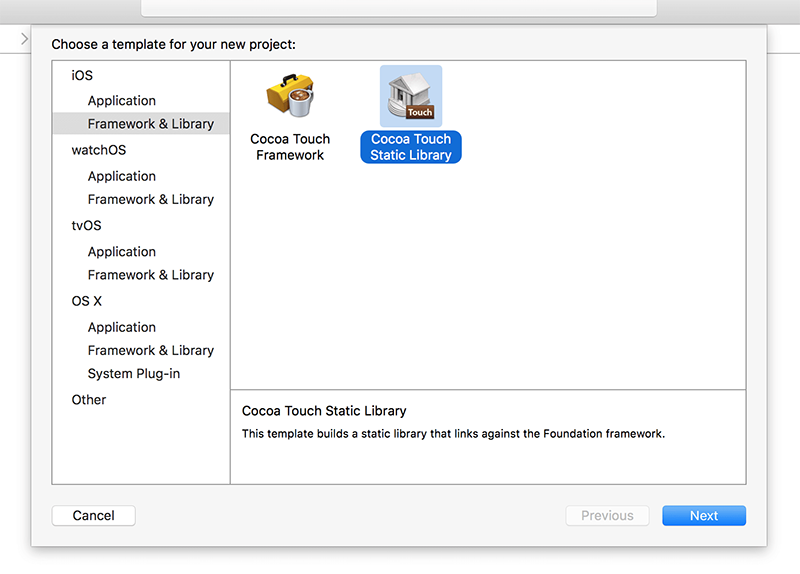
Let's begin with creating a Cocoa Touch Static Library project.
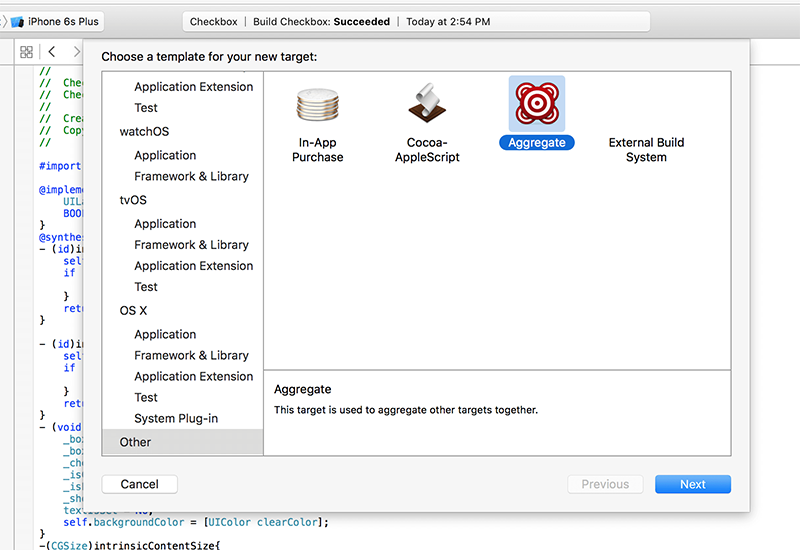
 Static Library Project Template The project will generically be named Checkbox. After we've taken this step, we can import in the code for our control. I'll directly copy the header and implementation files that were part of my custom control class into this project. Once I've copied those files over, I'll be able to generate a static library (denoted by the .a extension). One thing to keep in mind: initially, this file will be built for a single architecture only. The next step is to create a universal library (sometimes called a "fat library") built against multiple architectures. There are a few different processor architectures that we need to be concerned about, including x86_64 and i386 (for the iOS simulator), as well as armv7 and arm64 for the various iPhone and iPad devices that we're targeting. This way, when an app using our framework is deployed, it can be linked to the appropriate bits for the target device. We'll need to add a new target to our application, and select the Aggregate project template in the "Other" category.
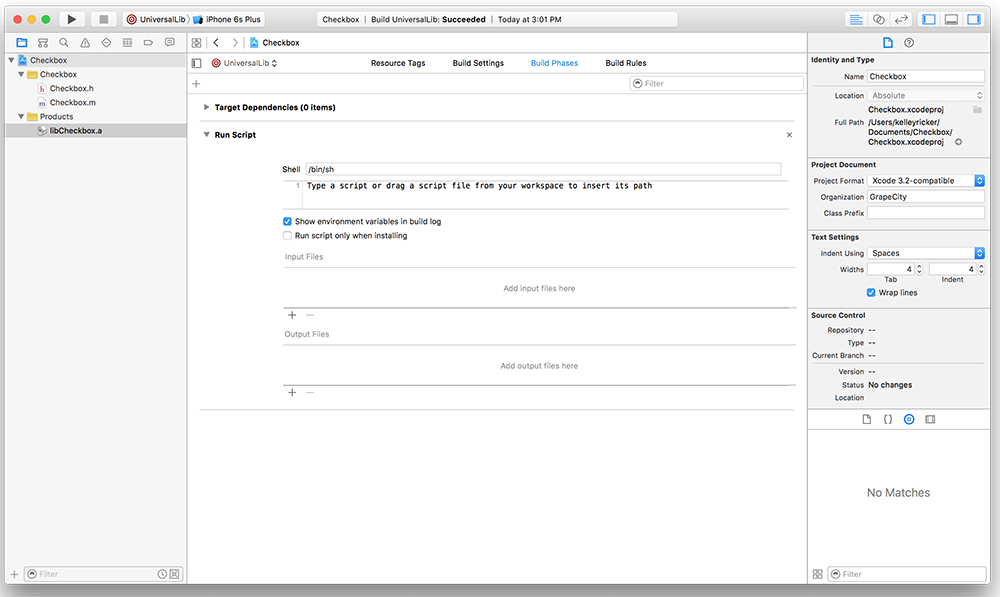
  Aggregate Project Template I'll name the Aggregate target UniversalLib so that it can be easily identified. Now, we'll need to navigate to the Build Phases for the UniversalLib target so that we can run our own script when we build for this target. Click the "+" at the top of the screen, and select the New Run Script Phase option. You can now expand the Run Script item, which provides two options: type your own script or specify the location of a script.
  Build Script Entry We'll use the following script to build the universal library. You can either copy this directly into Xcode or create a separate .sh file with this script and simply specify the path.
Define output folder environment variable
UNIVERSAL\_OUTPUTFOLDER=${BUILD\_DIR}/${CONFIGURATION}-universal
Build Device and Simulator versions
xcodebuild -target ${PROJECT\_NAME} ONLY\_ACTIVE\_ARCH=NO -configuration ${CONFIGURATION} -sdk iphoneos BUILD\_DIR="${BUILD\_DIR}" BUILD\_ROOT="${BUILD_ROOT}"
xcodebuild -target ${PROJECT\_NAME} ONLY\_ACTIVE\_ARCH=NO -configuration ${CONFIGURATION} -sdk iphonesimulator -arch i386 -arch x86\_64 BUILD\_DIR="${BUILD\_DIR}" BUILD\_ROOT="${BUILD\_ROOT}"
Make sure the output directory exists
mkdir -p "${UNIVERSAL_OUTPUTFOLDER}"
Create universal binary file using lipo
lipo -create -output "${UNIVERSAL\_OUTPUTFOLDER}/lib${PROJECT\_NAME}.a" "${BUILD\_DIR}/${CONFIGURATION}-iphoneos/lib${PROJECT\_NAME}.a" "${BUILD\_DIR}/${CONFIGURATION}-iphonesimulator/lib${PROJECT\_NAME}.a"
Copy the header files (just for convenience)
cp -R "${BUILD\_DIR}/${CONFIGURATION}-iphoneos/include" "${UNIVERSAL\_OUTPUTFOLDER}/"
You may have noticed I mentioned the lipo tool in the script comments. Lipo is used to merge the device and simulator binaries into one library. Once generated, this library can be found in the Derived Data location where Xcode puts its build output. The path for Derived Data folder is inside your user library, in Users//Library/Developer/Xcode/DerivedData.  Derived Data Folder in Finder We can verify that the library supports the required architectures with lipo. From a Terminal window we can use the command:
lipo -info libCheckbox.a
The lipo command should report the following: Architectures in the fat file: libXuniListView.a are: armv7 i386 x86_64 arm64 Now, we've reached the point where we can add a framework target to our project. The framework target is dependent upon the universal library target we just created, and it will encapsulate all necessary binaries and corresponding headers. Select the root item of our project, and add a new Target from the File menu -> New -> Target.
Choose the Cocoa Touch Framework template. 
We'll append the work Kit to our control name by our convention and call the target CheckboxKit. Next we'll make some changes to the Build Settings tab.
There are a number of changes here. Architectures Change the Build Active Architectures Only option to "No" for both Debug and Release Build Locations
For Per-configuration Build Products Path, replace the $(EFFECTIVE_PLATFORM_NAME) environment variable with the literal -framework
- For Per-configuration Intermediate Build Files Path, replace the $(EFFECTIVE_PLATFORM_NAME) environment variable with the literal -framework Deployment Change the Strip Style from "Debugging Symbols" to "Non-Global Symbols" Linking* Change Dead Code Stripping to "No"
- Change Macho-O Type from "Dynamic Library" to "Static Library"
Now, we'll need to navigate to the Build Phases tab and expand the Target Dependencies node. Click on the + sign to add a new dependency on the UniversalLib target.
 Target Dependencies Next, expand the headers node, and expand the child node named Public. We'll make all of our header files appear here. In this case, I'll add my original Checkbox.h header from my static library project to accompany the already-present CheckboxKit.h. You can click the + sign to add the additional header, but note that it's added to the Project node rather than the Public node. You can simply drag it into the Public node to correct this.
Stay in the Build Phases tab and click the top + sign above the Target depenencies node. Choose New Run Script Phase. Expand the Run Script Node and add the following script:
UNIVERSAL\_LIBRARY\_PATH=${UNIVERSAL\_LIBRARY\_DIR}/lib${PROJECT_NAME}.a

FRAMEWORK\_DIR=${BUILD\_DIR}/${CONFIGURATION}-framework

FRAMEWORK\_PATH=${FRAMEWORK\_DIR}/${PRODUCT_NAME}.framework

# Copy fat library from UniversalLib target as PRODUCT_NAME.

cp "${UNIVERSAL\_LIBRARY\_PATH}" "${FRAMEWORK\_PATH}/${PRODUCT\_NAME}"
Open framework folder for convenience
open "FRAMEWORK_DIR"
We'll also add an import statement to the CheckboxKit.h header so that a user can import the control via a single import statement. In this case:
#import <CheckboxKit/CheckboxKit.h>
Since our framework is relatively simple, this may seem unnecessary. For more complicated frameworks that contain many headers, requiring a single import makes the frameworks much easier to use. The final version should look as follows:
import <UIKit/UIKit.h>

//! Project version number for CheckboxKit.
FOUNDATION_EXPORT double CheckboxKitVersionNumber;

//! Project version string for CheckboxKit.
FOUNDATION_EXPORT const unsigned char CheckboxKitVersionString[];

#import <CheckboxKit/Checkbox.h>
Finally, we build the project for our framework target to generate the CheckboxKit framework. The containing folder should automatically open as the last step of the script, and the framework will appear in our Derived Data directory: 
Framework Location in Derived Data Our static iOS framework is done! Use this as you would any other third-party framework: add it under to the General -> Linked Frameworks and Libraries tab in your project settings. To access the controls in code, you'll simply need to add import statements for any necessary headers
Creating a Dynamic iOS Framework
Apple's mechanism for creating dynamic frameworks is a little more straightforward. For this type we can skip directly to creating a project using the Cocoa Touch Framework template and append the word Kit to the control name (CheckboxKit).  Framework Project Template We'll once again add the header and implementation files for the custom checkbox control to this project. We'll also need to add an import statement for our control headers to the CheckboxKit.h file so that is appears as follows:
import <UIKit/UIKit.h>

//! Project version number for CheckboxKit.
FOUNDATION_EXPORT double CheckboxKitVersionNumber;

//! Project version string for CheckboxKit.
FOUNDATION_EXPORT const unsigned char CheckboxKitVersionString[];

#import <CheckboxKit/Checkbox.h>
In the Build Phases tab, expand the headers node; then expand the child node name Public. We'll need to make all of our header files appear here. In this case, I'll add my original Checkbox.h header from my static library project to accompany the already-present CheckboxKit.h. You can click the + sign to add the additional header, but note that it's added to the Project node, not the Public node. Drag it into the Public node to correct this. 
If we build this project, we can already generate a dynamic framework in our Derived Data directory, though this framework is not universal (since we're only generating it against the iOS simulator at this point). We'll need to create a universal "fat" library so our framework can run on both the simulator and the device. Once again, we'll add another target to our project using the Aggregate template and call it UniversalLib.
We'll add a script to the UniversalLib target that handles both building and merging the various architecture binaries. Navigate to the Build Phases tab, click the small + sign, and choose the New Run Script Phase option.  Build Script Entry Next we'll add a script in the Run Script tab. Copy the following script into Xcode:
#!/bin/sh
UNIVERSAL\_OUTPUTFOLDER=${BUILD\_DIR}/${CONFIGURATION}-universal
Make sure the output directory exists
mkdir -p "${UNIVERSAL_OUTPUTFOLDER}"
Step 1. Build Device and Simulator versions
xcodebuild -target "${PROJECT\_NAME}" ONLY\_ACTIVE\_ARCH=NO -configuration ${CONFIGURATION} -sdk iphoneos  BUILD\_DIR="${BUILD\_DIR}" BUILD\_ROOT="${BUILD_ROOT}" clean build
xcodebuild -target "${PROJECT\_NAME}" -configuration ${CONFIGURATION} -sdk iphonesimulator ONLY\_ACTIVE\_ARCH=NO BUILD\_DIR="${BUILD\_DIR}" BUILD\_ROOT="${BUILD_ROOT}" clean build
Copy the framework structure to the universal folder
cp -R "${BUILD\_DIR}/${CONFIGURATION}-iphoneos/${PROJECT\_NAME}.framework" "${UNIVERSAL_OUTPUTFOLDER}/"
Copy Swift modules from iphonesimulator build (if it exists) to the copied framework directory
SIMULATOR\_SWIFT\_MODULES\_DIR="${BUILD\_DIR}/${CONFIGURATION}-iphonesimulator/${PROJECT\_NAME}.framework/Modules/${PROJECT\_NAME}.swiftmodule/."
if [ -d "${SIMULATOR\_SWIFT\_MODULES_DIR}" ]; then
cp -R "${SIMULATOR\_SWIFT\_MODULES\_DIR}" "${UNIVERSAL\_OUTPUTFOLDER}/${PROJECT\_NAME}.framework/Modules/${PROJECT\_NAME}.swiftmodule"
fi
Create universal binary file using lipo and place the combined executable in the copied framework directory
lipo -create -output "${UNIVERSAL\_OUTPUTFOLDER}/${PROJECT\_NAME}.framework/${PROJECT\_NAME}" "${BUILD\_DIR}/${CONFIGURATION}-iphonesimulator/${PROJECT\_NAME}.framework/${PROJECT\_NAME}" "${BUILD\_DIR}/${CONFIGURATION}-iphoneos/${PROJECT\_NAME}.framework/${PROJECT_NAME}"
Open the Universal output folder for convenience
open "${UNIVERSAL_OUTPUTFOLDER}"
At this point, we need to make sure we have the same setting for Build Active Architectures across our Project and Targets. Under the Architectures tab, change the Build Active Architectures Only option to No for both Debug and Release in all of targets and the project. Now we're able to build our project for the aggregate UnversalLib target. The containing folder should automatically open as the last step of the script, and the framework will appear in our Derived Data directory.
We've created our dynamic iOS framework! You'll need to add the Framework to the project under the General > Embedded Binaries tab in your project settings (which should automatically add it to Linked Frameworks and Libraries). To access the controls in code, you'll simply add import statements for any necessary headers.
iOS Framework Wrap-Up
The topic of iOS frameworks is deeply nuanced, and with Apple's addition of dynamic embedded frameworks, the subject has become even more complex. Ultimately, embedded frameworks will be the future since they're the only option for Swift, but static frameworks will also remain in use for supporting older versions of iOS. In the next part of this series we'll shift gears to examine how we can connect our native control to Xamarin via a binding library. Read more about custom controls.


