
TreeMap Chart
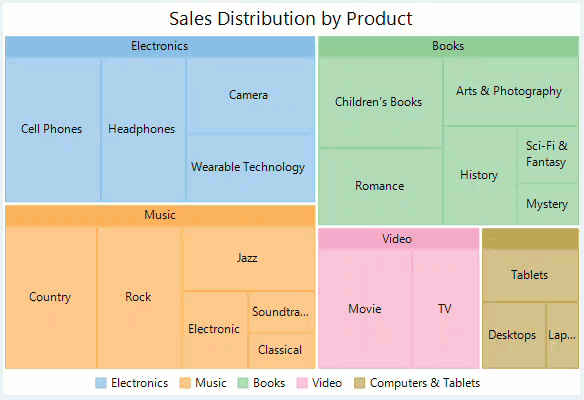
TreeMaps are the data visualization tools that display the hierarchical data as a set of nested rectangles, while displaying the quantities for each category through area size of the corresponding rectangles. These charts are useful in giving a quick glimpse of patterns in huge hierarchical data sets without costing you much of screen real estate. For instance, below treemap shows the product-wise sales distribution across various categories without occupying much space.
Create a WinForms TreeMap
FlexChart for WinForms provides treemap through a stand alone control which is represented by the TreeMap class. You can bind the chart with data using the DataSource property provided by the TreeMap class. This class also provides Binding and BindingName properties for generating rectangular nodes for data items and their respective categories or groups. While Binding property takes string value depicting the name of the property of data item that contains numeric data value, helpful in calculating the size of rectangular nodes, BindingName takes string value depicting the name of data items. ChildItemPath property ensures that a hierarchical structure of the provided data collection is maintained, by communicating to the control about the child items within the data.
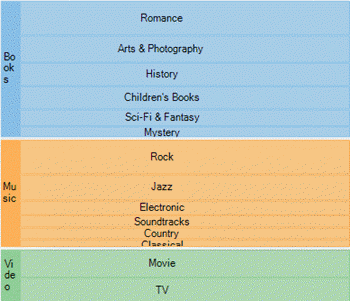
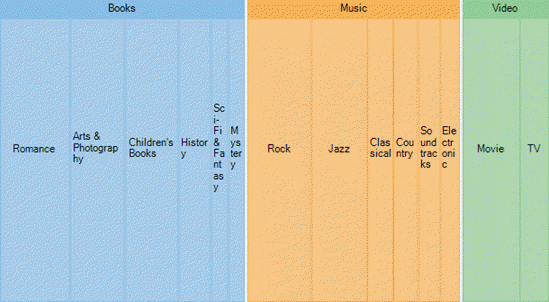
By default, the TreeMap control displays the squarified layout (as shown in the image above) in which treemap rectangles are arranged as approximate squares. This layout is very useful for displaying large data sets and makes it easy to make comparisons and point patterns. However, you can also display your treemap in the horizontal or vertical layout by setting the ChartType property of TreeMap class.
Horizontal TreeMap | Vertical TreeMap |
|---|---|
|
|
To create a treemap using FlexChart:
At design-time
Drag and drop the TreeMap control to the form.
Right click the TreeMap control on form to open the Properties window.
Set the data source using the DataSource property.
Set up chart by setting the Binding and BindingName property.
Set the ChildItemsPath property to name of the property that contains child items.
Using code
To create a WinForms treemap chart through code, the first step after initializing the control is to clear the default series. Set up the data source through the DataSource property and configure the chart by setting the Binding and BindingName property. Also, set the ChildItemsPath property to generate child items in hierarchical data.
//Passing data to TreeMap
treeMap1.DataSource = GetTreeMapData();
//Binding TreeMap to 'Sales' data
treeMap1.Binding = "sales";
treeMap1.BindingName = "type";
//Specifying the field for child item
treeMap1.ChildItemsPath = "items";
//Setting max depth upto level which items can be drilled
treeMap1.MaxDepth = 1;
'Passing data to TreeMap
treeMap1.DataSource = GetTreeMapData()
'Binding TreeMap to 'Sales' data
treeMap1.Binding = "Sales"
treeMap1.BindingName = "Type"
'Specifying the field for child item
treeMap1.ChildItemsPath = "Items"
'Setting max depth upto level which items can be drilled
treeMap1.MaxDepth = 1Note that the above sample code uses a custom method named GetTreeMapData to supply data to the chart. You can set up the data source as per your requirements.
//Method for creating data for TreeMap
        Random rnd = new Random();
int rand() { return rnd.Next(10, 100); }
public object GetTreeMapData()
{
    var data = new object[] { new {
type = "Music",
items = new [] { new {
    type = "Country",
    items= new [] { new {
        type= "Classic Country",
        sales = rand()
    }}
}, new {
    type= "Rock",
    items= new [] { new {
        type= "Funk Rock",
        sales= rand()
     } }
}, new {
    type= "Classical",
    items= new [] { new {
        type= "Symphonies",
        sales= rand()
        } }
}}
}, new {
type= "Books",
items= new [] { new {
    type= "Arts & Photography",
items= new [] { new {
        type= "Architecture",
sales= rand()
}}
}, new {
    type= "Children's Books",
items= new [] { new {
        type= "Beginning Readers",
sales= rand()
} }
}, new {
    type= "History",
items= new [] { new {
        type= "Ancient",
sales= rand()
} }
}, new {
    type= "Mystery",
items= new [] { new {
        type= "Thriller & Suspense",
sales= rand()
     } }
}, new {
    type= "Sci-Fi & Fantasy",
items= new [] { new {
        type= "Fantasy",
sales= rand()
}}
} }
}, new {
type= "Electronics",
items= new [] { new {
    type= "Wearable Technology",
items= new [] { new {
        type= "Activity Trackers",
sales= rand()
}}
}, new {
    type= "Cell Phones",
items= new [] { new {
        type= "Accessories",
sales= rand()
} }
}, new {
    type= "Headphones",
items= new [] { new {
        type= "Earbud headphones",
sales= rand()
} }
}, new {
    type= "Camera",
items= new [] { new {
        type= "Digital Cameras",
sales= rand()
     } }
} }
}, new {
type= "Video",
items= new [] { new {
    type= "Movie",
items= new [] { new {
        type= "Children & Family",
sales= rand()
} }
}, new {
    type= "TV",
items= new [] { new {
        type= "Comedy",
sales= rand()
} }
} }
} };
    return data;
}
' Method for creating data for TreeMap
Private rnd As New Random()
Private Function rand() As Integer
Return rnd.[Next](10, 100)
End Function
Private Function GetTreeMapData() As Leaf()
Dim data As Leaf() = New Leaf() {New Leaf With {
.Type = "Music",
.Items = {New Leaf With {
.Type = "Country",
.Items = {New Leaf With {
.Type = "Classic Country",
.Sales = rand()
}, New Leaf With {
.Type = "Cowboy Country",
.Sales = rand()
}, New Leaf With {
.Type = "Outlaw Country",
.Sales = rand()
}, New Leaf With {
.Type = "Western Swing",
.Sales = rand()
}, New Leaf With {
.Type = "Roadhouse Country",
.Sales = rand()
}}
}, New Leaf With {
.Type = "Rock",
.Items = {New Leaf With {
.Type = "Hard Rock",
.Sales = rand()
}, New Leaf With {
.Type = "Blues Rock",
.Sales = rand()
}, New Leaf With {
.Type = "Funk Rock",
.Sales = rand()
}, New Leaf With {
.Type = "Rap Rock",
.Sales = rand()
}, New Leaf With {
.Type = "Guitar Rock",
.Sales = rand()
}, New Leaf With {
.Type = "Progressive Rock",
.Sales = rand()
}}
}, New Leaf With {
.Type = "Classical",
.Items = {New Leaf With {
.Type = "Symphonies",
.Sales = rand()
}, New Leaf With {
.Type = "Chamber Music",
.Sales = rand()
}}
}, New Leaf With {
.Type = "Soundtracks",
.Items = {New Leaf With {
.Type = "Movie Soundtracks",
.Sales = rand()
}, New Leaf With {
.Type = "Musical Soundtracks",
.Sales = rand()
}}
}, New Leaf With {
.Type = "Jazz",
.Items = {New Leaf With {
.Type = "Smooth Jazz",
.Sales = rand()
}, New Leaf With {
.Type = "Vocal Jazz",
.Sales = rand()
}, New Leaf With {
.Type = "Jazz Fusion",
.Sales = rand()
}, New Leaf With {
.Type = "Swing Jazz",
.Sales = rand()
}, New Leaf With {
.Type = "Cool Jazz",
.Sales = rand()
}, New Leaf With {
.Type = "Traditional Jazz",
.Sales = rand()
}}
}, New Leaf With {
.Type = "Electronic",
.Items = {New Leaf With {
.Type = "Electronica",
.Sales = rand()
}, New Leaf With {
.Type = "Disco",
.Sales = rand()
}, New Leaf With {
.Type = "House",
.Sales = rand()
}}
}}
}, New Leaf With {
.Type = "Video",
.Items = {New Leaf With {
.Type = "Movie",
.Items = {New Leaf With {
.Type = "Kid & Family",
.Sales = rand()
}, New Leaf With {
.Type = "Action & Adventure",
.Sales = rand()
}, New Leaf With {
.Type = "Animation",
.Sales = rand()
}, New Leaf With {
.Type = "Comedy",
.Sales = rand()
}, New Leaf With {
.Type = "Drama",
.Sales = rand()
}, New Leaf With {
.Type = "Romance",
.Sales = rand()
}}
}, New Leaf With {
.Type = "TV",
.Items = {New Leaf With {
.Type = "Science Fiction",
.Sales = rand()
}, New Leaf With {
.Type = "Documentary",
.Sales = rand()
}, New Leaf With {
.Type = "Fantasy",
.Sales = rand()
}, New Leaf With {
.Type = "Military & War",
.Sales = rand()
}, New Leaf With {
.Type = "Horror",
.Sales = rand()
}}
}}
}, New Leaf With {
.Type = "Books",
.Items = {New Leaf With {
.Type = "Arts & Photography",
.Items = {New Leaf With {
.Type = "Architecture",
.Sales = rand()
}, New Leaf With {
.Type = "Graphic Design",
.Sales = rand()
}, New Leaf With {
.Type = "Drawing",
.Sales = rand()
}, New Leaf With {
.Type = "Photography",
.Sales = rand()
}, New Leaf With {
.Type = "Performing Arts",
.Sales = rand()
}}
}, New Leaf With {
.Type = "Children's Books",
.Items = {New Leaf With {
.Type = "Beginning Readers",
.Sales = rand()
}, New Leaf With {
.Type = "Board Books",
.Sales = rand()
}, New Leaf With {
.Type = "Chapter Books",
.Sales = rand()
}, New Leaf With {
.Type = "Coloring Books",
.Sales = rand()
}, New Leaf With {
.Type = "Picture Books",
.Sales = rand()
}, New Leaf With {
.Type = "Sound Books",
.Sales = rand()
}}
}, New Leaf With {
.Type = "History",
.Items = {New Leaf With {
.Type = "Ancient",
.Sales = rand()
}, New Leaf With {
.Type = "Medieval",
.Sales = rand()
}, New Leaf With {
.Type = "Renaissance",
.Sales = rand()
}}
}, New Leaf With {
.Type = "Mystery",
.Items = {New Leaf With {
.Type = "Mystery",
.Sales = rand()
}, New Leaf With {
.Type = "Thriller & Suspense",
.Sales = rand()
}}
}, New Leaf With {
.Type = "Romance",
.Items = {New Leaf With {
.Type = "Action & Adventure",
.Sales = rand()
}, New Leaf With {
.Type = "Holidays",
.Sales = rand()
}, New Leaf With {
.Type = "Romantic Comedy",
.Sales = rand()
}, New Leaf With {
.Type = "Romantic Suspense",
.Sales = rand()
}, New Leaf With {
.Type = "Western",
.Sales = rand()
}, New Leaf With {
.Type = "Historical",
.Sales = rand()
}}
}, New Leaf With {
.Type = "Sci-Fi & Fantasy",
.Items = {New Leaf With {
.Type = "Fantasy",
.Sales = rand()
}, New Leaf With {
.Type = "Gaming",
.Sales = rand()
}, New Leaf With {
.Type = "Science Fiction",
.Sales = rand()
}}
}}
}, New Leaf With {
.Type = "Electronics",
.Items = New Leaf() {New Leaf With {
.Type = "Camera",
.Items = New Leaf() {New Leaf With {
.Type = "Digital Cameras",
.Sales = rand()
}, New Leaf With {
.Type = "Film Photography",
.Sales = rand()
}, New Leaf With {
.Type = "Lenses",
.Sales = rand()
}, New Leaf With {
.Type = "Video",
.Sales = rand()
}, New Leaf With {
.Type = "Accessories",
.Sales = rand()
}}
}, New Leaf With {
.Type = "Headphones",
.Items = New Leaf() {New Leaf With {
.Type = "Earbud headphones",
.Sales = rand()
}, New Leaf With {
.Type = "Over-ear headphones",
.Sales = rand()
}, New Leaf With {
.Type = "On-ear headphones",
.Sales = rand()
}, New Leaf With {
.Type = "Bluetooth headphones",
.Sales = rand()
}, New Leaf With {
.Type = "Noise-cancelling headphones",
.Sales = rand()
}, New Leaf With {
.Type = "Audiophile headphones",
.Sales = rand()
}}
}, New Leaf With {
.Type = "Cell Phones",
.Items = New Leaf() {New Leaf With {
.Type = "Cell Phones",
.Sales = rand()
}, New Leaf With {
.Type = "Accessories",
.Items = New Leaf() {New Leaf With {
.Type = "Batteries",
.Sales = rand()
}, New Leaf With {
.Type = "Bluetooth Headsets",
.Sales = rand()
}, New Leaf With {
.Type = "Bluetooth Speakers",
.Sales = rand()
}, New Leaf With {
.Type = "Chargers",
.Sales = rand()
}, New Leaf With {
.Type = "Screen Protectors",
.Sales = rand()
}}
}}
}, New Leaf With {
.Type = "Wearable Technology",
.Items = New Leaf() {New Leaf With {
.Type = "Activity Trackers",
.Sales = rand()
}, New Leaf With {
.Type = "Smart Watches",
.Sales = rand()
}, New Leaf With {
.Type = "Sports & GPS Watches",
.Sales = rand()
}, New Leaf With {
.Type = "Virtual Reality Headsets",
.Sales = rand()
}, New Leaf With {
.Type = "Wearable Cameras",
.Sales = rand()
}, New Leaf With {
.Type = "Smart Glasses",
.Sales = rand()
}}
}}
}, New Leaf With {
.Type = "Computers & Tablets",
.Items = {New Leaf With {
.Type = "Desktops",
.Items = New Leaf() {New Leaf With {
.Type = "All-in-ones",
.Sales = rand()
}, New Leaf With {
.Type = "Minis",
.Sales = rand()
}, New Leaf With {
.Type = "Towers",
.Sales = rand()
}}
}, New Leaf With {
.Type = "Laptops",
.Items = New Leaf() {New Leaf With {
.Type = "2 in 1 laptops",
.Sales = rand()
}, New Leaf With {
.Type = "Traditional laptops",
.Sales = rand()
}}
}, New Leaf With {
.Type = "Tablets",
.Items = {New Leaf With {
.Type = "iOS",
.Sales = rand()
}, New Leaf With {
.Type = "Andriod",
.Sales = rand()
}, New Leaf With {
.Type = "Fire os",
.Sales = rand()
}, New Leaf With {
.Type = "Windows",
.Sales = rand()
}}
}}
}}
Return data
End Function