Validation
Data validation lets you control the data that a user can enter into a column cell. There are various ways in which a data can be validated such as restricting invalid input keys, showing the error or warning information or revert the value to original on getting an invalid input from the user.

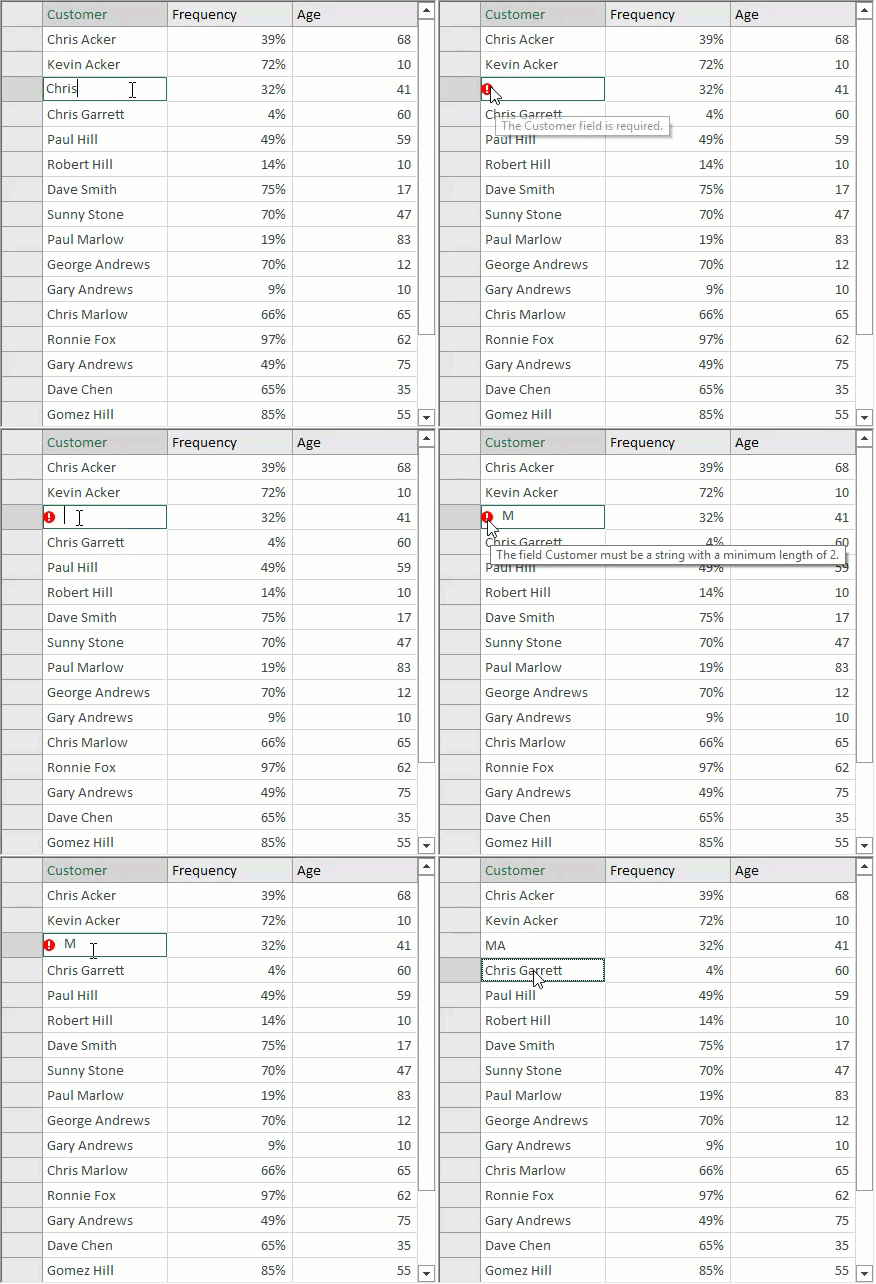
To implement validations such as specifying the range of acceptable values, or defining the minimum string length of input, FlexGrid provides EditorValidation property of the Column class. The property is of type ValidationRuleCollection class which consists of pre-defined rules for implementing enhanced data validation in FlexGrid columns. For instance, the sample code below demonstrates StringLength and Required validation rules applied to the Customer column using the EditorValidation property.
Refer the code below to know how to add validation rules in WinForms FlexGrid columns.
private void SetupGridColumns()
{
  var customerNameColumn = _flex.Cols["CustomerName"];
  customerNameColumn.Caption = "Customer";
  customerNameColumn.EditorValidation.Add(new RequiredRule());
  customerNameColumn.EditorValidation.Add(new StringLengthRule()
  {
    MinimumLength = 2
  });
  var customerIDColumn = _flex.Cols["CustomerID"];
  customerIDColumn.Visible = false;
  var frequencyColumn = _flex.Cols["Frequency"];
  frequencyColumn.Format = "0%";
  frequencyColumn.AllowEditing = false;
  var ageColumn = _flex.Cols["Age"];
  ageColumn.EditorValidation.Add(new RequiredRule());
  ageColumn.EditorValidation.Add(new RangeRule()
  {
    Minimum = 10,
    Maximum = 90
  });
}
Private Sub SetupGridColumns()
Dim customerNameColumn = _flex.Cols("CustomerName")
customerNameColumn.Caption = "Customer"
customerNameColumn.EditorValidation.Add(New RequiredRule())
customerNameColumn.EditorValidation.Add(New StringLengthRule() With {
.MinimumLength = 2
})
Dim customerIDColumn = _flex.Cols("CustomerID")
customerIDColumn.Visible = False
Dim frequencyColumn = _flex.Cols("Frequency")
frequencyColumn.Format = "0%"
frequencyColumn.AllowEditing = False
Dim ageColumn = _flex.Cols("Age")
ageColumn.EditorValidation.Add(New RequiredRule())
ageColumn.EditorValidation.Add(New RangeRule() With {
.Minimum = 10,
.Maximum = 90
})
End SubAnother way of applying validation is by capturing the ValidateEdit event and checking the value of Editor.Text property. If value obtained is invalid, set the Cancel parameter to true to keep the grid in editing mode until user enters a valid value. Such validation can be used in scenarios such as setting the range of valid values, validating the current cell value based on another cell value. For example, the below sample code validates input into a currency column to ensure that values entered are between 1,000 and 10,000.
Use ValidateEdit event to check for valid values during edit mode of the WinForms FlexGrid cell as shown in the code below.
private void _flex_ValidateEdit( object sender, ValidateEditEventArgs e)
{
    // Validate amounts
    if (_flex.Cols[e.Col].DataType == typeof(Decimal))
    {
        try
        {
            Decimal dec = Decimal.Parse(_flex.Editor.Text);
            if ( dec < 1000 || dec > 10000 )
            {
                MessageBox.Show("Value must be between 1,000 and 10,000");
                e.Cancel = true;
            }
        }
        catch
        {
            MessageBox.Show("Value not recognized as a Currency");
            e.Cancel = true;
        }
    }
}
Private Sub _flex_ValidateEdit(ByVal sender As Object, ByVal e As ValidateEditEventArgs)
' Validate amounts
If _flex.Cols(e.Col).DataType Is GetType(Decimal) Then
Try
Dim dec As Decimal = Decimal.Parse(_flex.Editor.Text)
If dec < 1000 OrElse dec > 10000 Then
MessageBox.Show("Value must be between 1,000 and 10,000")
e.Cancel = True
End If
Catch
MessageBox.Show("Value not recognized as a Currency")
e.Cancel = True
End Try
End If
End SubSee Also
Documentation


