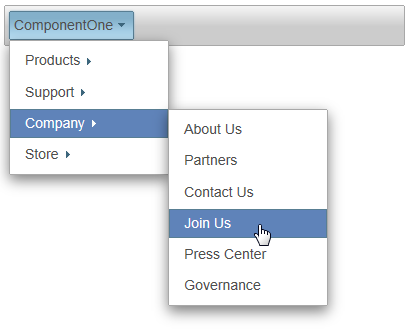
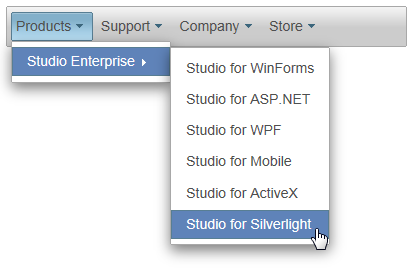
This lesson illustrates how to populate a C1Menu with site map data.
To create the Site Map and bind it to the C1Menu control, complete the following:
The Add New Item dialog box appears.
The following default source code appears for the Web.sitemap file:
To write code in Source View
<?xml version="1.0" encoding="utf-8" ?>
                                <sitemap xmlns="http://schemas.microsoft.com/AspNet/SiteMap-File-1.0">
                  <siteMapNode url="" title=""  description="">
                        <siteMapNode url="" title=""  description="" />
                        <siteMapNode url="" title=""  description="" />
                    </siteMapNode>
                </sitemap>
To write code in Source View
<?xml version="1.0" encoding="utf-8" ?>
<siteMap xmlns="http://schemas.microsoft.com/AspNet/SiteMap-File-1.0" >
<siteMapNode title="ComponentOne">
<siteMapNode title="Products">
<siteMapNode title="Studio Enterprise">
        <siteMapNode title="Studio for WinForms" />

        <siteMapNode title="Studio for ASP.NET" />

        <siteMapNode title="Studio for WPF" />

        <siteMapNode title="Studio for Mobile" />

        <siteMapNode title="Studio for ActiveX" />

        <siteMapNode title="Studio for Silverlight" />

      </siteMapNode>

    </siteMapNode>

    <siteMapNode title="Support">

      <siteMapNode title="Support Services" />
      <siteMapNode title="HelpCentral" />

      <siteMapNode title="Product Forums" />
    </siteMapNode>

    <siteMapNode title="Company">

      <siteMapNode title="About Us" />

      <siteMapNode title="Partners" />

      <siteMapNode title="Contact Us" />

      <siteMapNode title="Join Us" />

      <siteMapNode title="Press Center" />

      <siteMapNode title="Governance" />

    </siteMapNode>
<siteMapNode title="Store">
      <siteMapNode title="Buy Now" />

      <siteMapNode title="Resellers" />
    </siteMapNode>

  </siteMapNode>

</siteMap>
SiteMapDataSource1 is added to your project.
The data from the Web.sitemap file is reflected in the C1Menu control.

Observe that the control opens with the top-level node, ComponentOne. In the next step, you'll learn how to remove the top-level node so that you just expose the second-level nodes in the C1Menu.
