- SpreadJS Overview
- Getting Started
- JavaScript Frameworks
- Best Practices
-
Features
- Workbook
- Worksheet
- Rows and Columns
- Headers
- Cells
- Data Binding
- Data Manager
- TableSheet
- GanttSheet
-
ReportSheet
-
Template Sheet Settings
- Set Template Cell Type
- Set Spill Mode
- Apply Cell Expansion
- Set Spill Direction
- Set Pin
- Set Cell Context
- Set Filter Condition
- Sort Cell Data
- Auto Fit Template Cell
- Change Cell Styles
- Apply Conditional Formatting
- Add Data Validation
- Change Cell States
- Add Show/Collapse Button
- Show Hidden Row and Col
- ReportSheet Formula Functions
- Preserve Formula in Export
- Configure Data Entry Settings
- Set Pagination
- Fill Blank Data
- Configure Layout Settings
- Add Picture Shape
- Report Sheet Settings
- Report Sheet Data Entry Support
- Report Sheet Data Charts
-
Template Sheet Settings
- Data Charts
- JSON Schema with SpreadJS
- SpreadJS File Format
- Data Validation
- Conditional Formatting
- Sort
- Group
- Formulas
- What-If Analysis
- Serialization
- Keyboard Actions
- Shapes
- Floating Objects
- Barcodes
- Charts
- Sparklines
- Tables
- Pivot Table
- Slicer
- Theme
- User Management
- Culture
- AI Assistant
- SpreadJS Designer
- SpreadJS Designer VSCode Plugin
- Tutorials
- SpreadJS Designer Component
- SpreadJS Collaboration Server
- Touch Support
- Formula Reference
- Import and Export Reference
- Events
- API Documentation
- Release Notes
Fill Blank Data
The Fill Blank Data feature ensures that datasets inside list or group cells are padded with blank rows or columns until they meet a specified multiple when necessary.
Usage Scenarios
When generating reports, developers often face misaligned layouts. For example, the last page of a paginated report may show fewer rows than expected, or grouped sections may contain blocks of different lengths, leading to uneven Excel/PDF exports.
With Fixed Fill Count, these issues are automatically resolved:
Consistent pagination and grouping: Each page or data block (such as groups or lists) is filled to a fixed multiple of rows or columns, ensuring uniform structure throughout the report.
Non-intrusive blank filling: Blank rows/columns are added at render time to stabilize layout, without affecting filtering, sorting, or the dataset itself.
Cleaner output: Exported or printed reports maintain a neat, professional layout across all blocks.
Related API
This feature is configured through the GC.Spread.Report.TemplateSheet.setTemplateCell method.
When applying the setting on a ListCell or GroupCell, use the fixedFillCount property.
Note:
The value must be a positive integer.
The default is 1, which means no extra padding is applied.
export type ListCell = DataCellBase & {
    type: 'List';
    fixedFillCount?: number;
    // see API reference for other properties
};

export type GroupCell = DataCellBase & {
    type: 'Group';
    fixedFillCount?: number;
    //see API reference for other properties
};
Usage Examples
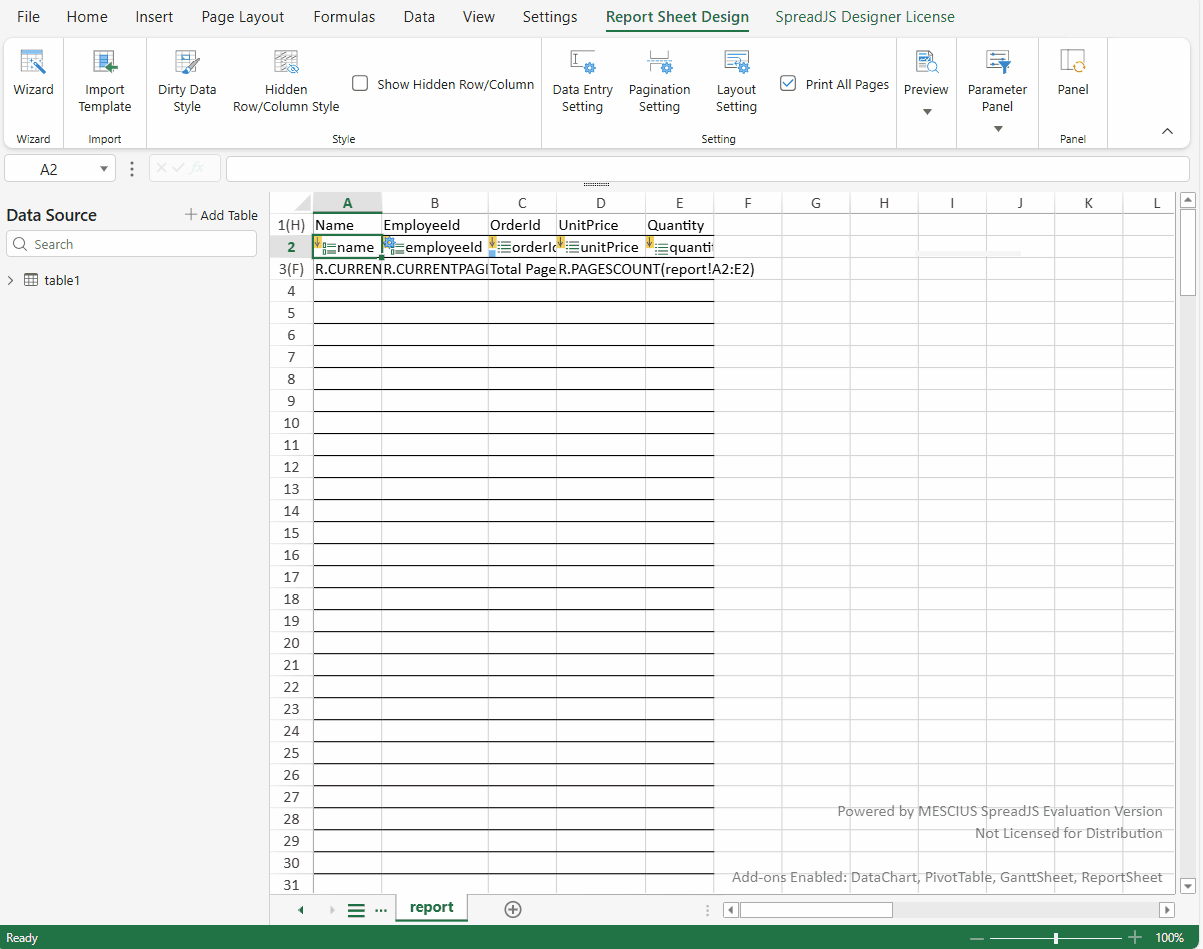
Step 1: Create a Report Sheet
In this example, we generate 23 rows of sample data and configure row pagination to show 10 rows per page.
This intentionally leaves the last page partially filled so you can see how the report behaves when rows don’t divide evenly by the page size.
let spread = new GC.Spread.Sheets.Workbook("spreadjs-host");

// Create Data Source
var sheet = spread.getActiveSheet();
const headers = ['orderId', 'name', 'employeeId', 'unitPrice', 'quantity'];
const rows = [];
const productNames = ['Pencil', 'Notebook', 'Eraser'];
for (let i = 1; i <= 23; i++) {
  const name = productNames[(i - 1) % productNames.length]; // 1->Pencil, 2->Notebook, 3->Eraser, 4->Pencil...
  rows.push([
    `A${String(i).padStart(3, '0')}`,
    name,
    String((i % 2) + 1),
    1.5,
    (i % 3) + 1
  ]);
}
sheet.setArray(0, 0, [headers, ...rows]);
sheet.tables.add('table1', 0, 0, 24, 5, GC.Spread.Sheets.Tables.TableThemes.light1);
// convert table1 to a data manager table
sheet.tables.convertToDataTable('table1');

// Create a Template Sheet
const reportSheet = spread.addSheetTab(1, 'report', GC.Spread.Sheets.SheetType.reportSheet);
reportSheet.renderMode('Design');
const templateSheet = reportSheet.getTemplate();

// set value and binding for the template
const columns = ['name','employeeId', 'orderId', 'unitPrice', 'quantity'];
columns.forEach((columnName, i) => {
    templateSheet.setValue(0, i, `${columnName[0].toUpperCase()}${columnName.substring(1)}`);
    templateSheet.setTemplateCell(1, i, {
      type: 'List',
      binding: `table1[${columnName}]`,
    });
});

// Set Table End
templateSheet.setValue(2,0,'Current Page:');
templateSheet.setFormula(2,1,'=R.CURRENTPAGE()');
templateSheet.setValue(2,2,'Total Pages:');
templateSheet.setFormula(2,3,'=R.PAGESCOUNT()');

// set border style for the template
const style = new GC.Spread.Sheets.Style();
style.borderTop = new GC.Spread.Sheets.LineBorder("black", GC.Spread.Sheets.LineStyle.thin);
style.borderBottom = new GC.Spread.Sheets.LineBorder("black", GC.Spread.Sheets.LineStyle.thin);
templateSheet.getRange('A:E').setStyle(style);

// Set Pagination
templateSheet.setPaginationSetting({
   rowPagination: {
        paginationDataCell: 'C2',
        rowCountPerPage: 10,
   },
   titleRow: {
        start: 0,
        end: 0,
   },
   endRow: {
        start: 2,
        end: 2,
   },
});

// refresh the report
reportSheet.refresh();
reportSheet.renderMode('PaginatedPreview');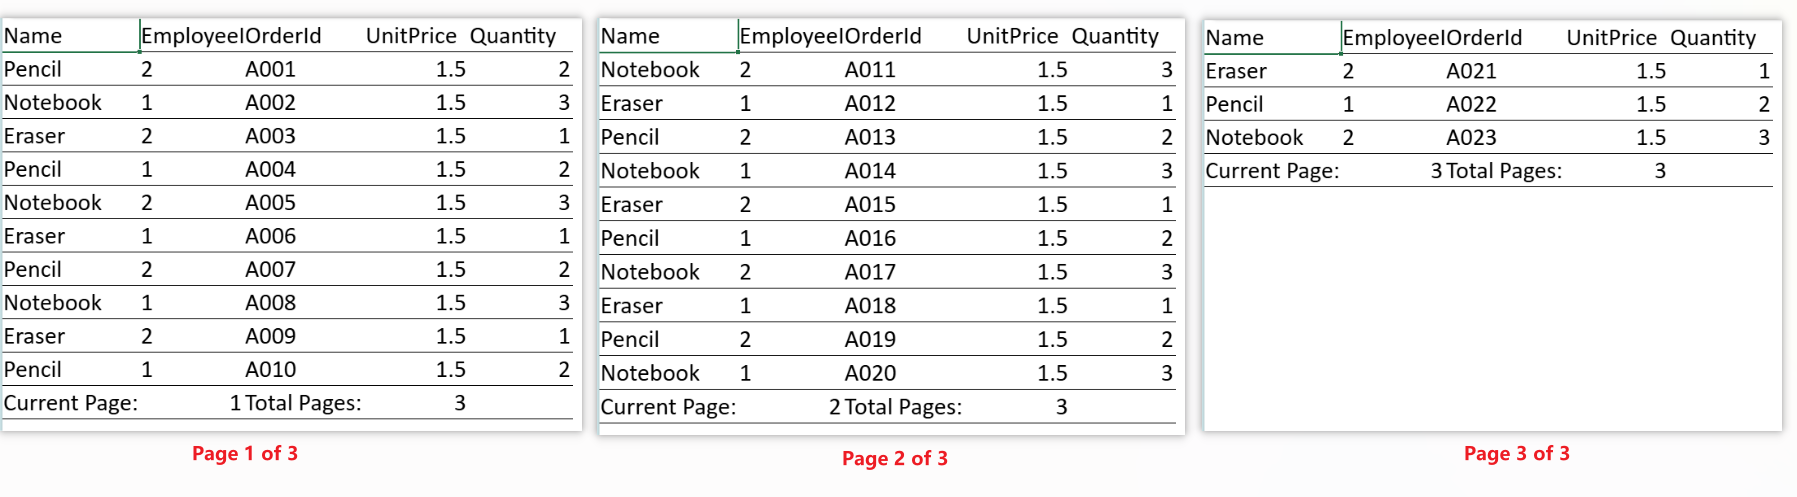
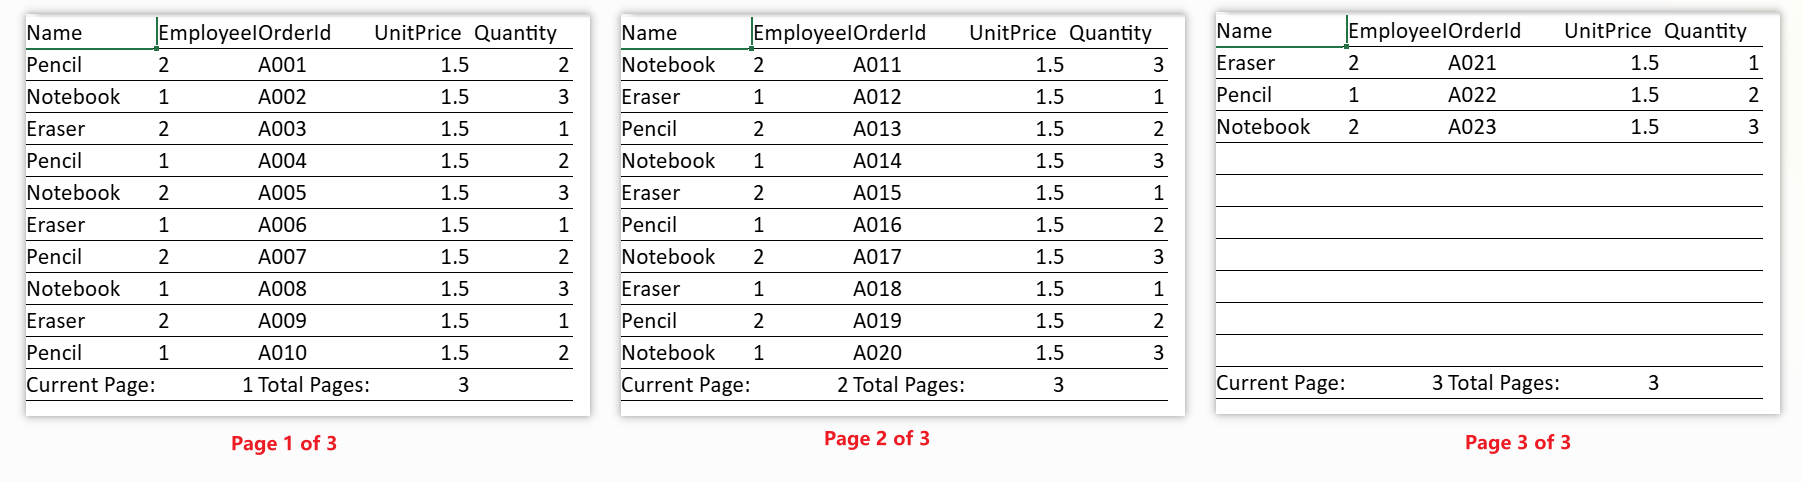
Step 2: Set Fixed Fill Count
Notes:
Works for both vertical (rows) and horizontal (columns) expansions.
Filling is always handled relative to the parent node.
Define column Name with fixedFillCount = 10.
reportSheet.renderMode('Design');

templateSheet.setTemplateCell(1, 0, {
    type: 'List',
    binding: 'table1[name]',
    fixedFillCount: 10
});

reportSheet.refresh();
reportSheet.renderMode('PaginatedPreview');
With blank-row filling enabled, the report appends 7 empty rows to the detail section so the total row count becomes a multiple of 10.
After pagination, the last page shows the same number of detail rows as the other pages, keeping the layout consistent across all pages.
Using Designer
You can also set the fixedFillCount property of the template cell using the SpreadJS designer's Fixed Fill Count option available in the Report Cell properties panel.
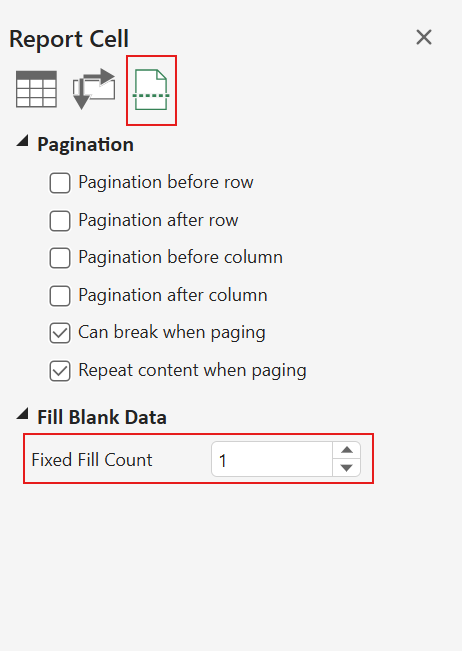
The value defaults to 1. You can change it either by using the up/down arrows or by typing a number directly into the field.