
- SpreadJS Overview
- Getting Started
- JavaScript Frameworks
- Best Practices
-
Features
- Workbook
- Worksheet
- Rows and Columns
- Headers
- Cells
- Data Binding
- Data Manager
- TableSheet
- GanttSheet
-
ReportSheet
-
Template Sheet Settings
- Set Template Cell Type
- Set Spill Mode
- Apply Cell Expansion
- Set Spill Direction
- Set Pin
- Set Cell Context
- Set Filter Condition
- Sort Cell Data
- Auto Fit Template Cell
- Change Cell Styles
- Apply Conditional Formatting
- Add Data Validation
- Change Cell States
- Add Show/Collapse Button
- Show Hidden Row and Col
- ReportSheet Formula Functions
- Preserve Formula in Export
- Configure Data Entry Settings
- Set Pagination
- Fill Blank Data
- Configure Layout Settings
- Add Picture Shape
- Report Sheet Settings
- Report Sheet Data Entry Support
- Report Sheet Data Charts
-
Template Sheet Settings
- Data Charts
- JSON Schema with SpreadJS
- SpreadJS File Format
- Data Validation
- Conditional Formatting
- Sort
- Group
- Formulas
- What-If Analysis
- Serialization
- Keyboard Actions
- Shapes
- Floating Objects
- Barcodes
- Charts
- Sparklines
- Tables
- Pivot Table
- Slicer
- Theme
- User Management
- Culture
- AI Assistant
- SpreadJS Designer
- SpreadJS Designer VSCode Plugin
- Tutorials
- SpreadJS Designer Component
- SpreadJS Collaboration Server
- Touch Support
- Formula Reference
- Import and Export Reference
- Events
- API Documentation
- Release Notes
Auto Fit Template Cell
The auto-fit feature in ReportSheet automatically adjusts column width and row height to fit the content when generating reports. For this, you need to configure the autoFit property in the setTemplateCell method.
You can set the following enum values for auto-fit operation while working with ReportSheet:
None
Row
Column
Using Code
The following code sample shows how to set the auto-fit types for the template cell.
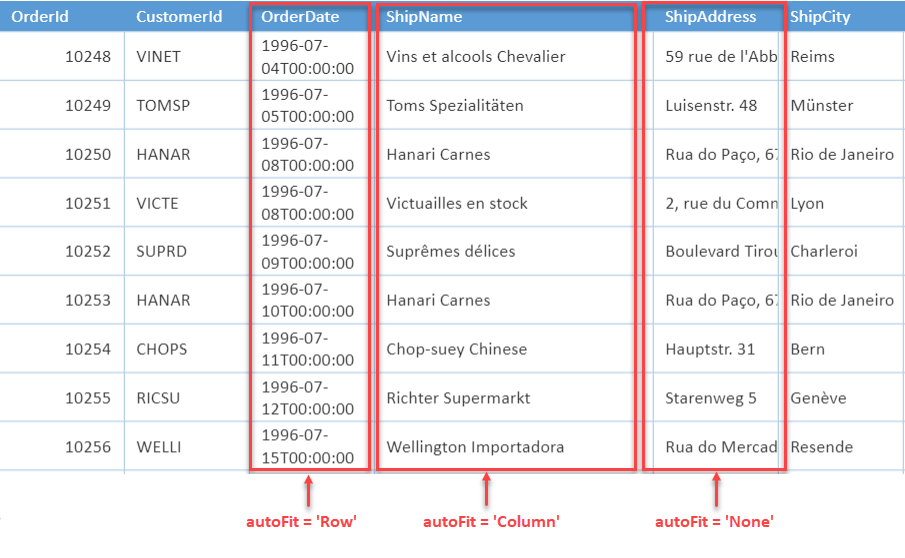
// Set the autoFit property as Row.
 templateSheet.setTemplateCell(1, 0, {
     type: 'List',
     binding: Orders[orderDate],
     autoFit: 'Row',
 });

 // Set the autoFit property as Column.
 templateSheet.setTemplateCell(1, 2, {
     type: 'List',
     binding: Orders[shipName],
     autoFit: 'Column',
 });

 // Set the autoFit property as None.
 templateSheet.setTemplateCell(1, 3, {
     type: 'List',
     binding: Orders[shipAddress],
     autoFit: 'None',
 });
The output of the above code is as follows:
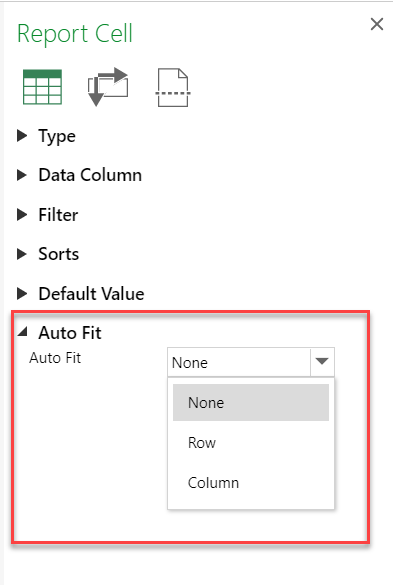
Using Designer
You can also set the autoFit property of the template cell using the SpreadJS designer's Auto Fit option available in the Report Cell properties panel.
Note:
ReportSheet supports a combination of row and column auto fit within the same report. This means you can apply different auto fit types to different template cells.
AutoFit operations will not reduce row heights or column widths when the autoFit property values are less than the dimensions set in the template.
In the Preview mode, if a cell's autoFit property is set as 'Row' and the cell is part of a row merge, it will expand the last row of the span. Similarly, a cell with 'Column' autofit will expand the last column of the span.