- TileControl for WinForms Overview
- TileControl for WinForms Key Features
- TileControl for WinForms Quick Start
- Design-Time Support
- TileControl Layout
- TileControl Behavior
- TileControl Templates
- TileControl Groups
- TileControl Tiles and Elements
- Data Binding Overview
- TileControl for WinForms Samples
-
TileControl for WinForms Task-Based Help
- Adding Templates to the C1TileControl
- Assigning a Template to a Specified Tile
- Adding Elements to a Template
- Creating a Lookup Table for C1TileControl
- Changing the BackColor of the Template
- Removing Specific Templates
- Alternating the Text View by a Timer
- Saving and Loading TileControl as an XML File
- Setting Text for the TileControl and Group
- Adding Groups to the C1TileControl
- Removing Groups from the C1TileControl
- Modifying the Group’s Font Properties
- Setting the TileControl’s BackColor
- Adding Tiles to a Specific Group
- Creating a CheckMark for the Tile
- Adding Image Elements to a Tile
Drawing an Image at Runtime
Images can be drawn at runtime using the Paint event, like the following:
Right-click on the C1TileControl and select Edit Templates.
Click Add to add a template to the C1TileControl.
Add the following code to your project to draw an image at runtime:
To write code in Visual Basic
Private Sub template1_Paint(sender As Object, e As C1.Win.C1Tile.TemplatePaintEventArgs)
   Dim g As Graphics = e.Graphics
   g.SmoothingMode = System.Drawing.Drawing2D.SmoothingMode.HighQuality
   Dim rect As Rectangle = e.ClipRectangle
   rect.X += (rect.Width - 28) \ 2
   rect.Y += (rect.Height - 28) \ 2
   rect.Width = 28
   rect.Height = 28
   Dim brush As Brush = New SolidBrush(e.Tile.GetBackColor())
   Dim pen As New Pen(e.Tile.GetForeColor())
   Select Case e.Tile.IntValue
          Case 1
                 g.FillPie(brush, rect, 50F, 270F)
                 g.DrawPie(pen, rect, 50F, 270F)
                 Exit Select
          Case 2
                 g.FillRectangle(brush, rect)
                 g.DrawRectangle(pen, rect)
                 Exit Select
          Case Else
                 g.FillEllipse(brush, rect)
                 g.DrawEllipse(pen, rect)
                 Exit Select
   End Select
   brush.Dispose()
   pen.Dispose()
End Sub
To write code in C#
private void template8_Paint(object sender, C1.Win.C1Tile.TemplatePaintEventArgs e)
   {
       Graphics g = e.Graphics;
       g.SmoothingMode = System.Drawing.Drawing2D.SmoothingMode.HighQuality;
       Rectangle rect = e.ClipRectangle;
       rect.X += (rect.Width - 28) / 2;
       rect.Y += (rect.Height - 28) / 2;
       rect.Width = 28;
       rect.Height = 28;
       Brush brush = new SolidBrush(e.Tile.GetBackColor());
       Pen pen = new Pen(e.Tile.GetForeColor());
       switch (e.Tile.IntValue)
       {
           case 1:
              g.FillPie(brush, rect, 50f, 270f);
              g.DrawPie(pen, rect, 50f, 270f);
              break;
           case 2:
              g.FillRectangle(brush, rect);
              g.DrawRectangle(pen, rect);
              break;
          default:
             g.FillEllipse(brush, rect);
             g.DrawEllipse(pen, rect);
             break;
       }
       brush.Dispose();
       pen.Dispose();
   }
In design view, right-click on the C1TileControl and select Properties.
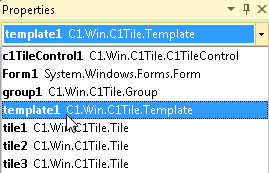
Select Template1 from the Windows dropdown listbox.

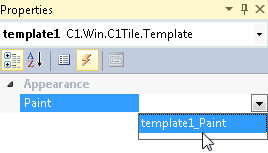
Click on the events button and set the Paint event to template1_Paint.

Select tile1 so its C1TileControl Tasks menu appears and set its properties to the following:
- Horizontal Size to 1.
- Vertical Size to 1.
- IntValue to 0. This will apply the first drawing to the first tile.
- Template to template1.
Select tile2 so its C1TileControl Tasks menu appears and set its properties to the following:
- Horizontal Size to 1.
- Vertical Size to 1.
- IntValue to 1. This will apply the second drawing to the second tile.
- Template to template1.
. Select tile2 so its C1TileControl Tasks menu appears and set its properties to the following:
- Horizontal Size to 1.
- Vertical Size to 1.
- IntValue to 2. This will apply the third drawing to the third tile.
- Template to template1.
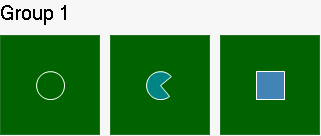
Run your project and observe the drawings made on the tiles.


