
Operations in Bound Mode
Adding Unbound Column in Bound Mode
In the bound mode, grid fetches the data from data source and display it as records and bound columns. To add a column to display data that does not exist in the data source, you need to add unbound columns at design time or through code.
Adding unbound column at design time
In the design view, select the FlexGrid control and click smart tag to open the C1FlexGrid Tasks menu.
Bind the grid control with a data source. For detailed steps about how to bind FlexGrid to a data source, see Bound Mode.
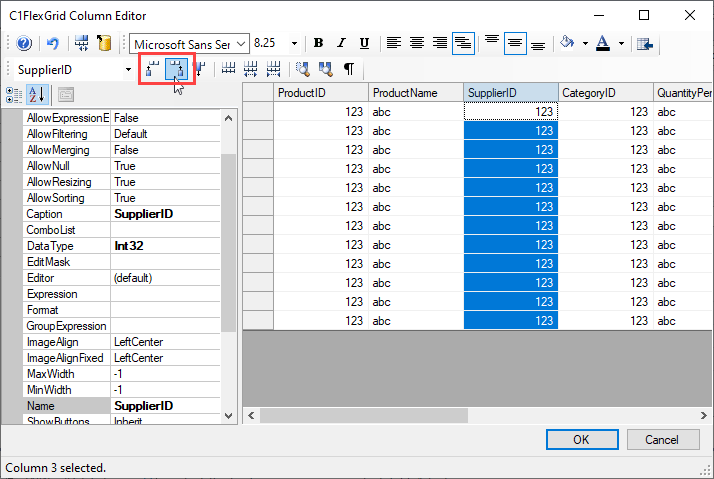
Click the Designer... option to open the C1FlexGrid Column Editor.
In the right hand side pane, select an existing column from the grid preview.
Click Insert Column options in the toolbar to add a column before or after the selection.
Adding unbound column through code
FlexGrid provides Add, Insert and InsertRange method of the ColumnCollection class to add an unbound column to the grid. While Add method adds a column at the end, the Insert method lets you specify the position where you want to add a new column. Similarly, you can add multiple columns at a specified position by using the InsertRange method.
Use the code below to add unbound column in a bound WinForms FlexGrid.
// add unbound column
Column col = _flex.Cols.Add();
col.Name = col.Caption = "Unbound";
_flex[1, "Unbound"] = 123;
' add unbound column
Dim col As Column = C1FlexGrid1.Cols.Add()
col.Name = "Unbound"
col.Caption = "Unbound"
C1FlexGrid1(1, "Unbound") = 123Set Values in Unbound Column
To define values in the unbound column of bound grid, you need to use the SetUnboundValue and GetUnboundValue events of the C1FlexGrid class. First, create a hash table to store the entered values then, use the SetUnboundValue event to set unbound value in the hash table using a unique key to identify the record and use GetUnboundValue event, to get the value stored in the hash table using its unique key and set unbound value to be displayed in the cell.
Following code shows how to set values in an unbound column added to a bound WinForms FlexGrid.
// get value from hashtable using ProductID as key
void _flex_GetUnboundValue(object sender, C1.Win.C1FlexGrid.UnboundValueEventArgs e)
{
       DataRowView drv = (DataRowView)_flex.Rows[e.Row].DataSource;
   e.Value = _hash[drv["ProductID"]];
}
// store value in hashtable using ProductID as key
void _flex_SetUnboundValue(object sender, C1.Win.C1FlexGrid.UnboundValueEventArgs e)
{
       DataRowView drv = (DataRowView)_flex.Rows[e.Row].DataSource;
        _hash[drv["ProductID"]] = e.Value;
}
Private Sub C1FlexGrid1_GetUnboundValue(sender As Object, e As C1.Win.C1FlexGrid.UnboundValueEventArgs) Handles C1FlexGrid1.GetUnboundValue
Dim drv As DataRowView = DirectCast(C1FlexGrid1.Rows(e.Row).DataSource, DataRowView)
e.Value = _hash(drv("ProductID"))
End Sub
Private Sub C1FlexGrid1_SetUnboundValue(sender As Object, e As C1.Win.C1FlexGrid.UnboundValueEventArgs) Handles C1FlexGrid1.SetUnboundValue
Dim drv As DataRowView = DirectCast(C1FlexGrid1.Rows(e.Row).DataSource, DataRowView)
_hash(drv("ProductID")) = e.Value
End SubDisplaying Data in Fixed Column
To set values in the fixed columns, you need to set DrawMode property of the C1FlexGrid class to OwnerDraw in the form load event and then, create the OwnerDrawCell event to set values in the fixed column cells. In this example, we are setting row numbers in the fixed column of a bound WinForms FlexGrid.
private void C1FlexGrid1_OwnerDrawCell(object sender, OwnerDrawCellEventArgs e)
{
  if ((e.Row >= this.c1FlexGrid1.Rows.Fixed) & (e.Col == (this.c1FlexGrid1.Cols.Fixed - 1)))
   {
     e.Text = e.Row.ToString(); // or any text
      }
}
Private Sub C1FlexGrid1_OwnerDrawCell(ByVal sender As Object, ByVal e As OwnerDrawCellEventArgs)
If e.Row >= Me.c1FlexGrid1.Rows.Fixed And e.Col Is Me.c1FlexGrid1.Cols.Fixed - 1 Then
e.Text = e.Row.ToString() ' or any text
End If
End SubAuto-adjust Column Width
FlexGrid provides AutoResize property of the C1FlexGrid class to adjust the width of columns automatically according to the text length. You need to set the property to true before binding it to the data source to load the grid with appropriate column width. You can also call AutoSizeCol method to adjust the width of the specified column.
Use the code below auto-adjust the column width according to the text in WinForms FlexGrid.
// Automatically adjust the width of all columns
   c1FlexGrid1.AutoResize = true;
// Automatically adjust the width of fourth column
// c1FlexGrid1.AutoSizeColumns(3);
' Automatically adjust the width of all columns
c1FlexGrid1.AutoResize = True
' Automatically adjust the width of fourth column
' c1FlexGrid1.AutoSizeColumns(3) Display Bitmap Image in Field
In most of the scenarios, grid directly fetches the images from the data source. However, if the grid is bound to a database which stores images as OLE objects such as Microsoft Access, a little bit of extra processing is required to fetch bitmap images. In such case, you need to convert the image data stored as byte array to a memory stream and then, use the OwnerDrawCell event to load the image. In the form load event, you need to set the DrawMode property to OwnerDraw. Also, adjust the height of row to display the image properly.
Following code demonstrates how to display bitmap image in fields of WinForms FlexGrid.
private void C1FlexGrid1_OwnerDrawCell(object sender, C1.Win.C1FlexGrid.OwnerDrawCellEventArgs e)
 {
   if(!e.Measuring && e.Row>=c1FlexGrid1.Rows.Fixed && e.Col >= c1FlexGrid1.Cols.Fixed)
    {
     // "Photo" is an image stored in a blob (byte[])
         if (c1FlexGrid1.Cols[e.Col].Name == "Picture")
          {
            // Try loading from mdb
                e.Image = LoadImage(c1FlexGrid1[e.Row, e.Col] as byte[]);
           // If we get an image, do not put text
                if (e.Image != null) e.Text = null;
            }
        }
    }
Private Sub C1FlexGrid1_OwnerDrawCell(ByVal sender As Object, ByVal e As C1.Win.C1FlexGrid.OwnerDrawCellEventArgs)
If Not e.Measuring AndAlso e.Row >= c1FlexGrid1.Rows.Fixed AndAlso e.Col >= c1FlexGrid1.Cols.Fixed Then
' "Photo" is an image stored in a blob (byte[])
If c1FlexGrid1.Cols(e.Col).Name Is "Picture" Then
' Try loading from mdb
e.Image = LoadImage(TryCast(c1FlexGrid1(e.Row, e.Col), Byte()))
' If we get an image, do not put text
If e.Image IsNot Nothing Then e.Text = Nothing
End If
End If
End Sub Note that the above sample code uses a custom method, LoadImage method to convert the images from byte array to a memory stream.
Image LoadImage(byte[] picData)
   static Image LoadImage(byte[] picData)
   {
      // Make sure this is an embedded object
        const int bmData = 78;
        if (picData == null || picData.Length < bmData + 2) return null;
        if (picData[0] != 0x15 || picData[1] != 0x1c) return null;
      // Only handle bitmaps for now
         if (picData[bmData] != 'B' || picData[bmData + 1] != 'M') return null;
     // Load the picture
        Image img = null;
          try
            {
                MemoryStream ms = new MemoryStream(picData, bmData, picData.Length - bmData);
                img = Image.FromStream(ms);
            }
            catch { }
      // Return image
         return img;
        }
Private Function LoadImageMethod(ByVal picData As Byte()) As Image
Private Shared Function LoadImage(ByVal picData As Byte()) As Image
' Make sure this is an embedded object
Const bmData As Integer = 78
If picData Is Nothing OrElse picData.Length < bmData + 2 Then Return Nothing
If picData(0) <> &H15 OrElse picData(1) <> &H1c Then Return Nothing
' Only handle bitmaps for now
If picData(bmData) <> "B"c OrElse picData(bmData + 1) <> "M"c Then Return Nothing
' Load the picture
Dim img As Image = Nothing
Try
Dim ms As MemoryStream = New MemoryStream(picData, bmData, picData.Length - bmData)
img = Image.FromStream(ms)
Catch
End Try
' Return image
Return img
End Function