
-
Getting Started
- Introduction
- QuickStart
- Licensing
- Referencing Wijmo from NPM
- Referencing Wijmo
- NPM Module Formats
- Sizing and Styling Controls
- Pseudo Classes
- Events
- Enumerations
- Globalization
- Glyphs
- Angular Components
- React Components
- React-Redux Support
- Vue Components
- WebComponents
- Intellisense
- SASS
- Wijmo Designer
- Accessibility
- Topics
- Tutorials
Using Wijmo with Vue
Wijmo provides built-in support for Vue, enabling developers to integrate powerful UI components seamlessly into Vue applications. With Wijmo’s lightweight and high-performance controls, you can build responsive, data-driven applications while leveraging Vue’s reactive and component-based architecture.
Wijmo components for Vue allow you to use Wijmo controls within Vue templates markup. Each Wijmo Vue component acts as a wrapper for its corresponding Wijmo control. It automatically creates the Wijmo control instance behind the scenes which is accessible through the control property. Additionally, these components allow declarative binding to control properties and events directly within the Vue template markup.
type=note
Note: If you are using Wijmo with Vue 2, we recommend migrating to Vue 3 and updating the existing custom components to ensure complete compatibility.
Vue3 Quick Start
This topic walks you through setting up Wijmo with a Vue3 project. For demonstration purpose, we are using Wijmo's FlexGrid component and see how to create a Vue 3 DataGrid, utilizing Composition API (Custom component level registration method).
type=note
Note that the topic assumes that the user understands how to create a Vue3 application using Vue CLI. For more information, see Vue CLI.
The QuickStart is categorized into the following sections:
Install Wijmo Packages
Import Wijmo Components and Data
Adding Vue Datagrid Markup
Install Wijmo Packages
Open your Vue application and switch to the application folder where you want to install the package.
Install Wijmo's Vue package using npm by running the following command:
npm install @mescius/wijmo.vue2.all
Import Wijmo Modules and Data
Import the required Wijmo Component and directive and register them at Component level. For our FlexGrid example, we will add a wj-flex-grid component to the App.vue file’s template section by including the code in the following files:
App.Vue file
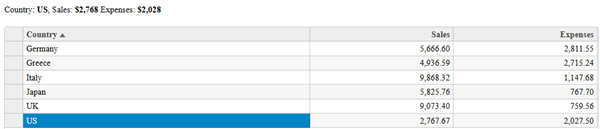
<script setup>=
import * as wjcCore from "@mescius/wijmo";
import { ref } from "vue";
const data = ref(_getData());
function _getData() {
  // create some
   random data
   let countries ="US,Germany,UK,Japan,Italy,Greece".split(","),
    data = [];
    for (let i = 0; i< countries.length; i++) {
      data.push({
          id: i,
          country:
    countries[i],
          sales:Math.random() * 10000,
          expenses:Math.random() * 5000,
      });
  }
  return data;
}
</script>

<template>

  <div class="container-fluid">

   </div>

</template>
Main.js file
import '@mescius/wijmo.styles/wijmo.css';
import { createApp } from "vue";
import App from "./App.vue";
import { registerGrid } from "@mescius/wijmo.vue2.grid";
const app = createApp(App);
registerGrid(app);
app.mount('#app');
In the main.js file, add a CSS import statement at the top of the file to import the Wijmo CSS.
import '@mescius/wijmo.styles/wijmo.css';
Adding Vue Datagrid Markup
The WjFlexGrid component is written as wj-flex-grid, as for HTML the lower-case-dash syntax is used.
<template>
  <div class="container-fluid">
<wj-flex-grid :itemsSource="data"
:initialized="flexInitialized">
<wj-flex-grid-column :header="'Country'"
:binding="'country'" width="2*" />
<wj-flex-grid-column :header="'Sales'"
:binding="'sales'" width="*" format="n2" />
<wj-flex-grid-column :header="'Expenses'"
:binding="'expenses'" width="*" format="n2" />
</wj-flex-grid>
  </div>
</template>
Run the application
You have successfully integrated Wijmo FlexGrid into your Vue application. To explore additional Wijmo components like charts, input controls, and pivot grids, see Wijmo Demos.