
-
Getting Started
- Introduction
- QuickStart
- Licensing
- Referencing Wijmo from NPM
- Referencing Wijmo
- NPM Module Formats
- Sizing and Styling Controls
- Pseudo Classes
- Events
- Enumerations
- Globalization
- Glyphs
- Angular Components
- React Components
- React-Redux Support
- Vue Components
- WebComponents
- Intellisense
- SASS
- Wijmo Designer
- Accessibility
- Topics
- Tutorials
Using Wijmo in PureJS
This quick start covers the step-by-step instructions to add Wijmo controls to your application.
In this topic, we are taking a PureJS application backed by TypeScript (ES2015 + ESM) to explain how to add the FlexGrid control to it.
Referencing Wijmo
Add a Wijmo reference to your application. In this example, we are adding a specific package for FlexGrid using npm. This step automatically installs the required dependencies into your application.
npm install @mescius/wijmo.grid You can also deploy Wijmo through CDN or locally. For more information, see Reference Wijmo Packages.
Adding a Host Element
Add a host element to your application and give it an ID. This is the HTML element that gets converted to a Wijmo control.
<div id="hostElement"></div> Here, we are adding the host element for FlexGrid in the index.html file.
<div id="theGrid"></div> Adding Wijmo Package
Add Wijmo modules to your application. We are using the following ES2015 import statements in the app.js file for our example.
import * as wjGrid from '@mescius/wijmo.grid';
var theGrid = new wjGrid.FlexGrid('#theGrid'),
It imports the "wijmo.grid" module and creates an instance of the FlexGrid control.
To learn more about adding Wijmo packages, see Reference Wijmo Packages.
Adding Wijmo CSS
Load wijmo.css style file into your application. Here, we are adding styles by using the ESM import statement at the top of the app.js file:
import '@mescius/wijmo.styles/wijmo.css'; For more information on adding styles to the Wijmo controls, see Style Controls.
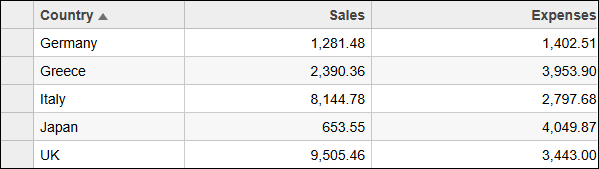
Populating Data in the Grid
To bind and populate data in the grid, you can bind your data source using the itemsSource property. For our example, let us add “Country,” “Sales,” and “Expenses” columns to the grid.
//create some random data
   var countries = 'Germany,UK,Japan,Italy,Greece'.split(',');
   var data = [];
   for (var i = 0; i < countries.length; i++)
    {
       data.push({
           id: i,
           country: countries[i],
           sales: Math.random() * 10000,
           expenses: Math.random() * 5000
       });
   }

    // bind a grid to the raw data
       var theGrid = new FlexGrid('#theGrid', {
       autoGenerateColumns: false,
       columns: [
           { binding: 'country', header: 'Country', width: '2*' },
           { binding: 'sales', header: 'Sales', width: '*', format: 'n2' },
           { binding: 'expenses', header: 'Expenses', width: '*', format: 'n2' }
       ],
       itemsSource: data
    });
You have successfully added the FlexGrid control to a PureJS application and populated it with data. Similarly, you can add other controls to your JavaScript applications. To see all of these controls in action, see Wijmo Demos. To learn the functioning of Wijmo controls in other frameworks, see framework specific quick starts.