- FlexPivot for WinForms Overview
- Introduction to FlexPivot
- Key Features
- FlexPivot Architecture
- Upgrading from Old PivotPage to New PivotPage
- Adding Data to FlexPivot Application
- Design Time Support through Smart Tag
- Quick Start: FlexPivot for WinForms
- Using FlexPivotPage ToolStrip
- Data Blending Features
- FlexPivot Cube
- Export
- Task-Based Help
- Walkthrough
- DataEngine Overview
- FlexPivotSlicer Overview
Creating Default View
Data (view or table) added to the FlexPivotPage control can be visualized by creating views. You can create summarized views by dragging data fields into various lists at runtime as illustrated in Creating Different Views at Runtime topic. To create a default view that appears automatically when your FlexPivot application runs, you need to perform some design-time settings and add set the ViewDefinition property in code.
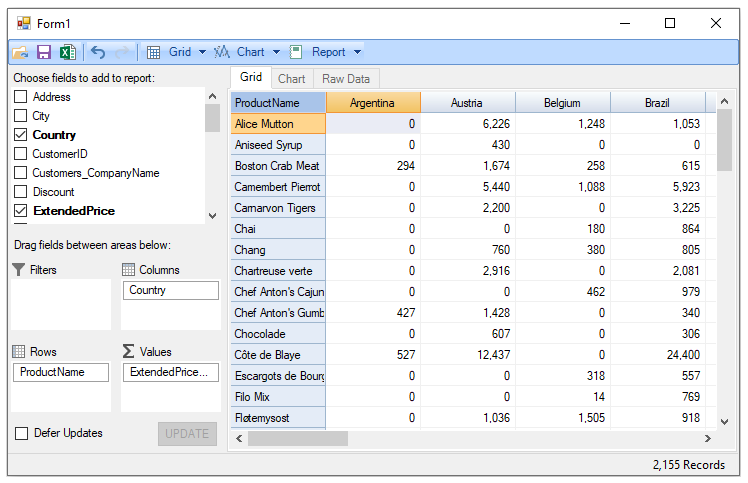
Complete the following steps to create an application that displays a default view with ProductName in the Rows list, Country in the Columns list, and ExtendedPrice in the Values list.
Create a new Windows Forms Application project in Visual Studio.
Add the FlexPivotPage control to your project and bind it to Invoices view of the c1NWind data source file as illustrated in Binding FlexPivot to Data Source topic.
In Solution Explorer, right-click your project and click Properties to open Project designer.
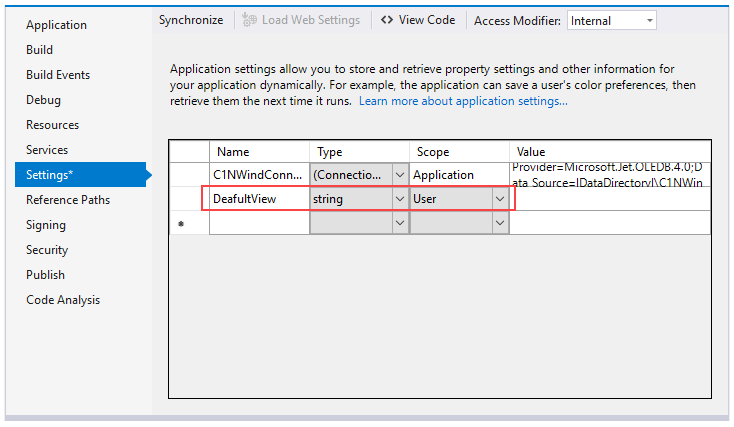
In the Project Design, click Settings option.
Create a new setting and name it, for example, DefaultView.

Switch to code view and add the following code in Form1_Load event to initialize the default view and set the data fields.
Private Sub Form1_Load(sender As Object, e As EventArgs) Handles MyBase.Load
    ' modify the connection string to make it work for the current user on this machine
    Me.InvoicesTableAdapter.Connection.ConnectionString = GetConnectionString()
    'loads data into the table adapter
    Me.InvoicesTableAdapter.Fill(Me.C1NWindDataSet.Invoices)
    ' show default view:
    ' this assumes an application setting of type string called "DefaultView"
    Dim view = My.Settings.DefaultView
    If Not String.IsNullOrEmpty(view) Then
        FlexPivotPage1.ViewDefinition = view
    Else
        ' build default view now
        Dim fp = FlexPivotPage1.PivotEngine
        fp.BeginUpdate()
        fp.RowFields.Add("ProductName")
        fp.ColumnFields.Add("Country")
        fp.ValueFields.Add("ExtendedPrice")
        fp.EndUpdate()
    End If
End Sub
private void Form1_Load(object sender, EventArgs e) { //modify the connection string to make it work for the current user on this machine this.invoicesTableAdapter.Connection.ConnectionString = GetConnectionString(); //loads data into the table adapter this.invoicesTableAdapter.Fill(this.c1NWindDataSet.Invoices); // show default view: // this assumes an application setting of type string called "DefaultView" var view = Properties.Settings.Default.DefaultView; if(!string.IsNullOrEmpty(view)) { flexPivotPage1.ViewDefinition = view; } else { // build default view var fp = flexPivotPage1.PivotEngine; fp.BeginUpdate(); fp.RowFields.Add("ProductName"); fp.ColumnFields.Add("Country"); fp.ValueFields.Add("ExtendedPrice"); fp.EndUpdate(); } }Initialize a standard connection string to the database file being used.
'initializing the connection string
Private Shared Function GetConnectionString() As String
    Dim path As String = Environment.GetFolderPath(Environment.SpecialFolder.Personal) + "\ComponentOne Samples\Common"
    Dim conn As String = "provider=microsoft.jet.oledb.4.0;data source={0}\c1nwind.mdb;"
    Return String.Format(conn, path)
End Function
//initializing the connection string static string GetConnectionString() { string path = Environment.GetFolderPath(Environment.SpecialFolder.Personal) + @"\ComponentOne Samples\Common"; string conn = @"provider=microsoft.jet.oledb.4.0;data source={0}\c1nwind.mdb;"; return string.Format(conn, path); }Press F5 to run the application. The default view gets displayed with ProductName appearing in the Rows list, Country in the Columns list, and ExtendedPrice in the Values list.


