Changing a Theme to Custom Theme
In This Topic
Splitter for ASP.NET Web Forms provides six built-in themes, but if you prefer to use a different theme, you can choose an existing theme using a CDN URL or create your own custom theme with the jQuery ThemeRoller Web application. We will use C1Splitter in the following examples.
Using a CDN URL
Complete the following steps:
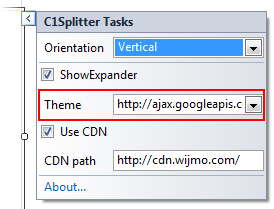
- Click the C1Splitter smart tag to open the Tasks menu.
- In the Theme property, enter a CDN URL to specify the theme; CDN URLs can be found at http://blog.jqueryui.com/2011/06/jquery-ui-1-8-14/. In this example, we'll use the trontastic theme: http://ajax.googleapis.com/ajax/libs/jqueryui/1.8.14/themes/trontastic/jquery-ui.css.
This theme setting is stored in the <appSettings> of the Web.config file. In the Solution Explorer, double-click the Web.config file. Notice the <appSettings> tag contains a WijmoTheme key and value; this is where the CDN URL you added is specified.
- Run the project and notice the theme is applied to C1Splitter.

Using jQuery ThemeRoller
Complete the following steps:
- Go to http://jqueryui.com/themeroller/.
- On the Roll Your Own tab, change the settings to create a custom theme; you can customize fonts, colors, backgrounds, borders, and more. Or click the Gallery tab and select an existing theme.
- Click the Download button and then click Download again on the Build Your Download page.
- Save and unzip the theme .zip file to a folder within your Visual Studio project folder. In this example, we created a customtheme folder.
- In the Solution Explorer, click Show All Files and then right-click the customtheme folder and select Include in Project.
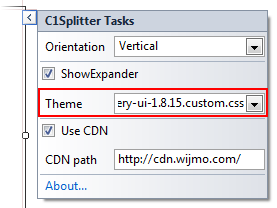
- Click the C1Splitter smart tag to open the Tasks menu.
- In the Theme property, enter the path to your custom theme .css; for example, custom-theme\css\custom-theme/jquery-ui-1.8.15.custom.css.
-
This theme setting is stored in the <appSettings> of the Web.config file. In the Solution Explorer, double-click the Web.config file. Notice the <appSettings> tag contains a WijmoTheme key and value; this is where the custom theme you added is specified.
- Run the project and notice the theme is applied to C1Splitter.
See Also