


-
Spread Windows Forms Product Documentation
- Getting Started
-
Developer's Guide
- Understanding the Product
- Working with the Component
-
Spreadsheet Objects
- Understanding Parts of the Component
- Object Parentage
- Resetting Parts of the Interface
- Rich Text Editing
- Improving Performance by Suspending the Layout
- Ways to Improve Performance
- Allowing User Functionality
- Allowing the User to Zoom the Display of the Component
- Working with Scroll Bars
- Adding a Status Bar
- Customizing Viewports
- Customizing Split Boxes
- Working With Slicers
- Working with Built-In Dialogs
- Ribbon Control
- Sheets
- Rows and Columns
- Headers
- Cells
- Cell Types
- Data Binding
- Customizing the Sheet Appearance
- Customizing Interaction in Cells
- Tables
- Pivot Table
- Understanding the Underlying Models
- Customizing Row or Column Interaction
- Formulas in Cells
- Sparklines
- Keyboard Interaction
- Events from User Actions
- File Operations
- Storing Excel Summary and View
- Printing
- Chart Control
- Enhanced Chart
- Customizing Drawing
- Touch Support with the Component
- Spread Designer Guide
- Assembly Reference
- Import and Export Reference
- Version Comparison Reference
Customizing the Scroll Bars
You can customize the display and operation of the scroll bars on the spreadsheet. The parts of the scroll bars are shown in the following figure.
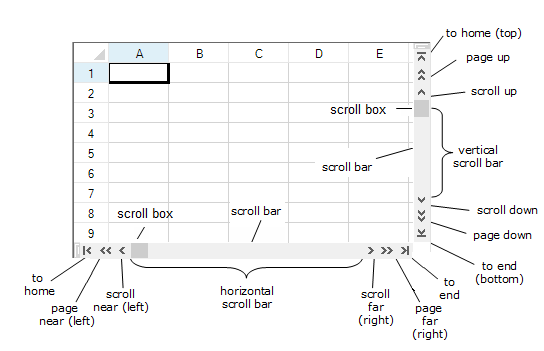
Setting scroll bar
You can use the properties of the FpSpread class to apply scroll bars settings for the entire component. Also, to set the scroll bars for the viewports, use the properties in the SpreadView class. The table below links to properties in the FpSpread class.
Property in FpSpread | Description |
|---|---|
When to display either a vertical or horizontal scroll bar or both on the edges of the sheet in the component | |
Dimensions of the scroll bars | |
Whether the spreadsheet scrolls across the display when the user moves the scroll box (tracking) | |
Whether scroll bars are based on only the area that has data or on the entire spreadsheet | |
Whether to align the scroll bars with the last row and column | |
To set the width of the horizontal scroll bar, set the tabstrip ratio. Default is 0.50 (divide the area by 50% with tab strip and scroll bar) |
Scroll bar width
To increase the width of the scroll bar, for example, you could change the tab strip ratio to 0.25, which would divide the area between 25% for the tab strip and 75% for the scroll bar, and allocate an area larger than the default to the scroll bar. For more information on the tab strip, refer to Customizing the Sheet Name Tabs.
Event
There are two events that indicate that the end user has moved the scroll bars. The TopChange event is raised when the end user moves the vertical scroll bar. The LeftChange event is raised when the horizontal scroll bar is moved. There is no event raised to indicate that the user has resized the tab strip.
Smooth Scrolling
By default, scrollbars scroll the sheet by row and column. But, you can set smooth scrolling by setting the VerticalScrollBarMode and HorizontalScrollBarMode properties of the FpSpread class.You can set the following values for the VerticalScrollMode and HorizontalScrollMode enumeration.
Values for VerticalScrollMode and HorizontalScrollMode enumeration | Description |
|---|---|
Row Column | Scroll by row or column. |
Pixel | Scroll in pixel. |
PixelEnhanced | For vertical scroll: Scroll in pixel (same as 'Pixel' value) as well as scroll in pixel while using mouse wheel operation. For horizontal scroll: Scroll in pixel (same as 'Pixel' value) The number of pixels scrolled by mouse wheel in vertical scroll is calculated by the expression: VerticalScrollBarSmallChange * MouseWheelScrollLine (The default value of MouseWheelScrollLine is 3) |
PixelAndColumn PixelAndRow | While scrolling in pixel with the mouse, scroll by row and column when you release the mouse button. |
Note:
You can display scroll bar tips. For more information, kindly refer to "Customizing Scroll Bar Tips".
Scroll bar is also a type of control and inherit the benefits of controls.For example, context menus are available for horizontal and vertical scrollbars, which are enabled by default.
By default, the scroll bar does not display page button, home button, or end button.For information regarding the method to display all scroll bar buttons, kindly refer to the sample code.
You can customize the display and operation of the scroll bar by using each member of the EnhancedScrollBarRenderer class that represents the scroll bar renderer.
Sample Code
The following sample code sets the scroll bar of the control.Scroll bars appear larger than the default size. For scrolling horizontally, the spreadsheet scrolls as you move the scroll box; for scrolling vertically, the scroll bar tip shows the row number, but the spreadsheet does not scroll until you are done.
FarPoint.Win.Spread.FpSpread fpSpread1 = new FarPoint.Win.Spread.FpSpread();
FarPoint.Win.Spread.SheetView shv = new FarPoint.Win.Spread.SheetView();
fpSpread1.Location = new Point(10, 10);
fpSpread1.Height = 250;
fpSpread1.Width = 400;
Controls.Add(fpSpread1);
fpSpread1.Sheets.Add(shv);
fpSpread1.HorizontalScrollBarPolicy = FarPoint.Win.Spread.ScrollBarPolicy.Always;
fpSpread1.VerticalScrollBarPolicy = FarPoint.Win.Spread.ScrollBarPolicy.AsNeeded;
// Setting vertical bar pixel change
fpSpread1.VerticalScrollBarSmallChange = 10;
// Setting Vertical scroll mode to PixelEnhanced to support pixel scrolling through mouse
fpSpread1.VerticalScrollBarMode = FarPoint.Win.VerticalScrollMode.PixelEnhanced;
fpSpread1.HorizontalScrollBarHeight = 30;
fpSpread1.VerticalScrollBarWidth = 30;
fpSpread1.ScrollBarMaxAlign = true;
fpSpread1.ScrollBarShowMax = true;
fpSpread1.ScrollBarTrackPolicy = FarPoint.Win.Spread.ScrollBarTrackPolicy.Horizontal;
fpSpread1.ScrollTipPolicy = FarPoint.Win.Spread.ScrollTipPolicy.Vertical;
Dim FpSpread1 As New FarPoint.Win.Spread.FpSpread()
Dim shv As New FarPoint.Win.Spread.SheetView()
FpSpread1.Location = New Point(10, 10)
FpSpread1.Height = 250
FpSpread1.Width = 400
Controls.Add(FpSpread1)
FpSpread1.Sheets.Add(shv)
FpSpread1.HorizontalScrollBarPolicy = FarPoint.Win.Spread.ScrollBarPolicy.Always
FpSpread1.VerticalScrollBarPolicy = FarPoint.Win.Spread.ScrollBarPolicy.AsNeeded
// Setting vertical bar pixel change
fpSpread1.VerticalScrollBarSmallChange = 10;
// Setting Vertical scroll mode to PixelEnhanced to support pixel scrolling through mouse
fpSpread1.VerticalScrollBarMode = FarPoint.Win.VerticalScrollMode.PixelEnhanced;
FpSpread1.HorizontalScrollBarHeight = 30
FpSpread1.VerticalScrollBarWidth = 30
FpSpread1.ScrollBarMaxAlign = True
FpSpread1.ScrollBarShowMax = True
FpSpread1.ScrollBarTrackPolicy = FarPoint.Win.Spread.ScrollBarTrackPolicy.Horizontal
FpSpread1.ScrollTipPolicy = FarPoint.Win.Spread.ScrollTipPolicy.VerticalThe following sample code displays all the scroll bar buttons.
fpSpread1.VerticalScrollBar.Buttons = FarPoint.Win.Spread.ScrollBarButtons.HomeEnd | FarPoint.Win.Spread.ScrollBarButtons.PageUpDown | FarPoint.Win.Spread.ScrollBarButtons.LineUpDown | FarPoint.Win.Spread.ScrollBarButtons.Thumb;
fpSpread1.HorizontalScrollBar.Buttons = FarPoint.Win.Spread.ScrollBarButtons.HomeEnd | FarPoint.Win.Spread.ScrollBarButtons.LineUpDown | FarPoint.Win.Spread.ScrollBarButtons.PageUpDown | FarPoint.Win.Spread.ScrollBarButtons.Thumb;
FpSpread1.VerticalScrollBar.Buttons = FarPoint.Win.Spread.ScrollBarButtons.HomeEnd Or FarPoint.Win.Spread.ScrollBarButtons.PageUpDown Or FarPoint.Win.Spread.ScrollBarButtons.LineUpDown Or FarPoint.Win.Spread.ScrollBarButtons.Thumb
FpSpread1.HorizontalScrollBar.Buttons = FarPoint.Win.Spread.ScrollBarButtons.HomeEnd Or FarPoint.Win.Spread.ScrollBarButtons.LineUpDown Or FarPoint.Win.Spread.ScrollBarButtons.PageUpDown Or FarPoint.Win.Spread.ScrollBarButtons.ThumbUsing the Spread Designer
From the Settings menu, select Scrollbars.
In the Scroll Bar tab, set the display and tracking by selecting the options.
Click OK.
From the File menu choose Apply and Exit to apply your changes to the component and exit Spread Designer.
or
Select the Spread component (or select Spread from the pull-down menu).
In the property list for the component (in the Behavior category), select one of the scroll bar properties.
Click the drop-down arrow to display the choices and select a value. Repeat this for each property.
From the File menu choose Apply and Exit to apply your changes to the component and exit Spread Designer.
Scroll Horizontally and Vertically
Spread WinForms allows you to scroll worksheet panes horizontally and vertically. You can use the Panes property of the IWorksheet interface to access all panes in a worksheet, and then use the IPane interface to activate a pane, get its current scroll position, or scroll the pane horizontally and vertically.
The following table lists the main APIs for scrolling worksheet panes.
API | Description |
|---|---|
Gets all panes of the worksheet. | |
Gets the total number of panes in the worksheet. | |
Gets the index number of the pane within the worksheet. | |
Gets the number of the leftmost column in the pane. | |
Gets the number of the row that appears at the top of the pane. | |
Activates the pane so that subsequent operations apply to the intended pane in worksheets that contain multiple panes. | |
Scrolls the document so that the specified rectangular area is displayed in the viewport. | |
Scrolls the pane by columns or rows. Use a positive horizontal value to scroll right, a negative horizontal value to scroll left, a positive vertical value to scroll down, and a negative vertical value to scroll up. | |
Scrolls the pane by pages. Use a positive horizontal value to scroll right, a negative horizontal value to scroll left, a positive vertical value to scroll down, and a negative vertical value to scroll up. |
Scroll by Rows or Columns
Use the SmallScroll method to scroll a pane by a specified number of columns and rows.
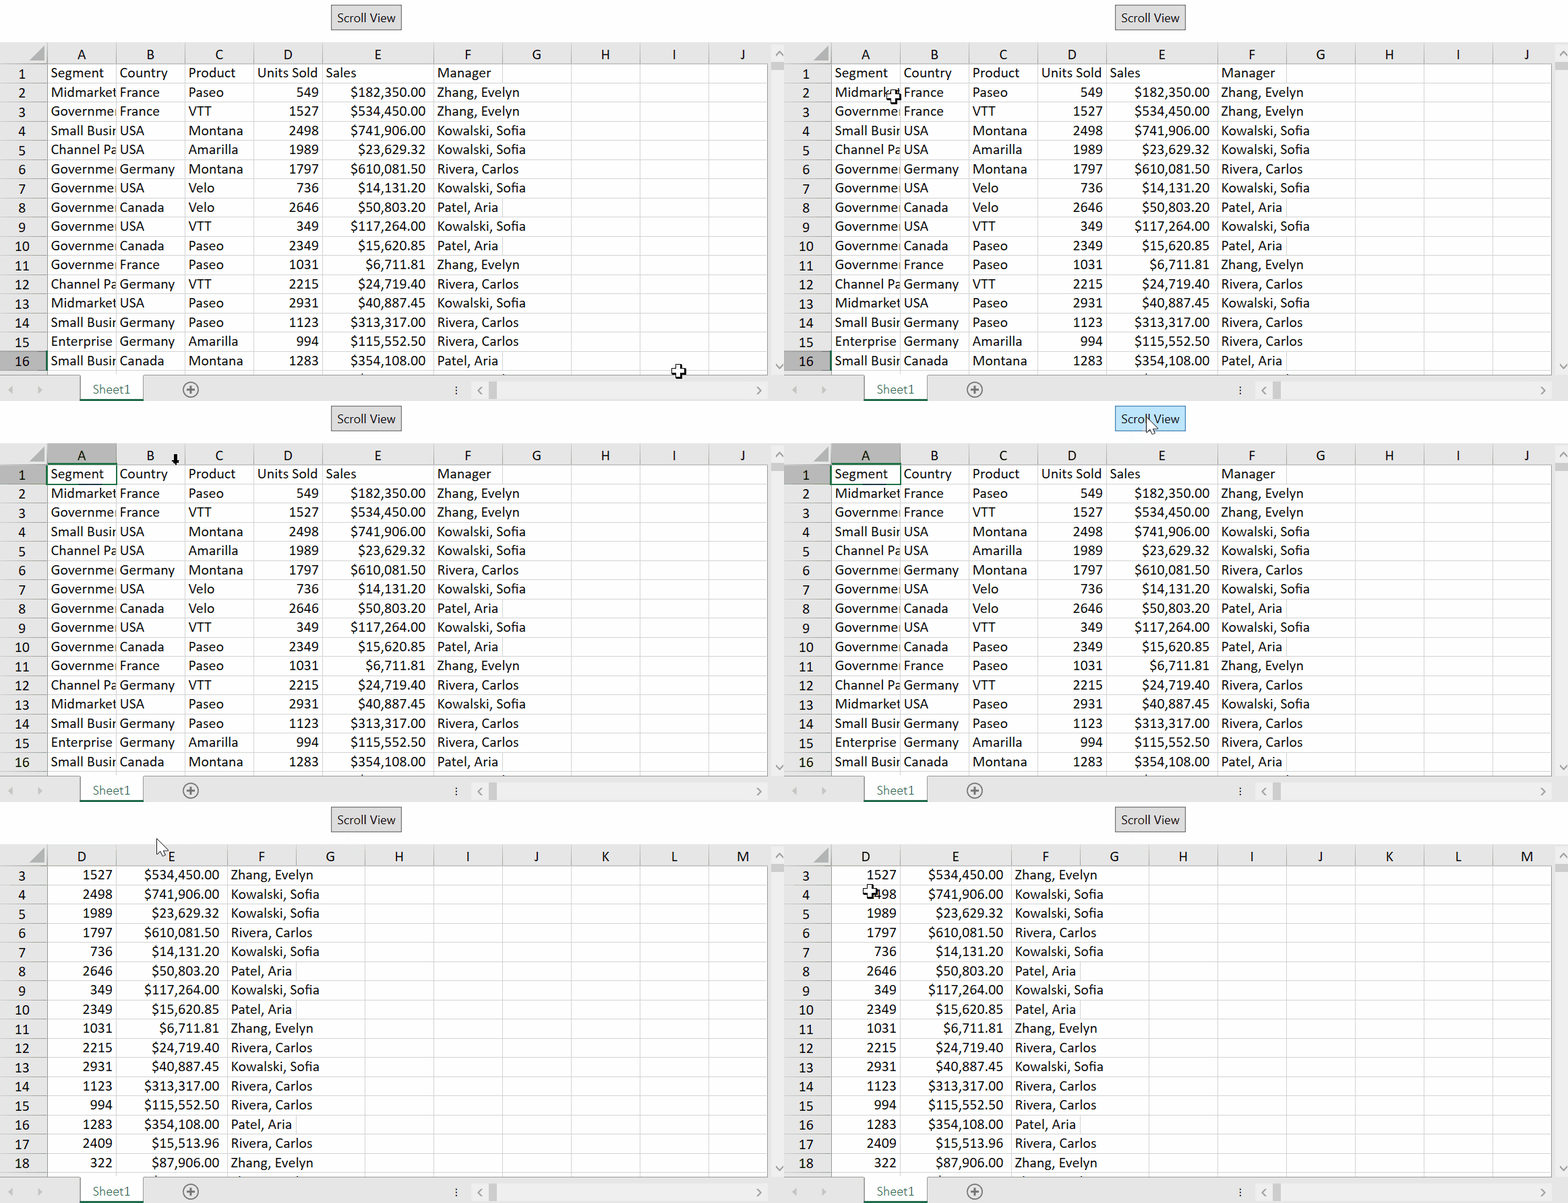
Refer to the following example code to scroll the first pane three columns to the right and two rows down.
C#
// Scroll the first pane by columns and rows.
var worksheet = spreadSheet1.Workbook.ActiveSheet;
var pane = worksheet.Panes[0];
pane.SmallScroll(3, 2);
VB
' Scroll the first pane by columns and rows.
Dim worksheet = spreadSheet1.Workbook.ActiveSheet
Dim pane = worksheet.Panes(0)
pane.SmallScroll(3, 2)
Scroll by Pages
Use the LargeScroll method to move through the worksheet one or more pages at a time. This is helpful when navigating large datasets more quickly.
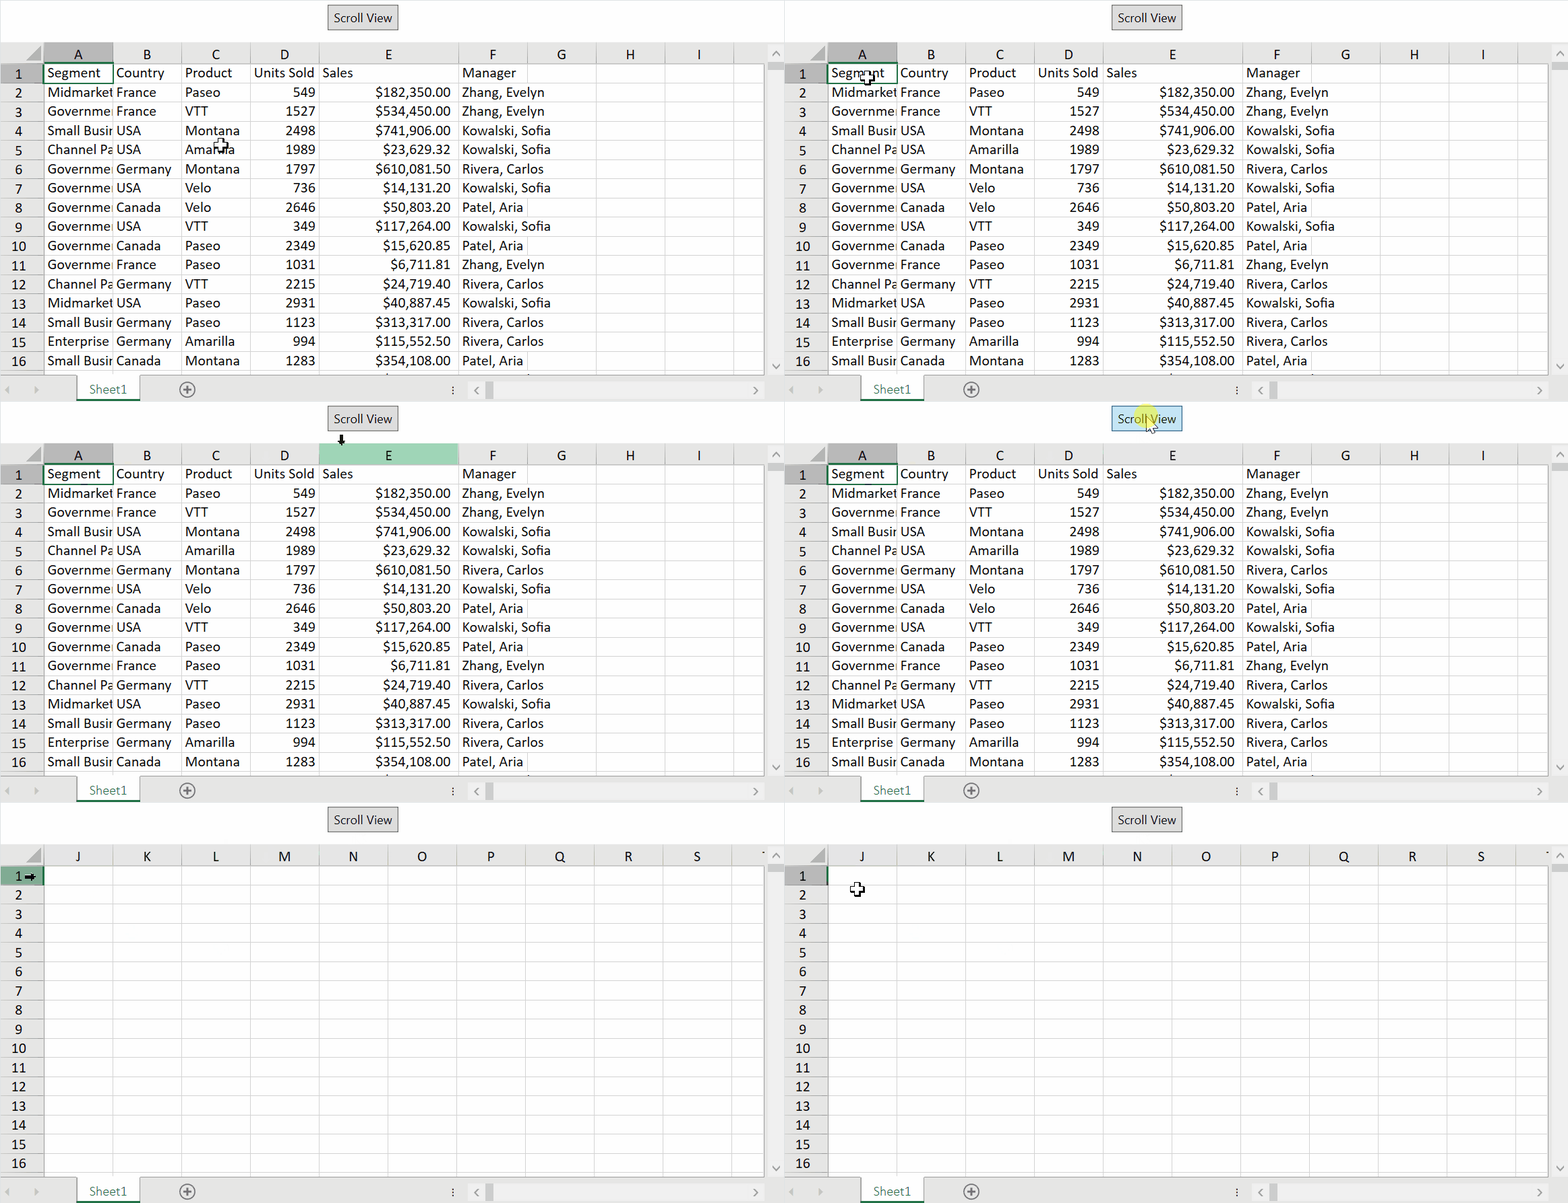
Refer to the following example code to scroll the first pane one page to the right.
C#
// Scroll the first pane by one page horizontally.
var worksheet = spreadSheet1.Workbook.ActiveSheet;
var pane = worksheet.Panes[0];
pane.LargeScroll(1, 0);
VB
' Scroll the first pane by one page horizontally.
Dim worksheet = spreadSheet1.Workbook.ActiveSheet
Dim pane = worksheet.Panes(0)
pane.LargeScroll(1, 0)
Scroll a Specific Area into View
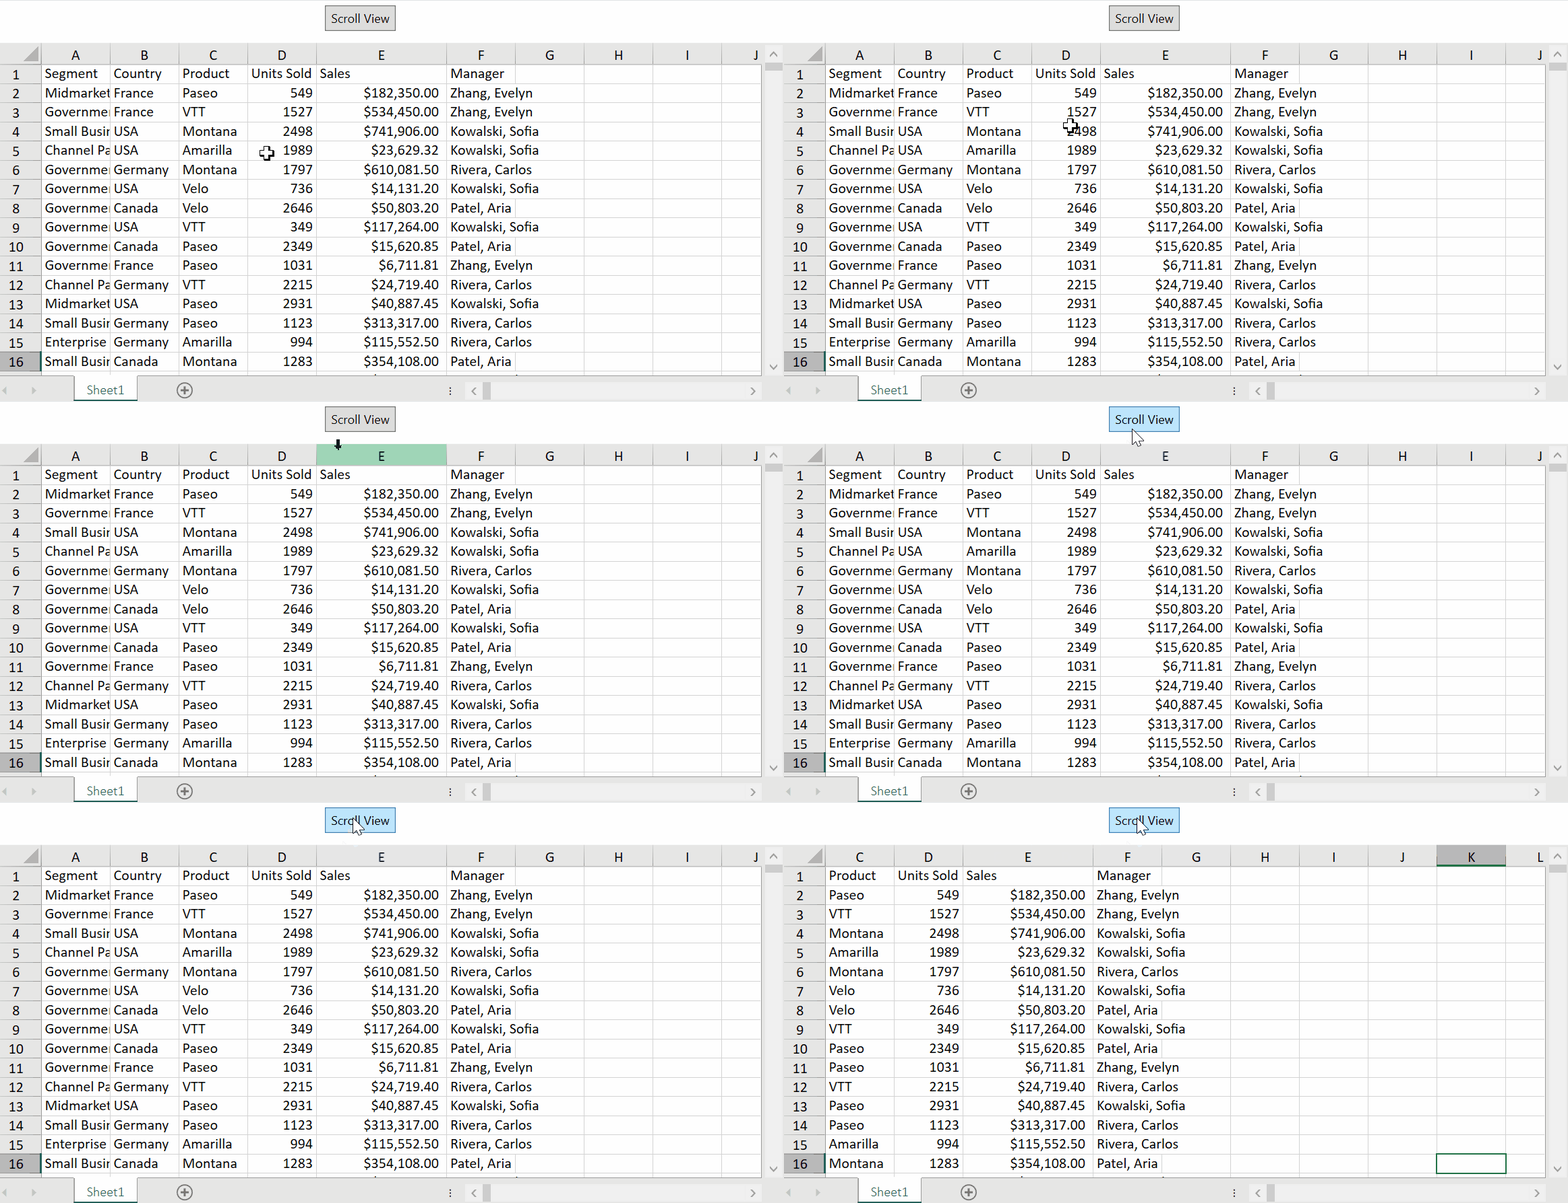
Use the ScrollIntoView method to scroll the pane so that a specified rectangular area is displayed in the viewport. The position and size of the rectangle are specified in pixels.
Refer to the following example code to scroll the pane so that the specified area becomes visible.
C#
// Scroll the pane so that the specified rectangle is visible.
var worksheet = spreadSheet1.Workbook.ActiveSheet;
var pane = worksheet.Panes[0];
pane.ScrollIntoView(600, 0, 200, 120);
VB
' Scroll the pane so that the specified rectangle is visible.
Dim worksheet = spreadSheet1.Workbook.ActiveSheet
Dim pane = worksheet.Panes(0)
pane.ScrollIntoView(600, 0, 200, 120)
Get the Current Scroll Position
You can use the ScrollColumn and ScrollRow properties to determine the current scroll position of a pane.
Refer to the following example code to get the top row and leftmost column of the first pane.
C#
// Get the current scroll position of the first pane.
var worksheet = spreadSheet1.Workbook.ActiveSheet;
var pane = worksheet.Panes[0];
int leftColumn = pane.ScrollColumn;
int topRow = pane.ScrollRow;
VB
' Get the current scroll position of the first pane.
Dim worksheet = spreadSheet1.Workbook.ActiveSheet
Dim pane = worksheet.Panes(0)
Dim leftColumn As Integer = pane.ScrollColumn
Dim topRow As Integer = pane.ScrollRow
Horizontal Scrolling using Mouse Wheel
Spread provides a convenient way to navigate horizontally within a worksheet using the mouse wheel and Ctrl+ Shift keys.
To scroll Right: Hold the Ctrl + Shift keys and scroll down the mouse wheel.
To Scroll Left: Hold the Ctrl + Shift keys and scroll up the mouse wheel.
This feature is enabled in a worksheet by default. However, if you wish to disable the horizontal scrolling functionality then use the following code in the MouseWheel event.
private void FpSpread1_MouseWheel(object sender, MouseEventArgs e)
 {
     if ((Control.ModifierKeys & (Keys.Control | Keys.Shift)) == (Keys.Control | Keys.Shift) && e is HandledMouseEventArgs handledMouseEventArgs)
         {
           handledMouseEventArgs.Handled = true;
         }
 }
Private Sub FpSpread1_MouseWheel(ByVal sender As Object, ByVal e As MouseEventArgs)
Dim handledMouseEventArgs As HandledMouseEventArgs = Nothing
If (Control.ModifierKeys And (Keys.Control Or Keys.Shift)) Is (Keys.Control Or Keys.Shift) AndAlso CSharpImpl.__Assign(handledMouseEventArgs, TryCast(e, HandledMouseEventArgs)) IsNot Nothing Then
handledMouseEventArgs.Handled = True
End IfSee Also
Customizing the Position in the Display