


Create and Format Excel Tables
This tutorial shows how to take raw XLSX worksheet data and convert it into a structured Excel Table in .NET applications using C# and a server-side Excel API library, Document Solutions for Excel .NET (DsExcel .NET).
You’ll learn how to:
Add a simple dataset to a worksheet
Convert a range into an Excel table using the Worksheet.Tables.Add() method
Apply a built-in TableStyle for a clean, formatted result
Prerequisites
Before you begin, make sure you have:
.NET SDK
Document Solutions for Excel .NET (DsExcel .NET)
The DS.Documents.Excel NuGet package installed in your project
Install the package using the .NET CLI:
dotnet add package DS.Documents.ExcelImport the required namespace:
using GrapeCity.Documents.Excel;1) Create a Workbook and Worksheet (Minimal Setup)
This tutorial assumes you already know how to initialize a workbook, with a minimal setup shown below.
Workbook workbook = new Workbook();
IWorksheet worksheet = workbook.Worksheets[0];
worksheet.Name = "Tables";
2) Add Sample Data to the Worksheet
We’ll start with a small dataset (header row + values), then place it into a worksheet range.
object[,] sourceData = new object[,]
{
    {"ITEM", "AMOUNT"},
    {"Income 1", 2500},
    {"Income 2", 1000},
    {"Income 3", 250},
    {"Other", 250},
};

worksheet.Range["B3:C7"].Value = sourceData;
At this stage, the worksheet contains raw values, but it is not yet a structured Excel table.
3) Convert the Range into an Excel Table
Use the Worksheet.Tables.Add() method to convert the data range into a structured table.
The second argument set to true indicates the range includes a header row.
ITable incomeTable = worksheet.Tables.Add(worksheet.Range["B3:C7"], true);
incomeTable.Name = "tblIncome";
4) Apply a Built-In Table Style
Once the range is a table, you can apply a predefined Excel table style.
incomeTable.TableStyle = TableStyle.TableStyleMedium4;Visual Outcome (Formatted Excel Table)
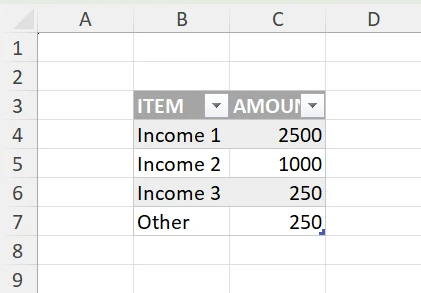
After converting the range into a table and applying a style, the worksheet will display:
A styled header row
Alternating row shading (depending on style)
Table filtering dropdowns in the header row
A structured table object that Excel recognizes as a real table
5) Save the Workbook
You can save the workbook in XLSX format with the following code:
workbook.Save("ExcelTables.xlsx");Next Steps
Read the full table documentation here.
Explore a full demo showcasing tables here.