
Quick Start
This quick start will guide you through the steps of adding C1FlexGrid and C1RulesManager controls, binding C1FlexGrid to data source, integrate C1RulesManager to the C1FlexGrid control, and applying conditional formatting on the grid data.
You can achieve the following output through the design view or completely through the code.
Through Design View
Note: WinForms .NET Edition has only runtime assemblies. Due to the new design-time model in VS2019 Preview, which is not complete yet from the Microsoft side, we do not supply any special design-time features as of yet. So, a RulesManager application for .NET can only be created programmatically for now. For the programmatic steps for this quick start sample, see the "Through Code View" implementation tab.
Set up the application
Create a new Windows Forms App.
Drag and drop the C1FlexGrid and C1RulesManager controls from the Toolbox onto the Form.
From the Properties window, set the Name property of the C1RulesManager control to rulesManager and C1FlexGrid to flexGrid.
Bind FlexGrid to a data source
Click on the C1FlexGrid's smart tag (
 ) to open the C1FlexGrid Tasks menu.
In the C1FlexGrid Tasks menu, click the Choose Data Source drop-down arrow and select the Add Project Data Source link from the drop-down box.
The Data Source Configuration Wizard appears. Leave the default setting, Database, selected on the Choose a Data Source Type page, and click Next.
On the Choose a Database Model page, leave Dataset selected and click Next.
Click the New Connection button to create a new connection or choose one from the drop-down list. When you click New Connection, the Add Connection dialog box appears.
Leave Microsoft Access Database File as the Data source.
Click the Browse button under Database file name. In the Select Microsoft Access Database File dialog box, browse to the C1NWind.mdb database in the Documents\ComponentOne Samples\Common directory. Select the C1NWind.mdb file and click Open.
In the Add Connection dialog box, click the Test Connection button to make sure that you have successfully connected to the database or server and click OK.
Click OK again to close the Add Connection dialog box.
Click the Next button to continue. A dialog box will appear asking if you would like to add the data file to your project and modify the connection string. Since it is not necessary to copy the database to your project, click No.
Save the connection string in the application configuration file by checking the Yes, save the connection as box and entering a name. Click the Next button to continue.
On the Choose Your Database Objects page, expand the Tables node, and select the Products table. Click Finish to exit the wizard.
A DataSet and connection string are added to your project. Additionally, Visual Studio automatically adds the following code to fill the DataSet.
this.productsTableAdapter.Fill(this.c1NWindDataSet.Products);Integrate RulesManager with FlexGrid
To integrate RulesManager with FlexGrid, use the following code:
rulesManager.SetC1RulesManager(flexGrid, rulesManager);Apply conditional formatting
Click on the C1RuleManager's smart tag (
) to open the C1RuleManager Tasks menu.In the C1RuleManager Tasks menu, select Edit Rule. This opens the IRule Collection Editor.
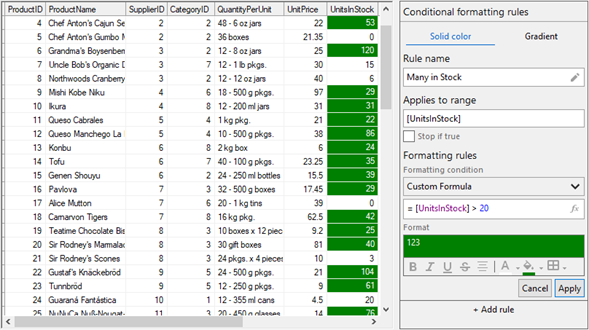
In the IRule Collection Editor, click Add to add a rule and set the following properties:
Property
Value
Name
Many In Stock
Expression
= [UnitsInStock] > 20
Style > BackColor
Green
Style > ForeColor
White
In the IRule Collection Editor, click the AppliesTo ellipsis button. This opens the IItemRange Collection Editor.
In the IItemRange Collection Editor, click Add, set the Fields property to "UnitsInStock" and click OK. This closes the editor and applies the rule you set to the "UnitsInStock" column of the grid.
Click OK to close the IRule Collection Editor.
Observe that the rule you just created gets added in the RulesManager control in the design view and is applied to FlexGrid control.
Through Code View
Set up the application
Create a new Windows Forms App.
Switch to the code view and add the following references:
using C1.Win.FlexGrid;
using C1.Win.RulesManager;
Initialize an instance of the C1FlexGrid and C1RulesManager class using the following code:
C1FlexGrid flexGrid = new C1FlexGrid();
C1RulesManager rulesManager = new C1RulesManager();
Use the following code to add C1RulesManager and C1FlexGrid to the Form.
//flexGrid
flexGrid.Location = new System.Drawing.Point(12, 36);
flexGrid.Size = new System.Drawing.Size(544, 375);
flexGrid.TabIndex = 0;
// rulesManager
rulesManager.Location = new System.Drawing.Point(562, 36);
rulesManager.Size = new System.Drawing.Size(237, 375);
rulesManager.TabIndex = 1;
Bind FlexGrid to a data source
Set the data source for FlexGrid.
//Set datasource for FlexGrid
        private DataTable GetDataSource()
        {
            var rs = "select * from Products;";
            var cn = GetConnectionString();
            var da = new OleDbDataAdapter(rs, cn);
            var dt = new DataTable();
            da.Fill(dt);
            return dt;
        }
        static string GetConnectionString()
        {
            var path = Environment.GetFolderPath(Environment.SpecialFolder.Personal) + @"\ComponentOne Samples\Common";
            var conn = @"provider=microsoft.jet.oledb.4.0;data source={0}\c1nwind.mdb;";
            return string.Format(conn, path);
        }
Assign data to the FlexGrid control using DataSource property of the C1FlexGrid class.
flexGrid.DataSource = GetDataSource();
Integrate RulesManager with FlexGrid
To integrate RulesManager with FlexGrid, use SetC1RulesManager method of the RulesManager class as shown in the following code:
rulesManager.SetC1RulesManager(flexGrid, rulesManager);Apply conditional formatting
Create a method, say ApplyPredefinedRules, to add rules to RulesManager which are to applied to the FlexGrid control and define the rule in RulesManager, using the Name, Expression and Style properties of the Rule class.
In the following example, rule applies to "UnitsInStock" column where the fore color of the cell is set to White and the back color is set to Green if the value in the cells of the "UnitsInStock" column is greater than 20.
private void ApplyPredefinedRules()
        {
            //Define the rule in RulesManager
            var rule1 = new C1.Win.RulesManager.Rule()
            {
                Name = "Many In Stock",
                Expression = "= [UnitsInStock] > 20",
                Style = new ItemStyle()
                {
                    ForeColor = Color.White,
                    BackColor = Color.Green
                }
            };
Invoke the AppliesTo method to apply conditional formatting to "UnitsInStock" column and pass the column name as a parameter to the method by initializing an instance of the FieldRange class.
rule1.AppliesTo.Add(new FieldRange(new string[] { "UnitsInStock" }));Add the rule to the RulesManager using Rules property of the C1RulesManager class.
rulesManager.Rules.Add(rule1);Invoke the method used to add rules to RulesMangager and apply to FlexGrid in the Form's Load method.
ApplyPredefinedRules();
Observe that the rule you just created gets added in the RulesManager control and is applied to FlexGrid control.