
Quick Start: Add and Configure Gauge
This section describes how to add a C1Gauge control to your Android app. This topic comprises two steps:
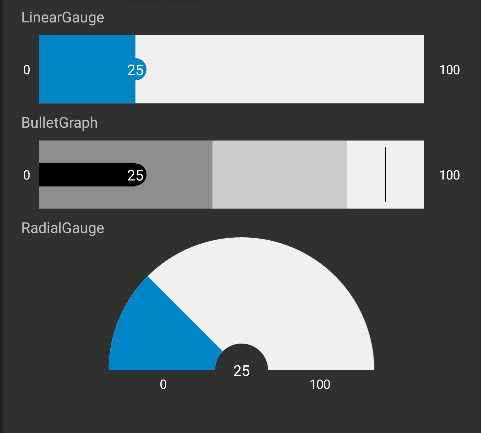
The following image shows how the C1Gauge appears after completing the steps above:
Step 1: Add Gauge Controls
Initialize Gauge controls in code
To add C1Gauge controls to your layout, open the .axml file in your layout folder from the Solution Explorer and replace its code with following code.
<LinearLayout xmlns:android="http://schemas.android.com/apk/res/android"
    xmlns:tools="http://schemas.android.com/tools"
    android:layout_width="match_parent"
    android:layout_height="match_parent"
    android:orientation="vertical"
    android:paddingLeft="16dp"
    android:paddingRight="16dp">
    <TextView
        android:layout_width="wrap_content"
        android:layout_height="wrap_content"
        android:text="@string/lineargauge" />
    <c1.android.gauge.C1LinearGauge
        android:id="@+id/linearGauge1"
        android:layout_width="match_parent"
        android:layout_height="wrap_content" />
    <TextView
        android:layout_width="wrap_content"
        android:layout_height="wrap_content"
        android:text="@string/bulletgraph" />
    <c1.android.gauge.C1BulletGraph
        android:id="@+id/bulletGraph1"
        android:layout_width="match_parent"
        android:layout_height="wrap_content" />
    <TextView
        android:layout_width="wrap_content"
        android:layout_height="wrap_content"
        android:text="@string/radialgauge" />
    <c1.android.gauge.C1RadialGauge
        android:id="@+id/radialGauge1"
        android:layout_width="match_parent"
        android:layout_height="wrap_content" />
</LinearLayout>
Alternatively, you can drag the C1LinearGauge, C1RadialGauge, or C1BulletGraph control from the Toolbox within the custom control tab onto your layout surface in designer mode.

Then, inside your activity, add the following code to the OnCreate method to initialize your layout.
public class GettingStartedActivity : Activity
    {
        private C1LinearGauge mLinearGauge;
        private C1RadialGauge mRadialGauge;
        private C1BulletGraph mBulletGraph;
        private TextView mValueText;
        private int mValue = 25;
        private int mMin = 0;
        private int mMax = 100;
        protected override void OnCreate(Bundle bundle)
        {
            base.OnCreate(bundle);
            SetContentView(Resource.Layout.activity_getting_started);
            // initializing widgets
            mRadialGauge = (C1RadialGauge)FindViewById(Resource.Id.radialGauge1);
            mLinearGauge = (C1LinearGauge)FindViewById(Resource.Id.linearGauge1);
            mBulletGraph = (C1BulletGraph)FindViewById(Resource.Id.bulletGraph1);
            // setting dafault values
            mBulletGraph.Enabled = true;
            mBulletGraph.Value = mValue;
            mBulletGraph.Bad = 45;
            mBulletGraph.Good = 80;
            mBulletGraph.Min = mMin;
            mBulletGraph.Max = mMax;
            mBulletGraph.Target = 90;
            mBulletGraph.ShowText = GaugeShowText.All;
            mBulletGraph.Step = 1;
            mBulletGraph.IsReadOnly = false;
            mBulletGraph.IsAnimated = true;
            mLinearGauge.Enabled = true;
            mLinearGauge.Value = mValue;
            mLinearGauge.Min = mMin;
            mLinearGauge.Max = mMax;
            mLinearGauge.Step = 1;
            mLinearGauge.ShowText = GaugeShowText.All;
            mLinearGauge.IsReadOnly = false;
            mLinearGauge.IsAnimated = true;
            mRadialGauge.Enabled = true;
            mRadialGauge.Value = mValue;
            mRadialGauge.Min = mMin;
            mRadialGauge.Max = mMax;
            mRadialGauge.Step = 1;
            mRadialGauge.ShowText = GaugeShowText.All;
            mRadialGauge.IsReadOnly = false;
            mRadialGauge.IsAnimated = true;
        }
    }
Step 2: Run the Project
In the ToolBar section, select the Android device and then press F5 to view the output.