Using DataFilter with FlexGrid
FlexGrid provides built-in filtering support with the help of column filters. However, consider a scenario where you want a filtering UI similar to the one seen in different e-commerce websites where a grid displaying the product listing shows only few attributes such as the product image, product name and product price. Although, the user is allowed to filter the product listing by many other attributes such as brand, category, price etc. It is not possible to set such kind of filters from column filters in data grid controls. Hence, this walkthrough explains how you can use the DataFilter control to filter FlexGrid content using a filtering UI similar to any online store’s website.
To create an application for filtering a car list by brand, category, and price, complete the following steps:
- Setting up the application UI
- Creating data source for FlexGrid and DataFilter
- Adding data to FlexGrid and DataFilter controls
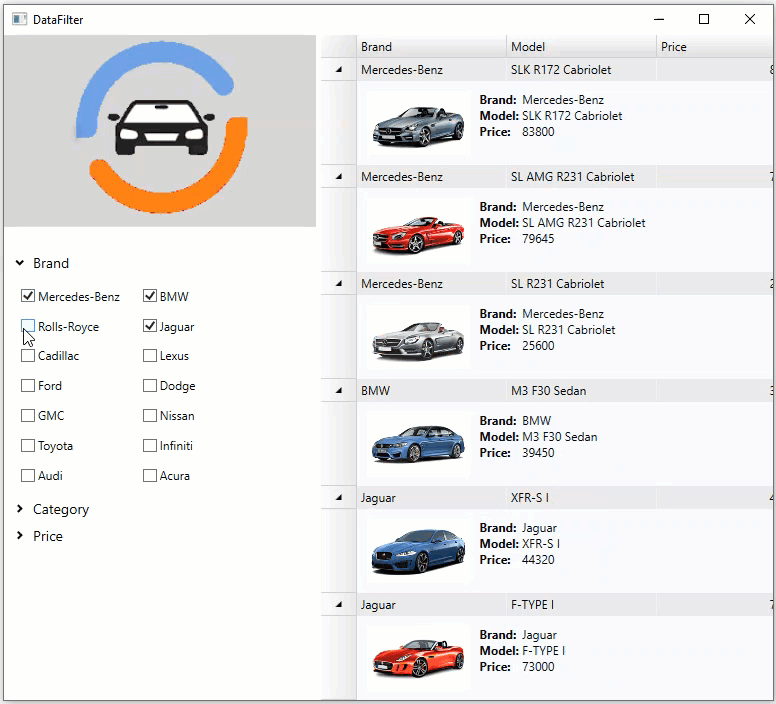
The following image shows a list of cars filtered by a specific brand, category and price in FlexGrid using the DataFilter control.
Step 1: Setting up the application UI
- Create a new WPF App in Visual Studio.
- Drag and drop the C1DataFilter and C1FlexGrid controls from the toolbox onto the form. Note that the following references get automatically added to the References.
- C1.WPF.DataFilter4.5.2.dll
- C1.WPF.4.5.2.dll
- C1.WPF.DateTimeEditors.4.5.2.dll
- C1.WPF.Extended.4.5.2.dll
- C1.DataCollection.4.5.2.dll
- C1.WPF.DataGrid.4.5.2.dll
- C1.DataCollection.BindingList.dll
- Open MainWindow.xaml and replace the existing XAML with the following code.
| XAML |
Copy Code
|
<Window
xmlns="http://schemas.microsoft.com/winfx/2006/xaml/presentation"
xmlns:x="http://schemas.microsoft.com/winfx/2006/xaml"
xmlns:d="http://schemas.microsoft.com/expression/blend/2008"
xmlns:mc="http://schemas.openxmlformats.org/markup-compatibility/2006"
xmlns:local="clr-namespace:C1FlexGrid_DataFilter"
xmlns:c1="http://schemas.componentone.com/winfx/2006/xaml" x:Class="C1FlexGrid_DataFilter.MainWindow"
mc:Ignorable="d"
Title="DataFilter" Height="900" Width="1061.526">
<Grid>
<Grid.ColumnDefinitions>
<ColumnDefinition Width="475*"/>
<ColumnDefinition Width="317*"/>
</Grid.ColumnDefinitions>
<c1:C1FlexGrid RowDetailsVisibilityMode="Visible" Name="grid" HorizontalAlignment="Left" Margin="317,0,0,0" VerticalAlignment="Top" Height="809" Width="650" Grid.ColumnSpan="2">
<c1:C1FlexGrid.Columns>
<c1:Column Header="Brand" Binding="{Binding Brand}" Width="150" />
<c1:Column Header="Model" Binding="{Binding Model}" Width="150" />
<c1:Column Header="Price" Binding="{Binding Price}" Width="150" />
<c1:Column Header="Category" Binding="{Binding Category}" Width="150" />
</c1:C1FlexGrid.Columns>
<c1:C1FlexGrid.RowDetailsTemplate>
<DataTemplate>
<DockPanel Background="GhostWhite">
<Image DockPanel.Dock="Left" Name="img" Source="{Binding Picture}"
Height="64" Margin="10" />
<Grid Margin="0, 10">
<Grid.ColumnDefinitions>
<ColumnDefinition Width="Auto" />
<ColumnDefinition Width="*" />
</Grid.ColumnDefinitions>
<Grid.RowDefinitions>
<RowDefinition Height="Auto" />
<RowDefinition Height="Auto" />
<RowDefinition Height="Auto" />
</Grid.RowDefinitions>
<TextBlock Text="Brand: " FontWeight="Bold" />
<TextBlock Text="{Binding Brand}" Grid.Column="1" />
<TextBlock Text="Model: " FontWeight="Bold" Grid.Row="1" />
<TextBlock Text="{Binding Model}" Grid.Column="1" Grid.Row="1" />
<TextBlock Text="Price: " FontWeight="Bold" Grid.Row="2" />
<TextBlock Text="{Binding Price}" Grid.Column="1" Grid.Row="2" />
</Grid>
</DockPanel>
</DataTemplate>
</c1:C1FlexGrid.RowDetailsTemplate>
</c1:C1FlexGrid>
<c1:C1DataFilter Name="c1DataFilter" FilterAutoGenerating="C1DataFilter_FilterAutoGenerating" HorizontalAlignment="Left" VerticalAlignment="Top" Height="705" Width="312" Margin="0,104,0,0"/>
<Image Margin="0" Stretch="Fill" Source="/CarLogo.png" HorizontalAlignment="Left" Height="192" VerticalAlignment="Top" Width="312"/>
</Grid>
</Window>
|
Back to Top
Step 2: Creating data source for FlexGrid and DataFilter
Add a class 'Car' to define data.
Public Iterator Function GetCarDataCollection(ByVal carTable As DataTable) As IEnumerable(Of car)
    Dim rnd As New Random()

    For Each row As DataRow In carTable.Rows

        Yield New car With {
            .Brand = row.Field(Of String)("Brand"),
            .Model = row.Field(Of String)("Model"),
            .Picture = row.Field(Of Byte())("Picture"),
            .Price = row.Field(Of Double)("Price"),
            .Category = row.Field(Of String)("Category")
        }

    Next row

End Function

Public Function GetCarTable() As DataTable
    Dim rs As String = "select * from Cars;"
    Dim cn As String = GetConnectionString()
    Dim da As New OleDbDataAdapter(rs, cn)
    Dim dt As New DataTable()
    da.Fill(dt)
    Return dt
End Function

Private Function GetConnectionString() As String
    AppDomain.CurrentDomain.SetData("DataDirectory", Environment.GetFolderPath(Environment.SpecialFolder.Personal) & "\ComponentOne Samples\Common")
    Dim conn As String = "provider=microsoft.jet.oledb.4.0;data source=|DataDirectory|\c1nwind.mdb;"
    Return conn
End Function
public IEnumerable<Car> GetCarDataCollection(DataTable carTable)
{
    Random rnd = new Random();

    foreach(DataRow row in carTable.Rows)
    {

        yield return new Car
        {
            Brand = row.Field<string>("Brand"),
            Model = row.Field<string>("Model"),
            Picture = row.Field<Byte[]>("Picture"),
            Price = row.Field<double>("Price"),
            Category = row.Field<string>("Category")

        };

    }

}

public DataTable GetCarTable()
{
    string rs = "select * from Cars;";
    string cn = GetConnectionString();
    OleDbDataAdapter da = new OleDbDataAdapter(rs, cn);
    DataTable dt = new DataTable();
    da.Fill(dt);
    return dt;
}

private string GetConnectionString()
{
    AppDomain.CurrentDomain.SetData("DataDirectory", Environment.GetFolderPath(Environment.SpecialFolder.Personal) + @"\ComponentOne Samples\Common");
    string conn = @"provider=microsoft.jet.oledb.4.0;data source=|DataDirectory|\c1nwind.mdb;";
    return conn;
}
Step 3: Adding data to FlexGrid and DataFilter controls
- Populate the FlexGrid and DataFilter controls with data.
' Initialize the data
_carsTable = _dataProvider.GetCarTable()
Dim Data = New C1DataCollection(Of car)(_dataProvider.GetCarDataCollection(_carsTable))
' Populate the grid and filter with data
grid.ItemsSource = Data
c1DataFilter.ItemsSource = Data
grid.AutoGenerateColumns = False
//Initialize the data
_carsTable = _dataProvider.GetCarTable();
var data = new C1DataCollection<Car>(_dataProvider.GetCarDataCollection(_carsTable));

//Populate the grid and filter with data
grid.ItemsSource = data;
c1DataFilter.ItemsSource = data;
grid.AutoGenerateColumns = false;
- Add the following code in the event handler of the FilterAutoGenerating event which provides the checklist items for the two filters namely “Brand”, “Category” and sets the maximum and minimum value for the price filter.
Defining these filters allows you to filter the cars listing by a specific brand, category or price which are the basic criteria used to view a car listing.
Private Sub C1DataFilter_FilterAutoGenerating(sender As Object, e As C1.DataFilter.FilterAutoGeneratingEventArgs)
    Select Case e.[Property].Name
        Case "Brand"
            Dim BrandFilter = CType(e.Filter, ChecklistFilter)
            BrandFilter.SelectAll()
        Case "Category"
            Dim CategoryFilter = CType(e.Filter, ChecklistFilter)
            CategoryFilter.SelectAll()
        Case "Price"
            Dim priceFilter = CType(e.Filter, RangeFilter)
            priceFilter.Maximum = _carsTable.AsEnumerable().Max(Function(x) x.Field(Of Double)("Price"))
            priceFilter.Minimum = _carsTable.AsEnumerable().Min(Function(x) x.Field(Of Double)("Price"))
            priceFilter.Increment = 1000
            priceFilter.Digits = 0
        Case Else
            e.Cancel = True
    End Select
End Sub
private void C1DataFilter_FilterAutoGenerating(object sender, C1.DataFilter.FilterAutoGeneratingEventArgs e)
{
    switch (e.Property.Name)
    {
        case "Brand":
            var BrandFilter = (ChecklistFilter)e.Filter;
            BrandFilter.SelectAll();
            break;
        case "Category":
            var CategoryFilter = (ChecklistFilter)e.Filter;
            CategoryFilter.SelectAll();
            break;

        case "Price":
            var priceFilter = (RangeFilter)e.Filter;
            priceFilter.Maximum = _carsTable.AsEnumerable().Max(x => x.Field<double>("Price"));
            priceFilter.Minimum = _carsTable.AsEnumerable().Min(x => x.Field<double>("Price"));
            priceFilter.Increment = 1000;
            priceFilter.Digits = 0;
            break;
        default:
            e.Cancel = true;
            break;
    }
}
- Run the application and observe how the cars data with image appear in the FlexGrid control while all the car attribute filters are added to the DataFilter control.
Now, you can change the filter values in the DataFilter UI and see how the FlexGrid renders the filtered data.
Back to Top