Quick Start
This quick start will guide you through the steps of adding DataFilter and DataGridView controls to an application, binding DataGridView to a data source and setting the properties of controls. The below section gets you started with C1DataFilter in .NET and .NET Framework editions.
Complete the steps given below to see how the DataFilter control appears after data binding and setting properties.
Adding DataFilter control to the application.
Binding DataFilter to data
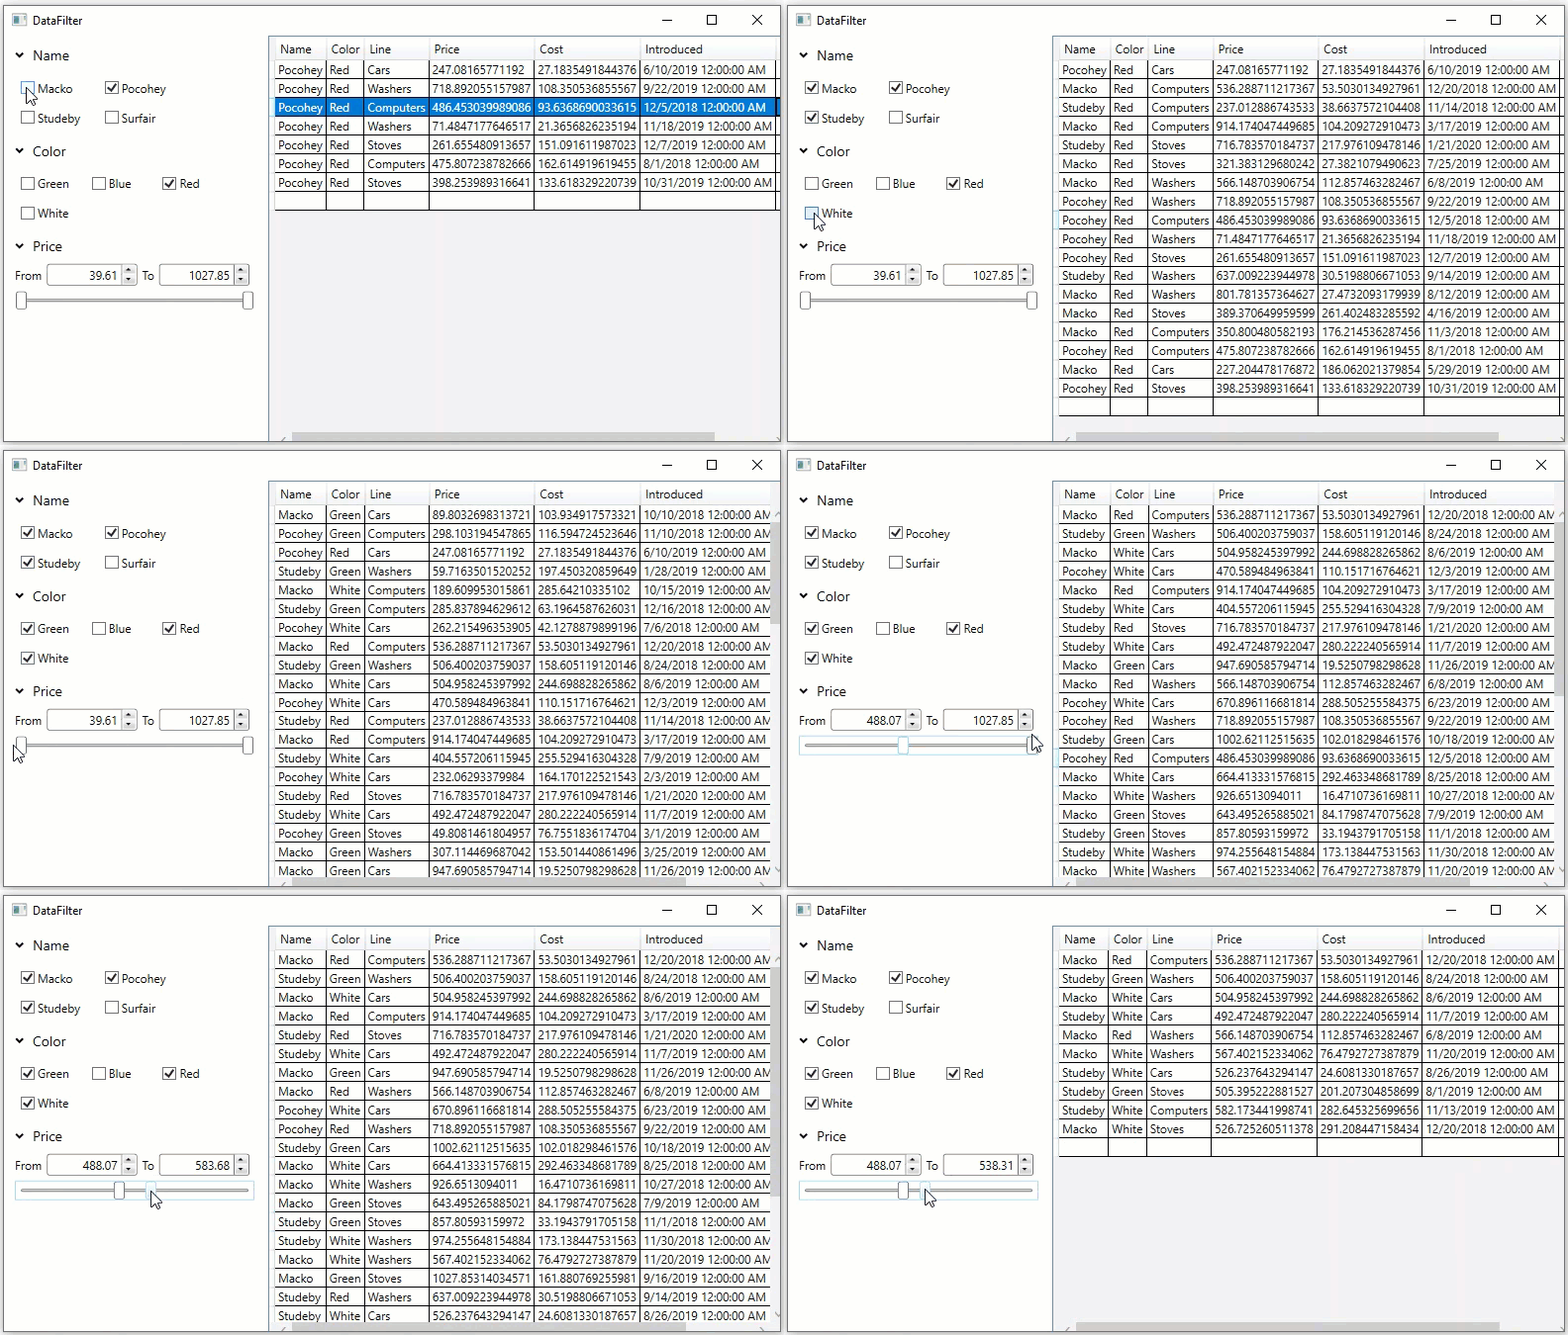
The following image shows filtered values in DataGrid on the basis of filters applied in the DataFilter control.

Step 1: Adding DataFilter control to the application.
Create a new WPF App in Visual Studio.
Drag and drop the C1DataFilter control from the toolbox onto the form. Additional reference assemblies get automatically added to the References.
Open MainWindow.xaml and replace the existing XAML with the following code.
<Window
xmlns="http://schemas.microsoft.com/winfx/2006/xaml/presentation"
xmlns:x="http://schemas.microsoft.com/winfx/2006/xaml"
xmlns:d="http://schemas.microsoft.com/expression/blend/2008"
xmlns:mc="http://schemas.openxmlformats.org/markup-compatibility/2006"
xmlns:local="clr-namespace:DataFilter_QuickStart"
xmlns:c1="http://schemas.componentone.com/winfx/2006/xaml" x:Class="MainWindow"
mc:Ignorable="d"
Title="MainWindow" Height="450" Width="800">
<Grid>
<c1:C1DataFilter FilterChanged="C1DataFilter_FilterChanged" Name="c1DataFilter" AutoGenerateFilters="True" FilterAutoGenerating="C1DataFilter_FilterAutoGenerating" HorizontalAlignment="Left" VerticalAlignment="Top" Height="419" Width="264"/>
<DataGrid Name="dataGrid" HorizontalAlignment="Left" Height="419" Margin="267,0,0,0" VerticalAlignment="Top" Width="525"/>
</Grid>
</Window>
Step 2: Binding DataFilter and DataGridto data.
Add a class 'Product' to define data.
vbnet
Public Class Product
    Shared _rnd As Random = New Random()
    Shared _names As String() = "Macko|Surfair|Pocohey|Studeby".Split("|"c)
    Shared _lines As String() = "Computers|Washers|Stoves|Cars".Split("|"c)
    Shared _colors As String() = "Red|Green|Blue|White".Split("|"c)
    Public Sub New()
        Name = _names(_rnd.[Next]() Mod _names.Length)
        Line = _lines(_rnd.[Next]() Mod _lines.Length)
        Color = _colors(_rnd.[Next]() Mod _colors.Length)
        Price = 30 + _rnd.NextDouble() * 1000
        Cost = 3 + _rnd.NextDouble() * 300
        Discontinued = _rnd.NextDouble() < 0.2
        Introduced = DateTime.Today.AddDays(_rnd.[Next](-600, 0))
    End Sub
    Public Property Name As String
    Public Property Color As String
    Public Property Line As String
    Public Property Price As Double
    Public Property Cost As Double
    Public Property Introduced As DateTime
    Public Property Discontinued As Boolean
End Class
csharp
public class Product
{
    static Random _rnd = new Random();
    static string[] _names = "Macko|Surfair|Pocohey|Studeby".Split('|');
    static string[] _lines = "Computers|Washers|Stoves|Cars".Split('|');
    static string[] _colors = "Red|Green|Blue|White".Split('|');
    public Product()
    {
        Name = _names[_rnd.Next() % _names.Length];
        Line = _lines[_rnd.Next() % _lines.Length];
        Color = _colors[_rnd.Next() % _colors.Length];
        Price = 30 + _rnd.NextDouble() * 1000;
        Cost = 3 + _rnd.NextDouble() * 300;
        Discontinued = _rnd.NextDouble() < .2;
        Introduced = DateTime.Today.AddDays(_rnd.Next(-600, 0));
    }
    public string Name { get; set; }
    public string Color { get; set; }
    public string Line { get; set; }
    public double Price { get; set; }
    public double Cost { get; set; }
    public DateTime Introduced { get; set; }
    public bool Discontinued { get; set; }
}
Add the following code to C1DataFilter_FilterAutoGenerating event. This provides the checklist items for the two filters namely “Name”, “Color” and sets the maximum and minimum value for the Price filter.
vbnet
Private Sub C1DataFilter_FilterAutoGenerating(sender As Object, e As C1.DataFilter.FilterAutoGeneratingEventArgs)
    Select Case e.[Property].Name
        Case "Name"
            Dim brandFilter = CType(e.Filter, C1.WPF.DataFilter.ChecklistFilter)
            brandFilter.ItemsSource = _products
            brandFilter.ValueMemberPath = "Name"
            brandFilter.SelectAll()
        Case "Color"
            Dim categoryFilter = CType(e.Filter, C1.WPF.DataFilter.ChecklistFilter)
            categoryFilter.ItemsSource = _products
            categoryFilter.ValueMemberPath = "Color"
            categoryFilter.SelectAll()
        Case "Price"
            Dim priceFilter = CType(e.Filter, C1.WPF.DataFilter.RangeFilter)
            priceFilter.Maximum = _products.AsEnumerable().Max(Function(x) x.Price)
            priceFilter.Minimum = _products.AsEnumerable().Min(Function(x) x.Price)
            priceFilter.Increment = 1000
            priceFilter.Digits = 0
        Case Else
            e.Cancel = True
    End Select
End Sub
csharp
private void C1DataFilter_FilterAutoGenerating(object sender, C1.DataFilter.FilterAutoGeneratingEventArgs e)
{
    switch (e.Property.Name)
    {
        //Set the checklist items for Brand filter
        case "Name":
            var brandFilter = (C1.WPF.DataFilter.ChecklistFilter)e.Filter;
            brandFilter.ItemsSource = _products;
            brandFilter.ValueMemberPath = "Name";
            brandFilter.SelectAll();
            break;
        //Set the checklist items for Category filter
        case "Color":
            var categoryFilter = (C1.WPF.DataFilter.ChecklistFilter)e.Filter;
            categoryFilter.ItemsSource = _products;
            categoryFilter.ValueMemberPath = "Color";
            categoryFilter.SelectAll();
            break;
        //Set the minimum/maximum value for the Price filter
        case "Price":
            var priceFilter = (C1.WPF.DataFilter.RangeFilter)e.Filter;
            priceFilter.Maximum = _products.AsEnumerable().Max(x => x.Price);
            priceFilter.Minimum = _products.AsEnumerable().Min(x => x.Price);
            priceFilter.Increment = 1000;
            priceFilter.Digits = 0;
            break;
        //Cancels the creation of all other filters
        default:
            e.Cancel = true;
            break;
    }
}
Add the following code to C1DataFilter_FilterChanged event.
vbnet
Private Sub C1DataFilter_FilterChanged(sender As Object, e As EventArgs)
    dataGrid.ItemsSource = c1DataFilter.View.Cast(Of Product)().ToList()
End Sub
csharp
private void C1DataFilter_FilterChanged(object sender, EventArgs e)
{
    dataGrid.ItemsSource = c1DataFilter.View.Cast<Product>().ToList();
}
Bind the DataGrid and DataFilter controls to data.
vbnet
'Assign datasource to the datagrid
dataGrid.ItemsSource = _products
'Assign datasource to the C1DataFilter
c1DataFilter.ItemsSource = _products
csharp
//Assign datasource to the datagrid
dataGrid.ItemsSource = _products;
//Assign datasource to the C1DataFilter
c1DataFilter.ItemsSource = _products;
Build and run the application. Use DataFilter's interactive UIto change the filter values and observe how the grid gets filtered.
See Also
FilterEditor


