
Components
InputPanel consists of a collection of 20 built-in input components to provide you several options to get different kinds of input in the most appropriate way. These components are represented by their corresponding classes and can be accessed programmatically through Items property of the C1InputPanel class. These objects can also be added at design time using the Add New Item option of C1InputPanel Tasks menu or, the C1InputPanel Item Collection Editor.
Each of these components are derived from a base class named InputComponent and have some common properties such as Text, Enabled, AutoSize, Width, Height, ToolTipText etc.
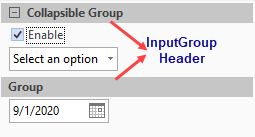
InputGroupHeader
InputGroupHeader component represents a group header in the InputPanel control and is used for grouping the components to get a cleaner layout. You can also make the collapsible groups by setting Collapsible property of the InputGroupHeader class to true. The class also provides various other properties to customize the group header and its appearance.
csharp
InputGroupHeader grphdr = new InputGroupHeader();
c1InputPanel1.Items.Add(grphdr);
grphdr.Collapsible = true;
grphdr.Text = "Collapsible Header";
vbnet
Dim grphdr As InputGroupHeader = New InputGroupHeader()
c1InputPanel1.Items.Add(grphdr)
grphdr.Collapsible = True
grphdr.Text = "Collapsible Header"
InputDataNavigator
InputDataNavigator component is a data-bound component which provides buttons for convenient operations related to data source rows. It enables navigation to the first, last, previous, and next record and other common data actions, such as updating the data source and refreshing data. You can choose the navigations items to be displayed by using the NavigatorItems property of the InputDataNavigator class. You can also display the Edit, Reload and Save buttons by using ShowEditButton, ShowReloadButton and ShowSaveButton properties respectively. The component even provides properties to customize the image and tooltip of all the buttons. For instance, to customize image and tooltip of the MovePrevious button, you can use the MovePreviousImage and MovePreviousToolTip properties.

csharp
InputDataNavigator nav = new InputDataNavigator();
c1InputPanel1.Items.Add(nav);
nav.NavigatorItems = InputNavigatorItems.All;
nav.ShowSaveButton = false;
nav.MovePreviousImage = ((System.Drawing.Image)(resources.GetObject("nav.MovePreviousImage")));
nav.MovePreviousToolTip = "Move to previous record";
vbnet
Dim nav As InputDataNavigator = New InputDataNavigator()
c1InputPanel1.Items.Add(nav)
nav.NavigatorItems = InputNavigatorItems.All
nav.ShowSaveButton = False
nav.MovePreviousImage = (CType((resources.GetObject("nav.MovePreviousImage")), System.Drawing.Image))
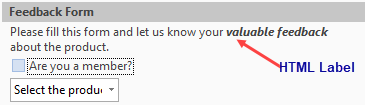
nav.MovePreviousToolTip = "Move to previous record"InputHtmlLabel
The InputHtmlLabel is an HTML Label component which can be used to provide HTML rich descriptive text such as purpose of your form. You can specify the HTML tags in value of its Text property of the InputHTMLLabel class to create rich label text.
csharp
InputHtmlLabel htmllbl = new InputHtmlLabel();
c1InputPanel1.Items.Add(htmllbl);
htmllbl.Text = "Please fill this form and let us know your

<i><b>valuable feedback</b></i><br/> about the product.";
vbnet
Dim htmllbl As InputHtmlLabel = New InputHtmlLabel()
c1InputPanel1.Items.Add(htmllbl)
htmllbl.Text = "Please fill this form and let us know your

<i><b>valuable feedback</b></i><br/> about the product."
InputProgressBar
The InputProgressBar component is a component which is used to indicate the progress of a task completion in percentage. The component lets you set the range of values to be displayed on the progress bar by specifying Minimum and Maximum properties of InputProgressBar class. Also, you can specify the amount by which progress bar should increase the current position using the Step property.

csharp
InputProgressBar prog = new InputProgressBar();
c1InputPanel1.Items.Add(prog);
prog.Minimum = 20;
prog.Maximum = 200;
prog.Value = 140;
prog.Step = 5;
vbnet
Dim prog As InputProgressBar = New InputProgressBar()
c1InputPanel1.Items.Add(prog)
prog.Minimum = 20
prog.Maximum = 200
prog.Value = 140
prog.[Step] = 5
InputTextBox
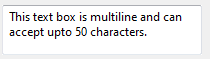
The InputTextBox component represents a text box component used for entering the text in the InputPanel control. You can easily implement the features such as character limit, word wrap, multi-line text with the help of properties provided by the InputTextBox class.
csharp
InputTextBox txtbox = new InputTextBox();
c1InputPanel1.Items.Add(txtbox);
txtbox.Text = "This text box is multiline and can accept upto 50 characters.";
txtbox.Height = 50;
txtbox.Width = 200;
txtbox.Multiline = true;
txtbox.TextBox.MaxLength = 50;
vbnet
Dim txtbox As InputTextBox = New InputTextBox()
c1InputPanel1.Items.Add(txtbox)
txtbox.Text = "This text box is multiline and can accept upto 50 characters."
txtbox.Height = 50
txtbox.Width = 200
txtbox.Multiline = True
txtbox.TextBox.MaxLength = 50
InputButton
The InputButton component is a standard button type control which enables the user to perform an action by clicking it. The InputButton class provides AutoEllipsis property to handle the text that extends beyond the button width and CheckOnClick property to specify whether button should toggle its pressed state when it is clicked.

csharp
InputButton btn = new InputButton();
c1InputPanel1.Items.Add(btn);
btn.Text = "Submit";
btn.Image = Image.FromFile("C:\Users\Desktop\ok.png");
btn.CheckOnClick = true;
vbnet
Dim btn As InputButton = New InputButton()
c1InputPanel1.Items.Add(btn)
btn.Text = "Submit"
btn.Image = Image.FromFile("C:\Users\Desktop\ok.png")
btn.CheckOnClick = True
InputDatePicker
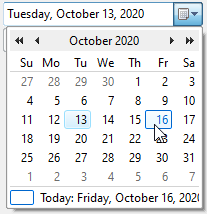
The InputDatePicker component is an input control to enter date type data with the help of a dropdown calendar. By default, the component selects and highlights the current date in calendar. You can navigate through the calendar to select the desired date. Also, you can set the ShowToday property of he InputDatePicker class to false. The default date format is set to short date which can be changed by setting the Format property.
csharp
InputDatePicker dtpkr = new InputDatePicker();
c1InputPanel1.Items.Add(dtpkr);
dtpkr.ShowToday = true;
dtpkr.Width = 200;
dtpkr.Format = "D";
vbnet
Dim dtpkr As InputDatePicker = New InputDatePicker()
c1InputPanel1.Items.Add(dtpkr)
dtpkr.ShowToday = True
dtpkr.Width = 200
dtpkr.Format = "D"
InputMaskedTextBox
The InputMaskedTextBox component is used to mask the input text. Each character position in the component maps to either a special placeholder or a literal character. Literal characters, or literals, can give visual cues about the type of data being used. For example, the parenthesis surrounding the area code of a telephone number and dashes are literals: (412)-123-2222. You can use the Mask property of InputMaskedTextbox to specify the input mask. In designer, Input Mask dialog opens on clicking the ellipsis button of Mask property.

csharp
InputMaskedTextBox masktxt = new InputMaskedTextBox();
c1InputPanel1.Items.Add(masktxt);
masktxt.Mask = "(999)000-0000";
vbnet
Dim masktxt As InputMaskedTextBox = New InputMaskedTextBox()
c1InputPanel1.Items.Add(masktxt)
masktxt.Mask = "(999)000-0000"
InputRadioButton
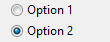
The InputRadioButton component is an input control that lets the user choose only one option out of predefined set of mutually exclusive options. Each of them is accompanied by a label which is represented by the Text property. You can set Boolean property Checked to true to select an option.
csharp
InputRadioButton radbtn1 = new InputRadioButton();
InputRadioButton radbtn2 = new InputRadioButton();
c1InputPanel1.Items.Add(radbtn1);
c1InputPanel1.Items.Add(radbtn2);
radbtn1.Text = "Option 1";
radbtn2.Text = "Option 2";
radbtn2.Checked = true;
vbnet
Dim radbtn1 As InputRadioButton = New InputRadioButton()
Dim radbtn2 As InputRadioButton = New InputRadioButton()
c1InputPanel1.Items.Add(radbtn1)
c1InputPanel1.Items.Add(radbtn2)
radbtn1.Text = "Option 1"
radbtn2.Text = "Option 2"
radbtn2.Checked = True
InputTimePicker
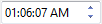
The InputTimePicker component is a control that lets you enter the time type values. The control comes with spin buttons for easy editing of values. To hide the spin buttons, you can set ShowSpinButtons property of the InputTimePicker class to false. It includes three fields; hour, minute and AM/PM. You can set the data formatting using the TimeFormat property.
csharp
InputTimePicker tpkr = new InputTimePicker();
c1InputPanel1.Items.Add(tpkr);
//tpkr.ShowSpinButtons = false;
 tpkr.Format = "hh:mm:ss";
vbnet
Dim tpkr As InputTimePicker = New InputTimePicker()
c1InputPanel1.Items.Add(tpkr)
tpkr.Format = "hh:mm:ss"
InputCheckBox
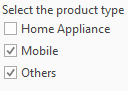
The InputCheckBox component is an input component using which user can choose one or more applicable options. By default, the checkbox allows two states, Checked and Unchecked. However, you can also achieve a checkbox with three states by setting ThreeState property of the InputCheckBox class to true.
csharp
InputCheckBox chkbox = new InputCheckBox();
c1InputPanel1.Items.Add(chkbox);
chkbox.Text = "Mobile";
chkbox.Checked = true;
chkbox.ThreeState = true;
vbnet
Dim chkbox As InputCheckBox = New InputCheckBox()
c1InputPanel1.Items.Add(chkbox)
chkbox.Text = "Mobile"
chkbox.Checked = True
chkbox.ThreeState = True
InputImage
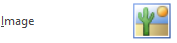
The InputImage component is used to display images within the InputPanel control. The InputImage class provides Image property to specify the source image. You can determine how the image is sized to fit within the component by using the ImageScaling property.
csharp
InputImage img = new InputImage();
c1InputPanel1.Items.Add(img);
img.Image = Image.FromFile("C:\\Users\\xxx\\Desktop\\image1.png");
vbnet
Dim img As InputImage = New InputImage()
c1InputPanel1.Items.Add(img)
img.Image = Image.FromFile("C:\Users\xxx\Desktop\image1.png")
InputMenu
The InputMenu component is a menu, which enables users to develop menus displaying other components such as InputGroupHeader, InputSplitButton. You can easily add menu items to the menu through the InputMenu Item Collection Editor. While using code, you can use Items property of the InputMenu class.

csharp
InputMenu menu = new InputMenu();
c1InputPanel1.Items.Add(menu);
menu.Text = "Options";
InputGroupHeader grphdr1 = new InputGroupHeader();
menu.Items.Add(grphdr1);
grphdr1.Text = "Proofing";
InputButton btn1 = new InputButton();
menu.Items.Add(btn1);
btn1.Text = "Spell-Check";
vbnet
Dim menu As InputMenu = New InputMenu()
c1InputPanel1.Items.Add(menu)
menu.Text = "Options"
Dim grphdr1 As InputGroupHeader = New InputGroupHeader()
menu.Items.Add(grphdr1)
grphdr1.Text = "Proofing"
Dim btn1 As InputButton = New InputButton()
menu.Items.Add(btn1)
btn1.Text = "Spell-Check"
InputSeparator
The InputSeparator component represents a line usually added on InputPanel to divide it into two different sections. The control lets you rotate itself by 90 degrees using Rotate 90° option in its context menu. You can also set height, width, padding etc. of the component by using the properties of InputSeparator class.

csharp
InputSeparator sepline = new InputSeparator();
c1InputPanel1.Items.Add(sepline);
sepline.Width = 200;
vbnet
Dim sepline As InputSeparator = New InputSeparator()
c1InputPanel1.Items.Add(sepline)
sepline.Width = 200
InputTrackBar
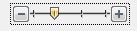
The InputTrackBar represents a slider element in the InputPanel control. User can slide the thumb between minimum and maximum values on the track bar. By default, the component is divided into 3 ticks which can be covered in 10 steps. You can change the frequency of ticks and steps by setting TickFrequency and StepFrequency property of the InputTrackBar class.
csharp
c1InputPanel1.Items.Add(trkbar);
trkbar.Minimum = 40;
trkbar.Maximum = 100;
trkbar.StepFrequency = 5;
trkbar.TickFrequency = 20;
vbnet
c1InputPanel1.Items.Add(trkbar)
trkbar.Minimum = 40
trkbar.Maximum = 100
trkbar.StepFrequency = 5
trkbar.TickFrequency = 20
InputComboBox
The InputComboBox component represents a list of options to choose from. The component can be of two types; dropdown(default) and dropdown list. While dropdown allows user to enter his own custom option as well, dropdown restricts the user to select from available options only. You can choose between the two types by setting DropDownStyle property of the InputComboBox class. The component provides an InputComboBox Item Collection Editor to add items to the combo box. You can add options using InputOption and group headers to segregate options into groups using the InputGroupHeader component. At runtime, you can use the Items property of input combo box to add sub-components.

csharp
InputComboBox cmbbox = new InputComboBox();
c1InputPanel1.Items.Add(cmbbox);
cmbbox.DropDownStyle = InputComboBoxStyle.DropDownList;
InputGroupHeader grphdr = new InputGroupHeader();
grphdr.Text = "Home Appliance";
InputOption option1 = new InputOption();
option1.Text = "Samsung";
cmbbox.Items.Add(grphdr);
cmbbox.Items.Add(option1);
vbnet
Dim cmbbox As InputComboBox = New InputComboBox()
c1InputPanel1.Items.Add(cmbbox)
cmbbox.DropDownStyle = InputComboBoxStyle.DropDownList
Dim grphdr As InputGroupHeader = New InputGroupHeader()
grphdr.Text = "Home Appliance"
Dim option1 As InputOption = New InputOption()
option1.Text = "Samsung"
cmbbox.Items.Add(grphdr)
cmbbox.Items.Add(option1)
InputLabel
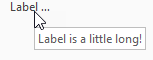
The InputLabel component represents a descriptive text, usually used to indicate the purpose of form or field. Just like any other component, you can set the text to be displayed by using Text property of the InputLabel class. The component automatically shows ellipsis if length of the text is more than the specified width and shows its full text as a tooltip. You can change this behavior by setting the AutoEllipsis property.
csharp
InputLabel lbl = new InputLabel();
c1InputPanel1.Items.Add(lbl);
lbl.Text = "Label is a little too long!";
lbl.Width = 40;
lbl.AutoEllipsis = true;
vbnet
Dim lbl As InputLabel = New InputLabel()
c1InputPanel1.Items.Add(lbl)
lbl.Text = "Label is a little too long!"
lbl.Width = 40lbl.AutoEllipsis = True
InputNumericBox
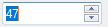
The InputNumericBox component is the input control to get a numeric value input from the user. The component comes with a spin button to increase or decrease the value by the interval specified using Increment property of the InputNumericBox class. You can also set the minimum and maximum value that a user can input. The component does not accept any value outside that range.
csharp
InputNumericBox numbox = new InputNumericBox();
c1InputPanel1.Items.Add(numbox);
numbox.Minimum = 20;
numbox.Maximum = 50;
numbox.Increment = 3;
vbnet
Dim numbox As InputNumericBox = New InputNumericBox()
c1InputPanel1.Items.Add(numbox)
numbox.Minimum = 20
numbox.Maximum = 50
numbox.Increment = 3
InputSplitButton
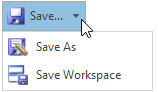
InputSplitButton is a hybrid component that comprises of a button as well as a menu. On one hand, the button part calls for an action on a single click, the menu part groups related commands into a dropdown. The component lets you add the menu options using the InputSplitButton Items Collection Editor. The same can be achieved at runtime by using Items property of the InputSplitButton class.
csharp
InputSplitButton splitbtn = new InputSplitButton();
c1InputPanel1.Items.Add(splitbtn);
splitbtn.Text = "Save..";
splitbtn.Image = Image.FromFile("C:\\Users\\xxx\\Desktop\\save.png");
InputGroupHeader hdr = new InputGroupHeader();
hdr.Text = "Save options";
InputOption option = new InputOption();
option.Text = "Save as..";
splitbtn.Items.Add(hdr);
splitbtn.Items.Add(option);
vbnet
Dim splitbtn As InputSplitButton = New InputSplitButton()
c1InputPanel1.Items.Add(splitbtn)
splitbtn.Text = "Save.."
splitbtn.Image = Image.FromFile("C:\Users\xxx\Desktop\save.png")
Dim hdr As InputGroupHeader = New InputGroupHeader()
hdr.Text = "Save options"
Dim [option] As InputOption = New InputOption()
[option].Text = "Save as.."
splitbtn.Items.Add(hdr)
splitbtn.Items.Add([option])
InputControlHost
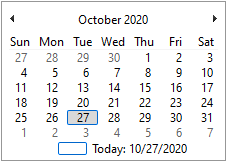
The InputControlHost component is a host component for adding any other external controls to the InputPanel control. To add a custom component to the InputPanel control, you can create a new class representing by inheriting the InputControlHost class and then adding it to the InputPanel items collection. For instance, in this example, we have added a calendar control using the InputControlHost component.
csharp
private void Form1_Load(object sender, EventArgs e)
        {
            //Add InputControlHost Item
            MonthCalendarHost mch = new MonthCalendarHost();
            c1InputPanel1.Items.Add(mch);
        }
public class MonthCalendarHost : InputControlHost
    {
        public MonthCalendarHost():base(new System.Windows.Forms.MonthCalendar())
        {
        }
    }
vbnet
Class SurroundingClass
    Private Sub Form1_Load(ByVal sender As Object, ByVal e As EventArgs)
        Dim mch As MonthCalendarHost = New MonthCalendarHost()
        c1InputPanel1.Items.Add(mch)
    End Sub
    Public Class MonthCalendarHost
        Inherits InputControlHost
        Public Sub New()
            MyBase.New(New System.Windows.Forms.MonthCalendar())
        End Sub
    End Class
End Class