- Getting Started
- Configuring your MVC Application
- Adding NuGet Packages to your App
- Adding Controls
- Client-Side Support
-
Working with Controls
- Accordion
- Barcode
- CollectionView
- DashboardLayout
- File Manager
- Financial Charts
- FlexChart
- FlexGrid
- Transposed Grid
- FlexMap
- Flex Pie
- Flex Radar
- Flex Report
- Flex Sheet
- Flex Viewer
- Gauge
- Input Controls
- Multi Row
- TransposedMultiRow
- OLAP
- Sunburst Chart
- Tab Panel
- Tree Map
- TreeView
- Globalization
- Styling
- ASP.NET MVC Samples
- ReleaseHistory
Cube Data Binding using DataEngine
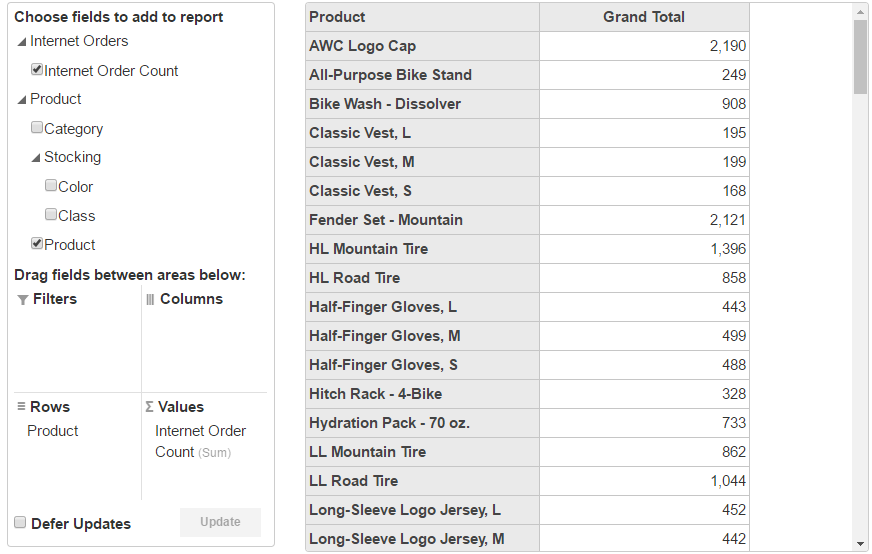
This section describes the steps required to add cube data in the OLAP control using SSAS (SQL Server Analysis Services). In the example below, the PivotEngine component binds to a service. In this the DataEngine Web Api is supported, the data engine is responsible for data aggregation in this example. The PivotPanel control and PivotGrid control binds the PivotEngine. You can change the view definition in the PivotPanel control. The aggregated data will be obtained from the service. Then the PivotGrid control displays the aggregated data.
This topic comprises of the following steps:
- Create an MVC Application using Visual Studio template
- Install the DataEngine Web API
- Configure Startup.cs
- Add an OLAP control
- Build and Run the Project
Step 1: Create an MVC Application using Visual Studio template
Create an ASP.NET MVC Application using Visual Studio template to enable WebAPI configuration.
- Select File | New | Project.
- Under installed templates, select Visual C# | Web | ASP.NET Web Application (.NET Framework).
- In the New ASP.NET Web Application dialog, select the MVC template.
- Under "Add folders and core references for", check Web API. Click OK.
For more information about licensing, resource registration, and assembly references, see Using Visual Studio Template.
Step 2: Install the DataEngine Web API
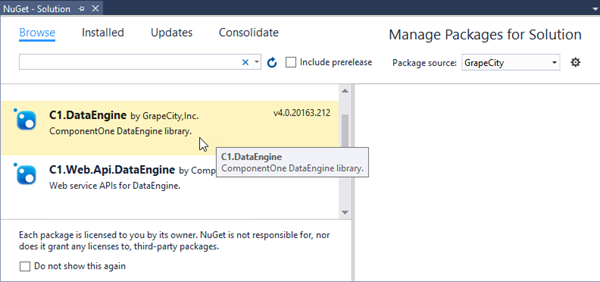
Install the DataEngine Web API and C1.WebApi packages from the NuGet server.
- Select MESCIUS from the Package source drop-down, in NuGet Package manager of your application.
- Browse for the DataEngine Web API packages, and install them.
You will see that the following references are added to your Visual Studio project.
C1.WebApi.dllC1.WebApi.DataEngine.dllC1.DataEngine.4.dllSystem.Net.Http.Formatting.dllSystem.Web.Http.dllSystem.Web.Http.Owin.dllSystem.Web.Http.WebHost.dll
Step 3: Configure Startup.cs
After adding the required references, you need to configure the Startup.cs to fetch the data that is stored on SSAS server.
In Solution Explorer, select your target project.
On the Project menu, click Add New Item option.
In the Add New Item dialog, select Web and then select OWIN Startup class template from the list on right.
In the Startup.cs file, add the following code inside the Startup class.
using C1.DataEngine;
using Microsoft.Owin;
using Owin;
using System.IO;
using System.Linq;
using System.Web.Http;
using OlapSSAS.Models;
[assembly: OwinStartupAttribute(typeof(OlapSSAS.Startup))]
namespace OlapSSAS
{
 public partial class Startup
   {
 private readonly HttpConfiguration config = GlobalConfiguration.Configuration;
 public void Configuration(IAppBuilder app)
   {
 app.UseDataEngineProviders()
 .AddCube("cube",
 @"Data Source=http://ssrs.componentone.com/OLAP/msmdpump.dll;
Provider=msolap;Initial Catalog=AdventureWorksDW2012Multidimensional",
 "Adventure Works");
        }
    }
}
Step 4: Add an OLAP control
Create a Controller and View for OLAP control and follow the below steps to initialize an OLAP control.
Add a new Controller
In the Solution Explorer, right click the folder Controllers.
From the context menu, select Add | Controller. The Add Scaffold dialog appears.
Complete the following steps in the Add Scaffold dialog:
- Select Empty MVC Controller template.
- Set name of the controller (for example:
OlapController). - Click Add.
Replace the method Index() with the following method.
// GET: SSAS
public ActionResult Index()
{
    return View();
}
Add a View for the Controller
From the Solution Explorer, expand the folder Controllers and double click the
OlapController.Place the cursor inside the method
Index().Right click and select Add View. The Add View dialog appears.
In the Add View dialog, verify that the view name is Index and View engine is Razor (CSHTML).
Click Add to add a view is for the controller. Copy the following code and paste it inside Index.cshtml.
@using C1.Web.Mvc.Grid
<c1-pivot-engine id="ssasEngine" service-url="~/api/dataengine/cube">
    <c1-view-field-collection c1-property="RowFields" items="[Customer].[Country]"></c1-view-field-collection>
    <c1-view-field-collection c1-property="ColumnFields" items="[Customer].[Occupation]"></c1-view-field-collection>
    <c1-view-field-collection c1-property="ValueFields" items="[Measures].[Customer Count]"></c1-view-field-collection>
</c1-pivot-engine>
Step 5: Build and Run the Project
Click Build | Build Solution to build the project.
Press F5 to run the project.
type=note
Append the folder name and view name to the generated URL (for example: http://localhost:1234/Olap/Index) in the address bar of the browser to see the view.
The following image shows how OLAP control appears in the browser after completing the above steps: