- Getting Started
- Configuring your MVC Application
- Adding NuGet Packages to your App
- Adding Controls
- Client-Side Support
-
Working with Controls
- Accordion
- Barcode
- CollectionView
- DashboardLayout
- File Manager
- Financial Charts
- FlexChart
- FlexGrid
- Transposed Grid
- FlexMap
- Flex Pie
- Flex Radar
- Flex Report
- Flex Sheet
- Flex Viewer
- Gauge
- Input Controls
- Multi Row
- TransposedMultiRow
- OLAP
- Sunburst Chart
- Tab Panel
- Tree Map
- TreeView
- Globalization
- Styling
- ASP.NET MVC Samples
- ReleaseHistory
Remote Binding
OLAP allows you to retrieve data directly using C1JSONRequest. This specifies remote data URLs that include the server, table and columns. The arrays returned are used as data sources for CollectionView objects.
CollectionViewHelper is a static class that enables collections to have editing, filtering, grouping, and sorting services. The Bind property of PivotEngine is used to bind it to a collection by passing an action URL method to carry out a specific operation. This class also includes the following methods:
Read(): Retrieves data from the collection.Edit(): Enables excel-style editing in OLAP.BatchEdit(): Allows editing multiple items at a time.
This topic comprises of three steps:
Step 1: Create a Datasource for OLAP
Create a new class inside the Models folder to create data source for the OLAP control.
Add a new class to the folder Models (for example:
ProductData.cs). See Adding controls to know how to add a new model.Add the following code to the model to define the data for OLAP. csharp
using System;
using System.Collections.Generic;
using System.Data;
using System.Linq;
using System.Web;
namespace OlapSample.Models
{
    public class ProductData
    {
        private static Random r = new Random();
        public int ID { get; set; }
        public string Product { get; set; }
        public string Country { get; set; }
        public DateTime Date { get; set; }
        public int Sales { get; set; }
        public int Downloads { get; set; }
        public bool Active { get; set; }
        public double Discount { get; set; }
        private static int randomInt(int max)
        {
            return (int)Math.Floor(r.NextDouble() * (max + 1));
        }
        public static IEnumerable<ProductData> GetData(int cnt)
        {
            string[] countries = "China,India,Russia,US,Germany,UK,Japan,Italy,Greece,Spain,Portugal".Split(',');
            string[] products = "Wijmo,Aoba,Xuni,Olap".Split(',');
            List<ProductData> result = new List<ProductData>();
            for (var i = 0; i < cnt; i++)
            {
                result.Add(new ProductData
                {
                    ID = i,
                    Product = products[randomInt(products.Length - 1)],
                    Country = countries[randomInt(countries.Length - 1)],
                    Date = new DateTime(2015, randomInt(5) + 1, randomInt(27) + 1),
                    Sales = randomInt(10000),
                    Downloads = randomInt(10000),
                    Active = randomInt(1) == 1 ? true : false,
                    Discount = r.NextDouble()
                });
            }
            return result;
        }
    }
}
Step 2: Add an OLAP control
Create a Controller and View for OLAP control and follow the below steps to initialize an OLAP control.
Complete the following steps to initialize an OLAP control.
Add a new Controller
In the Solution Explorer, right click the folder Controllers.
From the context menu, select Add | Controller. The Add Scaffold dialog appears.
Complete the following steps in the Add Scaffold dialog:
- Select Empty MVC Controller template.
- Set name of the controller (for example:
OlapController). - Click Add.
Replace the method Index() with the following method. csharp
partial class RemoteBindController : Controller
{
    private static IEnumerable<ProductData> RemoteData = ProductData.GetData(100000).ToList();
    // GET: PivotGrid
    public ActionResult RemoteBind()
    {
        return View();
    }
    public ActionResult RemoteBind_Read([C1JsonRequest] CollectionViewRequest<ProductData> requestData)
    {
        return this.C1Json(CollectionViewHelper.Read(requestData, RemoteData));
    }
}
Add a View for the Controller
From the Solution Explorer, expand the folder Controllers and double click the
OlapController.Place the cursor inside the method
Index().Right click and select Add View. The Add View dialog appears.
In the Add View dialog, verify that the view name is Index and View engine is Razor (CSHTML).
Click Add to add a view is for the controller. Copy the following code and paste it inside Index.cshtml.
@using RemoteDataOlap.Models;
@model IEnumerable<ProductData>
<c1-pivot-engine id="remoteEngine">
    <c1-items-source read-action-url="@Url.Action("RemoteBind_Read")"></c1-items-source>
    <c1-view-field-collection c1-property="RowFields" items="Country"></c1-view-field-collection>
    <c1-view-field-collection c1-property="ColumnFields" items="Product"></c1-view-field-collection>
    <c1-view-field-collection c1-property="ValueFields" items="Sales"></c1-view-field-collection>
</c1-pivot-engine>
<c1-pivot-panel items-source-id="remoteEngine"></c1-pivot-panel>
<c1-pivot-grid items-source-id="remoteEngine"></c1-pivot-grid>
Step 3: Build and Run the Project
Click Build | Build Solution to build the project.
Press F5 to run the project.
type=note
Append the folder name and view name to the generated URL (for example: http://localhost:1234/Olap/Index) in the address bar of the browser to see the view.
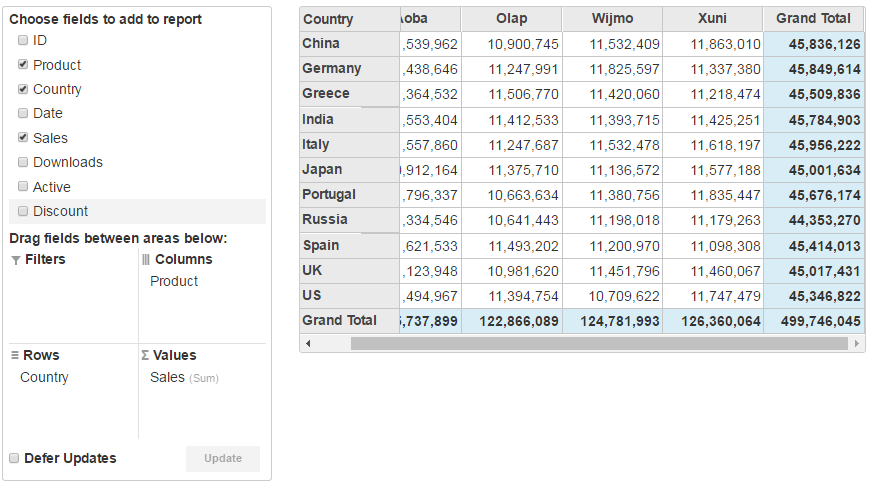
The following image shows how OLAP control appears in the browser after completing the above steps: