
-
Spread Windows Forms Product Documentation
- Getting Started
- Developer's Guide
-
Spread Designer Guide
- Introduction
- Spread Designer User Interface
- Spread Designer Dialogs
- Spread Designer Editors
- Designing in the Data Area
- Working with the Design
- Designing Shapes
- Using the Chart Designer
- Using the Pivot Table Designer
- Applying and Customizing Themes
- Assembly Reference
- Import and Export Reference
- Version Comparison Reference
Setting Table Properties in Spread Designer
You can set properties for the table using the context menu.
Right-click on the table to display the context menu.
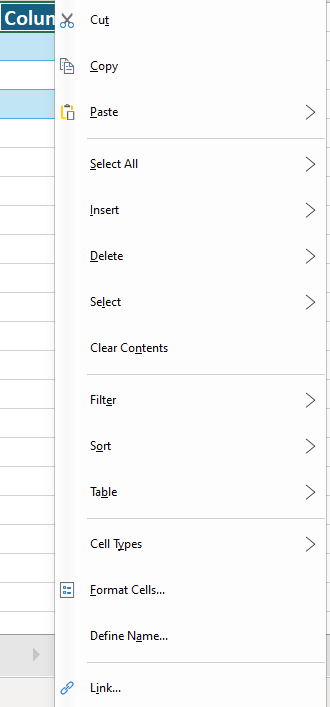
This context menu has the following items:
Context Menu Choice | Description |
|---|---|
Cut, Copy, Paste | These Clipboard operations handle the contents of the cells and cut, copy, and paste as expected. |
Select All | Allows you to select the entire sheet, all the cells in the data area, or all the cells with data. |
Insert | Opens the Insert dialog, allowing you to insert new rows, columns, or cells into the worksheet. |
Delete | Opens the Delete dialog, allowing you to remove the selected rows, columns, or cells from the worksheet. |
Select | Selects the table column data, entire table column, or table row. |
Clear Contents | Removes the contents of all the cells in the selected row or column but does not affect the header cells. |
Filter | Enables filtering for the selected range or removes filter from the data range. |
Sort | Sorts the data in the selected range according to the selected sort order. |
Table | Adds a totals row or converts to a range. |
Cell Types | You can select the cell type for the cells in this row or column. For more information, refer to Cell Type Dialog. |
Format Cells | Opens the Format Cells dialog box, where you can set number format, alignment, font, border, and fill options. |
Define Name | Allows you to define a name for a selected cell or range, making it easier to reference in formulas. |
Link | Lets you add a hyperlink to the selected cell(s), such as linking to a webpage or email address. |
See Also
Setting Sheet Properties in Spread Designer
Setting Row Properties in Spread Designer