


- SpreadJS Overview
- Getting Started
- JavaScript Frameworks
- Best Practices
-
Features
- Workbook
- Worksheet
- Rows and Columns
- Headers
- Cells
- Data Binding
- Data Manager
- TableSheet
- GanttSheet
- ReportSheet
- Data Charts
- JSON Schema with SpreadJS
- SpreadJS File Format
- Data Validation
- Conditional Formatting
- Sort
- Group
- Formulas
- What-If Analysis
- Serialization
- Keyboard Actions
- Shapes
- Floating Objects
- Barcodes
- Charts
- Sparklines
- Tables
- Pivot Table
- Slicer
- Theme
- User Management
- Culture
- AI Assistant
- SpreadJS Designer
- SpreadJS Designer VSCode Plugin
- Tutorials
- SpreadJS Designer Component
- SpreadJS Collaboration Server
- Touch Support
- Formula Reference
- Import and Export Reference
- Events
- API Documentation
- Release Notes
Work with Worksheets
SpreadJS allows you to perform various operations on worksheets to accomplish several important tasks.
Add Worksheet
You can add a worksheet to workbook by using the Workbook.addSheet method.
window.onload = function () {
    // Set the number of sheets to 3.
    var spread = new GC.Spread.Sheets.Workbook(document.getElementById("ss"), {
        sheetCount: 3
    });
    document.getElementById("button1").addEventListener("click", function () {
        // Create a new sheet and add it at the second position.
        var sheet = new GC.Spread.Sheets.Worksheet();
        sheet.name("The added sheet");
        spread.addSheet(1, sheet);
    });
};
Remove Worksheet
You can remove a worksheet from workbook by using the Workbook.removeSheet method.
window.onload = function () {
    // Set the number of sheets to 3.
    var spread = new GC.Spread.Sheets.Workbook(document.getElementById("ss"), {
        sheetCount: 3
    });

    document.getElementById("button1").addEventListener("click", function () {
        // Delete the second sheet.
        spread.removeSheet(1);
    });
};
Add Multiple Worksheets
You can set the number of sheets to add in a workbook by using the Workbook.setSheetCount method.
window.onload = function () {
    var spread = new GC.Spread.Sheets.Workbook(document.getElementById("ss"), {
        sheetCount: 3
    });

    // Set the number of sheets to 5.
    spread.setSheetCount(5);
};
Rename Worksheet
You can change the name of a worksheet by using the Worksheet.name method.
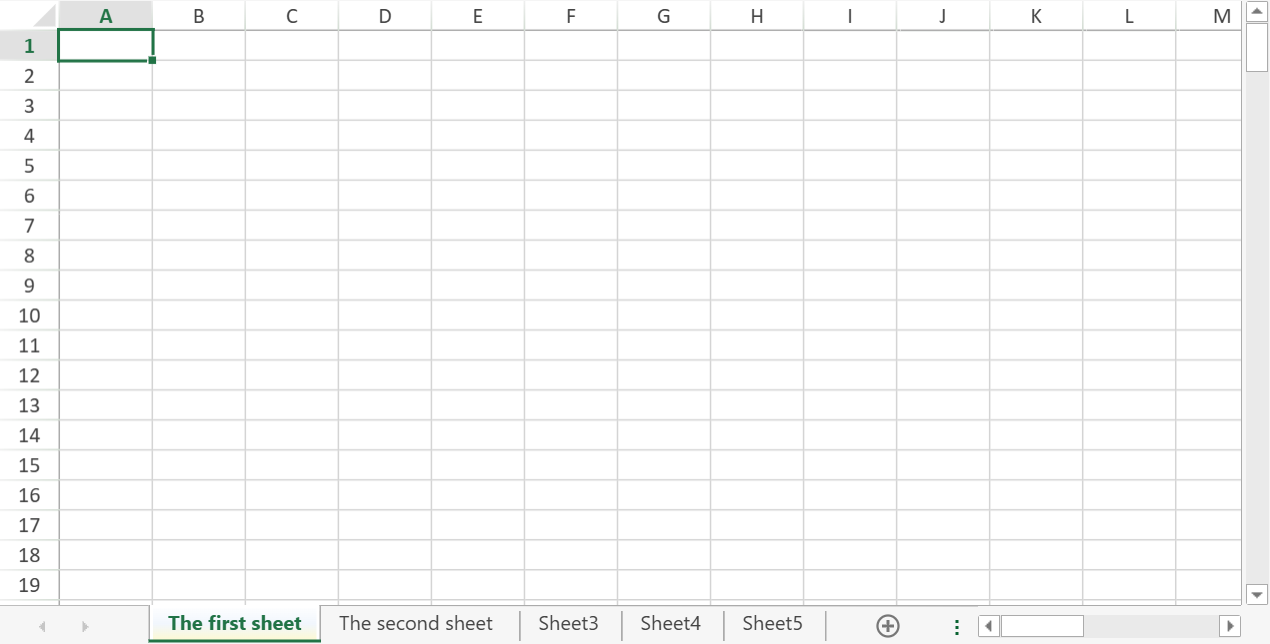
This code example changes the sheet name and sets the sheet tab color.
window.onload = function () {
    var spread = new GC.Spread.Sheets.Workbook(document.getElementById("ss"), {
        sheetCount: 3
    });

    // Set the number of sheets to 5.
    spread.setSheetCount(5);

    // Change the sheet names.
    spread.sheets[0].name("The first sheet");
    spread.sheets[1].name("The second sheet");

    // Change sheet information such as sheet tab display color.
    spread.sheets[0].options.sheetTabColor = "LemonChiffon";
};
Note: An error is thrown when using duplicate names or special characters in worksheet names within a workbook.
Bind the sheet with
undefinedto receive the error message during runtime.
Move Worksheet
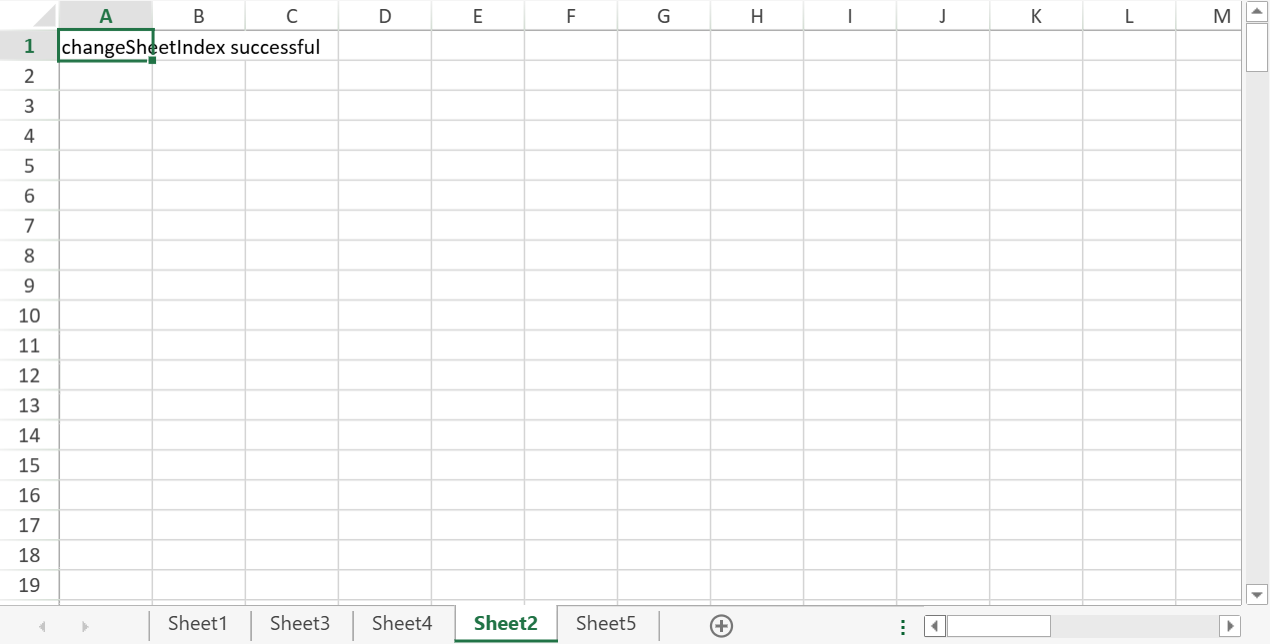
You can change the sheet index and re-order the sheets in the tab strip by using the Workbook.changeSheetIndex method. This method accepts the sheet name and the target index number as parameters.
Alternatively, the moveSheet command can also be used to move a sheet.
The following example changes the sheet index of "Sheet2" and adds the text in a worksheet cell using the new sheet index.
window.onload = function () {
    var spread = new GC.Spread.Sheets.Workbook(document.getElementById("ss"), {
        sheetCount: 5
    });

    spread.changeSheetIndex("Sheet2", 3);

    spread.sheets[3].getCell(0, 0).text("changeSheetIndex successful");

    // Alternatively, change sheet index by command.
    // spread.commandManager().execute({cmd: "moveSheet", sheetName: "Sheet2", targetIndex: 3});
};
Copy Worksheet
You can copy a sheet to a new worksheet using the copySheet command. This command accepts parameter values such as the sheet name, target index, and new sheet name. Additionally, you can also state whether to include data source binding in the copied sheet, which is true by default.
The copied sheet looks exactly the same as the original sheet. It modifies the relevant current sheet references in the content and retains references to other sheets.
Original Sheet | Copied Sheet |
|---|---|
|
|
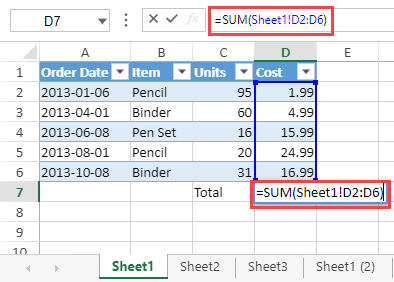
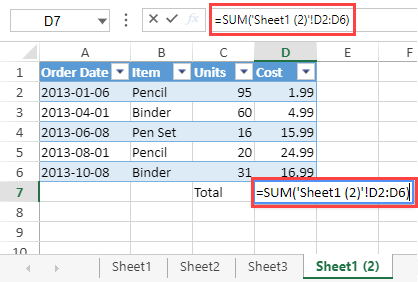
The copied sheet also copies the custom names that belong to the original sheet.
Original Sheet | Copied Sheet |
|---|---|
|
|
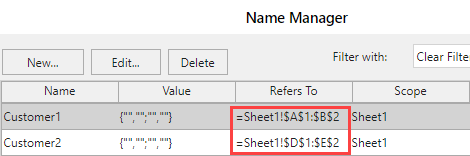
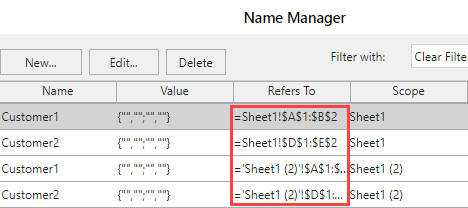
The copied sheet modifies all globally unique element names such as tables, slicers, charts, shapes, etc.
Original Sheet | Copied Sheet |
|---|---|
|
|
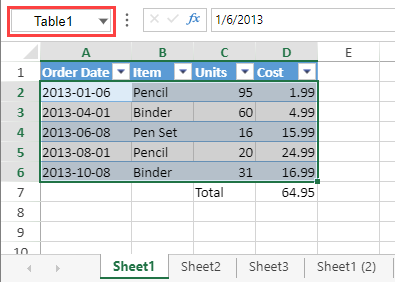
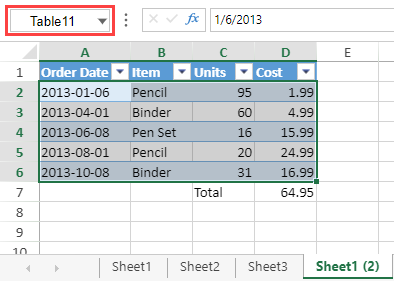
The following example copies the "Sheet1" to a new worksheet and modifies the existing sheet reference in the formula and the table name.
window.onload = function () {
    // Configure Workbook and Worksheet.
    var spread = new GC.Spread.Sheets.Workbook("ss", {
        sheetCount: 5
    });
    var activeSheet = spread.getActiveSheet();

    var tableData = {
        sales: [
            { orderDate: '1/6/2013', item: 'Pencil', units: 95, cost: 1.99 },
            { orderDate: '4/1/2013', item: 'Binder', units: 60, cost: 4.99 },
            { orderDate: '6/8/2013', item: 'Pen Set', units: 16, cost: 15.99 },
            { orderDate: '8/1/2013', item: 'Pencil', units: 20, cost: 24.99 },
            { orderDate: '10/8/2013', item: 'Binder', units: 31, cost: 16.99 }
        ]
    };

    activeSheet.getCell(7, 2).text("Total");
    activeSheet.getCell(7, 3).formula("=SUM(Sheet1!D2:D6)");

    var table = activeSheet.tables.add('Table1', 0, 0, 7, 4);
    var tableColumn1 = new GC.Spread.Sheets.Tables.TableColumn(1, "orderDate", "Order Date", "yyyy-mm-dd");
    var tableColumn2 = new GC.Spread.Sheets.Tables.TableColumn(2, "item", "Item");
    var tableColumn3 = new GC.Spread.Sheets.Tables.TableColumn(3, "units", "Units");
    var tableColumn4 = new GC.Spread.Sheets.Tables.TableColumn(4, "cost", "Cost");

    table.autoGenerateColumns(false);
    table.bind([tableColumn1, tableColumn2, tableColumn3, tableColumn4], 'sales', tableData);
    activeSheet.autoFitColumn(0);

    spread.commandManager().execute({
        cmd: "copySheet",
        sheetName: "Sheet1",
        targetIndex: 3,
        newName: "Sheet1 (2)",
        includeBindingSource: true
    });
};
Hide or Unhide Worksheet
You can hide or unhide a worksheet in SpreadJS by accessing the sheet tab context menu. Right-click and select the options “Hide” or “Unhide…” to perform the operations.
The Worksheet.visible class method can be used to set the visibility status of worksheets in runtime. It accepts boolean values to determine whether the worksheet is displayed. You can also set the visibility of a worksheet by using the SheetTabVisible enumeration options as a parameter in Worksheet.visible method.
// Configure Workbook and Worksheet
var spread = new GC.Spread.Sheets.Workbook("ss", { sheetCount: 5 });

// Hiding "Sheet2"
spread.getSheet(1).visible(false);

// Hiding "Sheet4"
spread.getSheet(3).visible(GC.Spread.Sheets.SheetTabVisible.hidden);
// or
// spread.getSheet(3).visible(0);
The SheetTabVisible.veryHidden enumeration option allows the application to hide a sheet in the Spread component. It means that a sheet cannot be set to visible through the UI by using the sheet tab context menu item "Unhide...".
A “very hidden” sheet can therefore be only set to visible by using the Worksheet.visible method.
// Very hidden "Sheet3"
spread.getSheet(2).visible(GC.Spread.Sheets.SheetTabVisible.veryHidden);Note: Users cannot perform the following operations on a “very hidden” sheet.
Cannot be set as an active worksheet.
Cannot select the worksheet.
Content of the sheet cannot be retrieved using find or replace.
The content of the sheet cannot be affected by GoTo operations.
The content of the sheet cannot be referenced by hyperlinks.
Cannot print the worksheet.
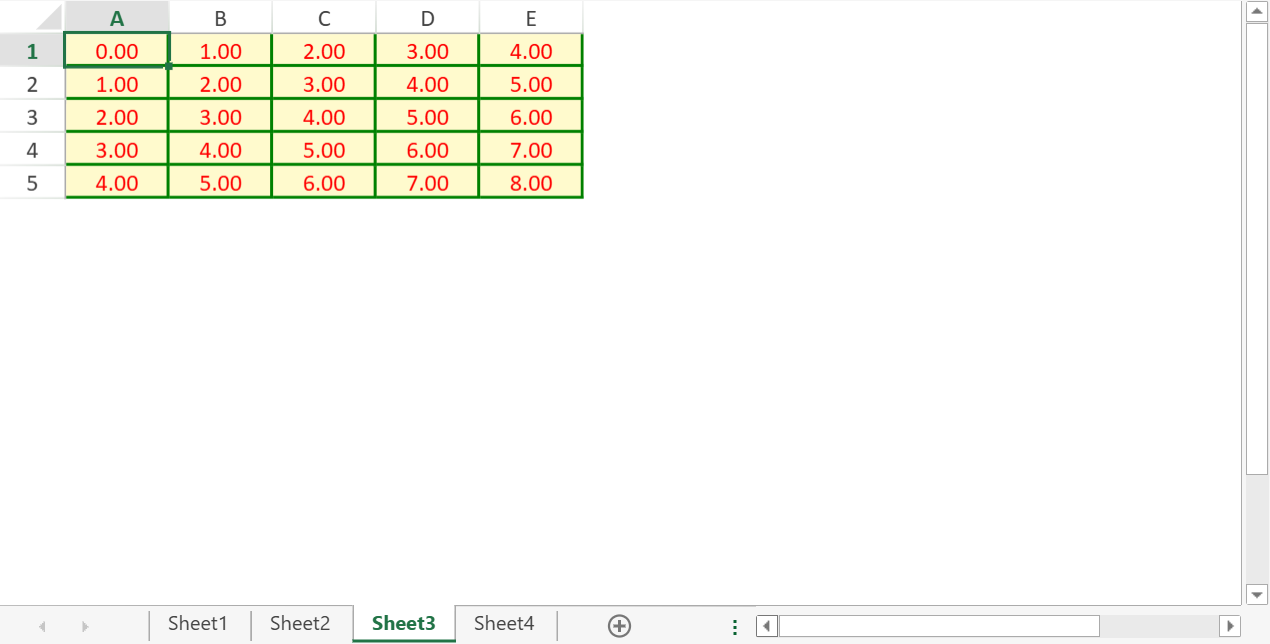
Set Default Style
You can set the default sheet style by using the below example code:
window.onload = function () {
    var spread = new GC.Spread.Sheets.Workbook(document.getElementById("ss"), {
        sheetCount: 3
    });
    var activeSheet = spread.getActiveSheet();

    // Set default style.
    activeSheet.setRowCount(5, GC.Spread.Sheets.SheetArea.viewport);
    activeSheet.setColumnCount(5, GC.Spread.Sheets.SheetArea.viewport);

    var defaultStyle = new GC.Spread.Sheets.Style();
    defaultStyle.backColor = "LemonChiffon";
    defaultStyle.foreColor = "Red";
    defaultStyle.formatter = "0.00";
    defaultStyle.hAlign = GC.Spread.Sheets.HorizontalAlign.center;
    defaultStyle.borderLeft = new GC.Spread.Sheets.LineBorder("Green", GC.Spread.Sheets.LineStyle.medium);
    defaultStyle.borderTop = new GC.Spread.Sheets.LineBorder("Green", GC.Spread.Sheets.LineStyle.medium);
    defaultStyle.borderRight = new GC.Spread.Sheets.LineBorder("Green", GC.Spread.Sheets.LineStyle.medium);
    defaultStyle.borderBottom = new GC.Spread.Sheets.LineBorder("Green", GC.Spread.Sheets.LineStyle.medium);

    activeSheet.setDefaultStyle(defaultStyle, GC.Spread.Sheets.SheetArea.viewport);

    var rowCount = activeSheet.getRowCount();
    var colCount = activeSheet.getColumnCount();

    for (var i = 0; i < rowCount; i++) {
        for (var j = 0; j < colCount; j++) {
            activeSheet.setValue(i, j, i + j, GC.Spread.Sheets.SheetArea.viewport);
        }
    }
};
Set Font Style
You can set the font style for the sheet using the font property which includes values for font style, font weight, font size, and font family.
Alternatively, you can use split font properties such as fontStyle, fontWeight, fontSize, and fontFamily to set the value for each property separately.
Refer to the following image which depicts the use of font property and split font properties separately.
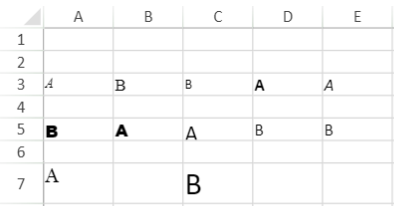
The following example code implements the font property on the cell (2,0) (4,0) and (6,0) whereas the split font properties are implemented on other cells.
// Font
activeSheet.getCell(2, 0).font('italic normal 12px Mangal');
activeSheet.getCell(4, 0).font('normal bold 15px Arial Black');
activeSheet.getCell(6, 0).font('normal normal 18px Georgia');

// FontFamily
activeSheet.getCell(2, 1).fontFamily('Mangal');
activeSheet.getCell(4, 1).fontFamily('Arial Black');
activeSheet.getCell(6, 1).fontFamily('Georgia');

// FontSize
activeSheet.getCell(2, 2).fontSize('12px');
activeSheet.getCell(4, 2).fontSize('20px');
activeSheet.getCell(6, 2).fontSize('28px');

// FontWeight
activeSheet.getCell(2, 3).fontWeight('bold');
activeSheet.getCell(4, 3).fontWeight('normal');

// Italic
activeSheet.getCell(2, 4).fontStyle('italic');
activeSheet.getCell(4, 4).fontStyle('normal');
Change Gridlines Appearance
You can change the color of grid lines or hide them using the gridline worksheet option.
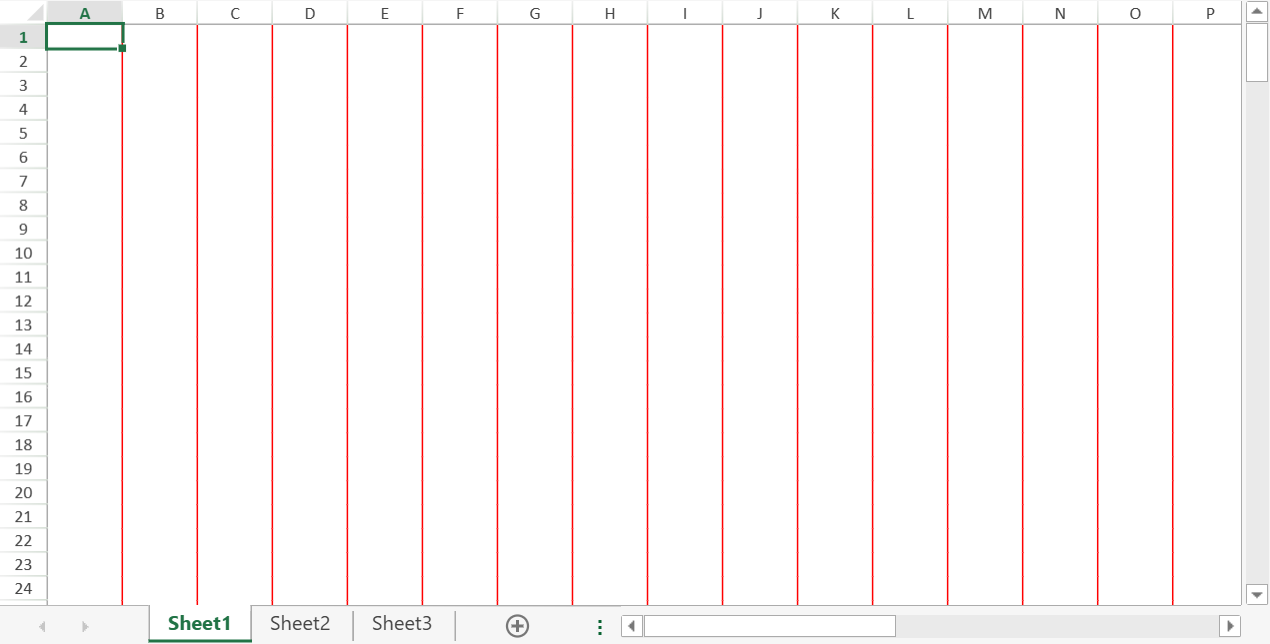
This code example sets the grid line color and hides the horizontal grid lines.
window.onload = function () {
    var spread = new GC.Spread.Sheets.Workbook(document.getElementById("ss"), {
        sheetCount: 3
    });
    var sheet = spread.getActiveSheet();

    // Hide horizontal grid lines.
    sheet.options.gridline = {
        color: "red",
        showVerticalGridline: true,
        showHorizontalGridline: false
    };

    spread.invalidateLayout();
    spread.repaint();
};